5 Proven Shoulder Exercises to End Pain and Prevent Impingement
Are you tired of that nagging, persistent shoulder pain that greets you every morning? That ache that limits your reach, disrupts your workouts, and holds you back from living your life to the fullest? The good news is, you don’t have to live with it. Relief is closer than you think. In this post, you’ll find some proven shoulder exercises to end pain and impingement.
Fed Up With Shoulder Pain? Here’s Why It’s Happening (and How to Fix It)
When we think of shoulder pain, we tend to focus only on the shoulder joint itself. However, the shoulder is part of a complex system, and the pain you’re feeling is often a symptom of an issue elsewhere.
Think of it as a chain reaction. Your shoulder blade (scapula) and your upper back (thoracic spine) are critical teammates for your shoulder joint. If your upper back is too stiff and rounded forward, or if your shoulder blade doesn’t rotate upward properly when you lift your arm, you create an impingement. That’s when the ball of your shoulder joint gets pinched, irritating tendons and bursa, leading to pain, popping, and clicking.
The solution isn’t just to rest the shoulder—it’s to correct the movement patterns of the entire system. This article gives you five targeted exercises to do just that, delivering fast relief by addressing the root causes of your pain.
You don’t need to spend hours in physical therapy to start feeling better. By dedicating a small fraction of your day to this routine, you can begin your journey back to a strong, resilient, and pain-free shoulder.
With just 15 minutes a day, you can:
- Dramatically reduce nagging pain and stiffness.
- Improve your ability to reach overhead and across your body.
- Restore proper movement in your shoulder blades and upper back.
- Build the strength and stability needed to prevent future flare-ups.
- Regain confidence in the gym and daily life.
- Get back to the activities you truly love, without hesitation.
Your 15-Minute Shoulder Rescue Plan
- Total Time: 15 Minutes
- Targets: Shoulder Joint, Shoulder Blades, Upper Back (Thoracic Spine), Lats
- Goals: Reduce Pain, Improve Mobility & Rotation, Build Stability
The 5 Exercises for Fast Shoulder Pain Relief
Here are the five key movements that have helped thousands resolve their shoulder pain and reclaim their lives.
Exercise 1: Bench Opener

Purpose: To free up a stiff upper back (t-spine) and improve your ability to lift your arms overhead.
Equipment Needed: Bench or chair, PVC pipe or broomstick.
How to Do It:
- Kneel in front of the bench, holding the pipe with your palms facing up.
- Place your elbows on the edge of the bench, about shoulder-width apart.
- Drop your butt back toward your heels, allowing your chest to sink toward the floor.
- Hold the stretch for 2-3 seconds, feeling it in your upper back and lats, then return to the start.
Sets: 2-3 sets of 10 reps.
Tip: Focus on dropping your chest to feel the stretch in your upper back, not just letting your head fall. Your shoulders and back will feel buttery smooth afterwards.
Exercise 2: Wall Slides

Purpose: To retrain your shoulder blades to rotate upward correctly, which can provide immediate relief from impingement.
Equipment Needed: A clear wall.
How to Do It:
- Stand facing a wall with one foot slightly in front of the other for balance.
- Place your hands on the wall at shoulder height. Ensure your forearms are not touching the wall.
- Slowly slide your hands up the wall, allowing your chest to move forward toward the wall as you reach.
- Slide back down to the starting position in a controlled manner.
Sets: 2-3 sets of 15 reps.
Tip: This exercise should feel good! Do not force it into pain. As you perform more reps, you should find yourself able to reach higher and higher.
Exercise 3: Angels Over Cones

Purpose: To build strength and control in the muscles that support shoulder extension, abduction, and flexion—three motions often limited by pain.
Equipment Needed: 3 small objects (shoes, cups, yoga blocks).
How to Do It:
- Lie on your stomach with the three objects placed in an arc around your shoulder.
- Keeping your arm straight, lift it up and over the first object, tap the floor, and return.
- Repeat this movement over the middle and highest objects. That’s one rep.
- Focus on squeezing the muscles between your shoulder blades to initiate the lift.
Sets: 2-3 sets of 8 reps per side.
Tip: Fair warning: this one can be spicy! Use shorter objects if you need to. Note any differences in smoothness or height between your left and right sides.
Exercise 4: Banded Open Book
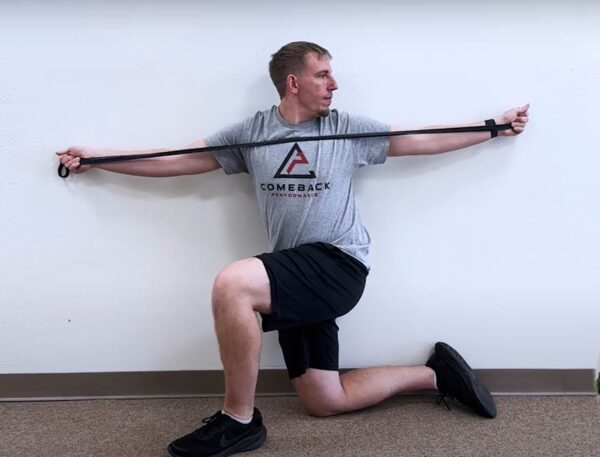
Purpose: To integrate the neck, upper back, and shoulders, training them to work together as a coordinated team.
Equipment Needed: Light resistance band, a clear wall.
How to Do It:
- Kneel on the knee closest to the wall, with your hip touching the wall.
- Hold the band with both hands, palms up, and extend your arms in front of you. Your inside shoulder should be against the wall.
- Keeping a light tension on the band, open your outside arm away from the wall, following your hand with your eyes.
- Rotate as far as you can comfortably, then control the movement back to the start.
Sets: 2-3 sets of 10 reps per side.
Tip: The good news is you can make this easier! If the band adds too much difficulty, drop it and focus on the mobility. It’s perfectly fine if you can’t touch the wall on the other side.
Exercise 5: Banded Bear Sliders
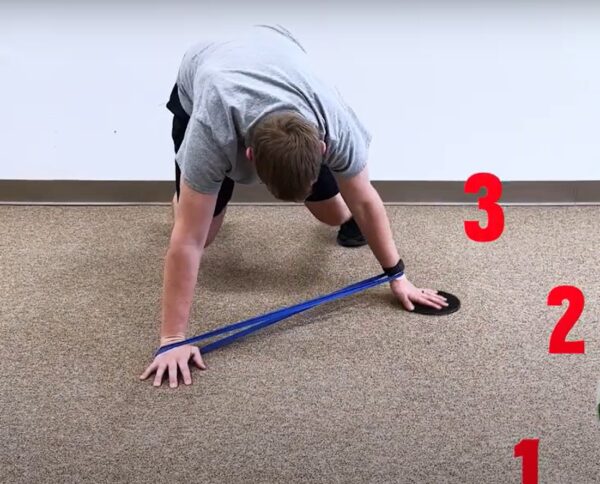
Purpose: To directly target the strength and stability of the shoulder joint in a weight-bearing position.
Equipment Needed: Light resistance band, furniture sliders (or you can use a towel on a slick floor).
How to Do It:
- Get into a “bear” position on all fours, with your hands under your shoulders and knees under your hips. Hover your knees an inch off the floor. Place a band around your hands.
- Keeping your core tight and your stabilizing arm strong, slide/tap your moving hand forward, then back to center.
- Next, slide/tap it out to the side, then back to the center.
- Finally, slide/tap it down at a 45-degree angle, then back to center. That’s one rep.
Sets: 2-3 sets of 6 reps per side.
Tip: If the bear position is too challenging, simply perform the exercise from your hands and knees. You’ll still target the right muscles without the intense stability demand.
You’re Out of Pain… Now What?
Getting out of pain is a fantastic first step, but the work isn’t done. The worst thing you can do is stop once the pain is gone. This often leads to a frustrating pain cycle: flare-up, rest, repeat.
To achieve a proper, long-term fix, you must transition into a “shoulder bulletproofing” phase. This is where you build your shoulder to be stronger and more resilient than ever before, so you’re not walking on eggshells, worried about the next injury.


")