Find the ROOT CAUSE of Your Shoulder Pain in Minutes (Do This Assessment First!)
Are you tired of doing random shoulder stretches and exercises that provide zero lasting relief? If your answer is yes, then you’ll love this piece. We shared a simple guide that will help you do shoulder pain assessment tests at home. Most people with shoulder pain are stuck in an endless cycle of cookie-cutter treatments that completely miss the real problem.
The shoulder is part of a complex team that includes your neck, thoracic spine, shoulder blade, and nervous system. When healthcare providers only examine the shoulder joint itself, they’re missing 80% of the puzzle. It’s like trying to fix a car engine while ignoring the transmission, fuel system, and electrical components.
When your shoulder blade doesn’t move properly, your shoulder gets pinched. When your neck is stiff, your shoulders can’t get into optimal positions. When your thoracic spine is locked up, your shoulders can’t open up effectively. Address these connected areas, and you’ll finally understand why your shoulder has been screaming for help.
With just 10-15 minutes of proper assessment, you can
- Pinpoint the exact source of your shoulder pain instead of guessing.
- Stop wasting time on exercises that don’t address your specific problem.
- Experience immediate relief by targeting the right areas.
- Sleep better by addressing nerve compression that causes nighttime pain.
- Return to overhead activities with confidence and zero pain.
- Prevent future shoulder injuries by understanding your body’s weak links.
Quick Reference Assessment Guide
- Total Time: 10-15 Minutes.
- Targets: Neck, thoracic spine, shoulder blade, nerves, and shoulder joint.
- Goals: Identify restrictions, pinpoint pain sources, and create a targeted treatment plan.
The 5-Part Shoulder Pain Assessment
Assessment 1: External Rotation Test

Purpose: Evaluates how your shoulder rotates when reaching overhead or behind your head.
Equipment Needed: None.
How to Do It
- Reach your affected arm up and behind your head as if scratching your upper back
- Note any pain, tightness, or inability to reach certain positions
- Compare the feeling to your unaffected side
- Pay attention to both the intensity and location of any discomfort
What It Reveals: Problems with overhead pressing, reaching, and general shoulder rotation.
Tip: Don’t push through sharp pain – we’re gathering information, not forcing movement.
Assessment 2: Internal Rotation Test (Chicken Wing)
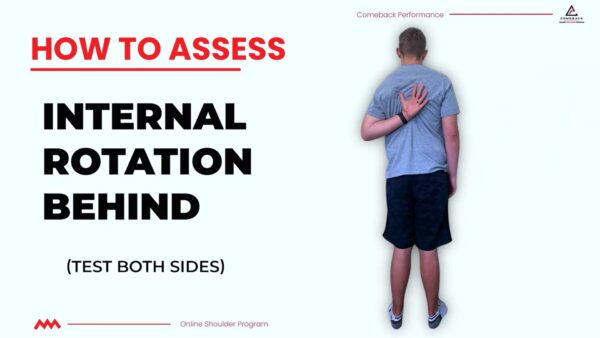
Purpose: Tests your shoulder’s ability to rotate internally behind your back.
Equipment Needed: None.
How to Do It
- Reach your affected arm behind your back toward your opposite shoulder blade
- Try to reach as high up your back as possible
- Note where you feel restriction or pain
- Compare to your other side’s range of motion
What It Reveals: Issues with putting on jackets, reaching for wallets, or doing dips at the gym.
Tip: This movement often reveals nerve involvement if you feel tingling or numbness.
Assessment 3: Overhead Positioning Test
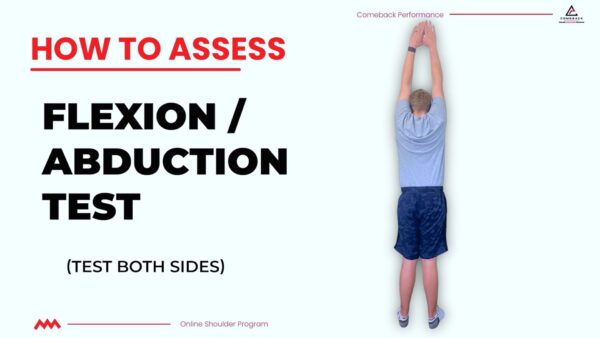
Purpose: Examines the critical connection between your shoulder blade and the shoulder joint.
Equipment Needed: None.
How to Do It
- Lift your arm straight up toward the ceiling (flexion)
- Then lift your arm out to the side and overhead (abduction)
- Notice if one direction is more painful or restricted than the other
- Pay attention to where you feel “pinching” or compression
What It Reveals: Shoulder blade dysfunction and impingement patterns.
Tip: If you feel pinching around 90 degrees, your shoulder blade likely isn’t rotating properly.
Assessment 4: Median Nerve/Neck Screen
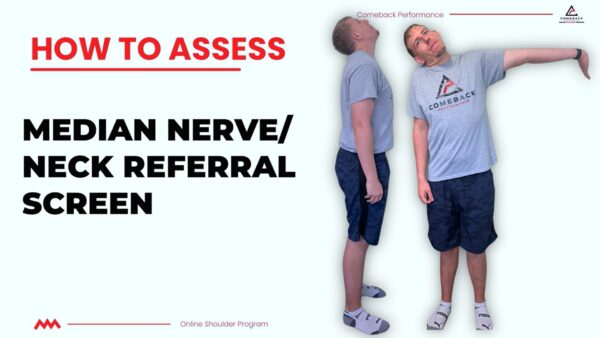
Purpose: Identifies nerve compression that often causes nighttime shoulder pain.
Equipment Needed: None.
How to Do It
- Start in a “teapot” position with one hand on your hip.
- Extend your opposite arm out to the side with your palm facing upward.
- Slowly extend your fingers and wrist backward, feeling the stretch through the front of your arm and into your bicep.
- For progression, add a gentle side bend away from the extended arm (proceed with caution).
What It Reveals: Nerve involvement and neck-related shoulder pain.
Tip: Nerve compression is the hidden culprit behind shoulder pain that worsens when lying down.
Assessment 5: Thoracic Spine Screen
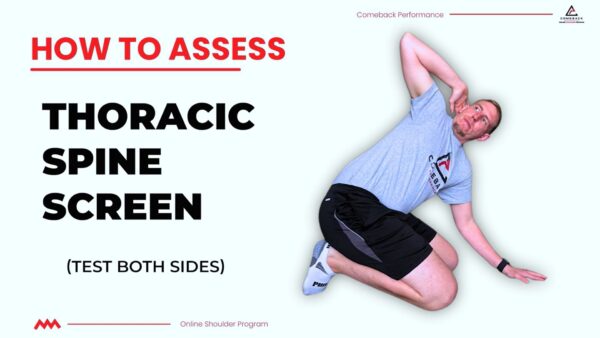
Purpose: Tests your mid-back’s ability to extend and rotate, which directly impacts shoulder function.
Equipment Needed: None.
How to Do It
- Get on your hands and knees, rock butt back to heels
- Notice which directions feel restricted or cause shoulder discomfort
What It Reveals: Mid-back restrictions that lock up your shoulders.
Tip: Poor thoracic mobility is especially problematic for golfers and throwing athletes.
The Pain Traffic Light System
Understanding how to monitor your symptoms during assessment and treatment is crucial for safe, effective recovery.
- Red Light (6+ out of 10 pain). Stop immediately. The stimulus is too intense and will likely cause increased pain later that day or the next morning. This level of pain indicates you’re pushing too hard, too fast.
- Yellow Light (2-4 out of 10 pain). Safe zone for continued movement. You can work through this level of discomfort as it allows beneficial blood flow to the shoulder while staying within healing limits. Adjust intensity and range of motion as needed.
- Green Light (0 out of 10 pain). Full go-ahead. Push your boundaries and test your shoulder’s current capabilities. This is when you can progressively challenge the joint and build confidence in your movement.
What Your Assessment Results Mean

Once you’ve completed these five assessments, you’ll have a clear picture of your shoulder’s restrictions and pain patterns. The areas that feel most restricted or painful are your priority targets for treatment. The most common findings are
- Neck restrictions often cause referred pain and nerve compression.
- Thoracic stiffness prevents proper shoulder blade movement.
- Shoulder blade dysfunction creates impingement and compression.
- Nerve tension causes nighttime pain and specific movement restrictions.
- Joint restrictions limit overall shoulder mobility and function.
Your Next Steps to Recovery
These assessments have given you the roadmap – now you need the right exercises and progressions to address your specific restrictions. Long-term success requires a systematic approach that rebuilds your shoulder’s foundation, returns you to pre-injury function, and bulletproofs your shoulders against future problems.
Ready to transform these assessment findings into a complete recovery plan?


")