4 Simple Exercises to Fix Shoulder Pain from Subacromial Bursitis (In Just 10 Minutes)
Are you experiencing sharp shoulder pain when reaching across your chest for your seatbelt? Does lifting your arm overhead to grab something from a high shelf make you wince? You might be dealing with subacromial bursitis – one of the most common yet misunderstood causes of shoulder pain. Your entire upper body works as an interconnected system, and when one part isn’t functioning properly, it creates a domino effect that leads to pain and dysfunction.
Think of your shoulder as the hub of a complex movement system. Your shoulder blade, ribcage, and rotator cuff muscles all work together to create smooth, pain-free motion. When your rotator cuff muscles become weak or your shoulder blade stops moving properly, your shoulder joint gets squeezed into a tight space, irritating the small fluid-filled sac (bursa) underneath your acromion bone.
You can start addressing this pain right now with four targeted exercises that take just 10 minutes. And you’ll
- Experience immediate pain relief during overhead movements and reaching across your body.
- Restore proper shoulder blade movement to prevent future flare-ups.
- Strengthen your rotator cuff muscles to stabilize your shoulder joint naturally.
- Improve your posture and reduce upper back tension.
- Return to activities you’ve been avoiding due to shoulder pain.
- Build a bulletproof shoulder that can handle daily demands without breaking down.
Quick Reference Guide
- Total Time: 10 Minutes.
- Targets: Your rotator cuff muscles, shoulder blade mobility, and thoracic spine.
- Goals: Pain reduction, improved mobility, and rotator cuff strengthening.
Exercise Breakdown
Exercise 1: Wall Slide

Purpose: Teaches your shoulder blades to move up and around properly, creating space to offload the irritated bursa.
Equipment Needed: Wall
How to Do It
- Stand facing a wall with one foot in front of the other for stability.
- Place only the back of your hands against the wall at shoulder height.
- Slide your arms forward and up the wall while leaning your body forward.
- Let the wall guide the movement – don’t force it.
Sets: 2 sets of 10-15 repetitions.
Tip: This should feel good, not painful. If you experience pain, reduce your range of motion and don’t slide as high up the wall.
Exercise 2: Wall Open Book

Purpose: Adds rotation to improve shoulder mobility while increasing thoracic spine movement to support better shoulder function.
Equipment Needed: Wall
How to Do It
- Get into a half-kneeling position next to a wall with your hip touching the wall.
- Start with palms together in front of your chest.
- Open your top arm away from the wall, following your hand with your eyes.
- Rotate as far as comfortable, then return to the starting position.
Sets: 2 sets of 8-10 repetitions each side.
Tip: Keep your eyes following your moving hand to engage your neck properly. You may feel a gentle stretch in your shoulder – this is normal and beneficial.
Exercise 3: Banded I

Purpose: Strengthens the muscles underneath your shoulder blades to improve shoulder stability and reduce forward shoulder posture.
Equipment Needed: Resistance band.
How to Do It
- Hold a resistance band with both hands, palms facing up.
- Keep your elbows completely straight throughout the movement.
- Pull your shoulders back by squeezing your shoulder blades together.
- Hold for 2-3 seconds, focusing on the burn between your shoulder blades.
Sets: 2 sets of 12-15 repetitions.
Tip: You should feel a strong burn between your shoulder blades if you’re doing this correctly. Keep those elbows locked straight!
Exercise 4: Banded Shoulder Flexion Hold
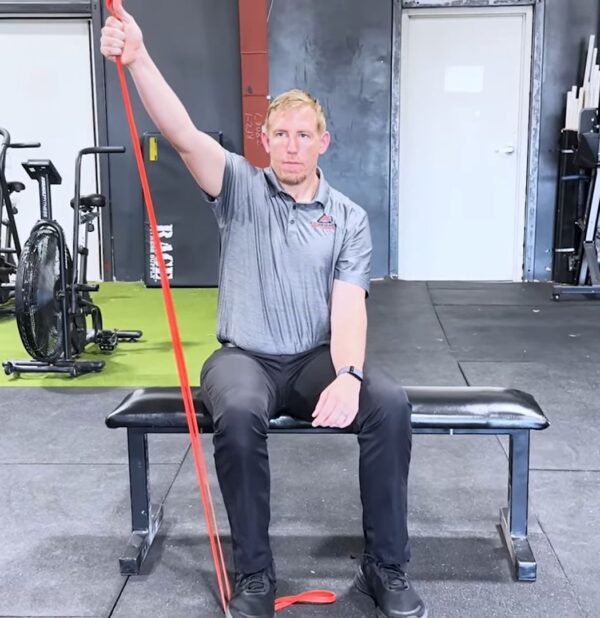
Purpose: Builds strength and endurance in your rotator cuff muscles while maintaining optimal shoulder positioning.
Equipment Needed: Resistance band, bench, or chair.
How to Do It
- Sit on a bench with one foot securing the resistance band.
- Hold the band with your thumb pointing straight up.
- Lift your arm to 45 degrees and hold for 5 seconds.
- Lift to 90 degrees (if comfortable) and hold for 5 seconds, then back to 45 degrees.
Sets: Continue alternating positions for 45-60 seconds total.
Tip: This exercise is challenging! Start with lighter resistance and build up. The isometric holds are what make this so effective for rotator cuff strength.
Build Your Stress-Free Shoulders!
Remember, these exercises work best when performed daily. Even if you only have 5 minutes, doing a shortened version consistently will yield better results than sporadic longer sessions. Many people notice reduced pain during overhead movements within the first week of consistent practice. Your shoulder will start moving more freely, and those daily activities that once caused discomfort will become easier.
While these exercises provide excellent immediate relief and prevention, persistent or severe shoulder pain may require professional evaluation to get to the true root cause and develop a proper game plan for long term results.


")