The 5-Point Shoulder Pain Solution
This guide is for you if your shoulder hurts when you reach overhead, reach behind your back, try to sleep on that side, or do basic gym movements like pressing and rows.
Here’s the frustrating truth: Traditional healthcare often stares at your shoulder joint in isolation, completely ignoring the four other critical areas that are actually driving your pain. That’s why you’ve tried scraping, needling, taping, stretching, and physical therapy without lasting results.
The good news? Your shoulder isn’t acting alone—it’s part of an interconnected system I call the “Big Five.” In just 5 minutes, you’ll discover exactly which part of your system is failing and get one targeted exercise to start fixing it today.
Quick Reference Guide
- Total Time: 5 Minutes for Assessment + 5-10 Minutes for Exercises
- Targets: Neck, Thoracic Spine, Scapula, Shoulder Joint, Nerves/First Rib
- Goals: Pain reduction, improved mobility, better sleep quality
The 5-Point Assessment System
Rate each test from 0-10 (0 = no pain, 10 = severe pain). Note both what you feel (pain, tightness, pinching, burning) and where you feel it.
Test 1 – External Rotation Behind Back

Purpose: To check your shoulder movement when reaching up behind your back.
How to Do It
- Stand tall with good posture.
- Reach one hand above your head and back between your shoulder blades.
- Note how far you can reach and any sensations.
- Repeat on the other side and compare.
Score: Rate each side 0-10 based on restriction or pain.
Exercise 1: Bench Opener

Purpose: Opens up external rotation and reduces front shoulder tightness.
Equipment Needed: Bench/firm surface
How to Do It
- Kneel in front of a bench, placing elbows on the surface.
- Keep your hands together or hold a dowel.
- Slowly sit your hips back, letting your chest drop toward the floor.
- Stop before any sharp pain.
Sets: 2 sets of 12 reps
Tip: You should feel a stretch across the front of your shoulders and lats, not sharp pain.
Test 2: Internal Rotation “Chicken Wing”
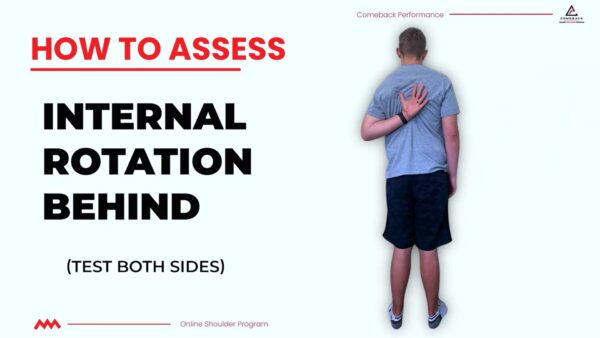
Purpose: Assesses your jacket, wallet, and bra strap motion
How to Do It
- Stand tall and reach your hand behind your back, as if sliding it into a back pocket.
- Slide your hand up your back as high as comfortable.
- Note any pain, tightness, or hard blocks.
- Compare both sides.
Score: Rate each side 0-10
Exercise 2: Ball Posterior Capsule Mobilization

Purpose: Opens up the posterior shoulder capsule for better internal rotation.
Equipment Needed: Lacrosse ball or baseball.
How to Do It
- Stand next to the wall with the ball.
- Place the ball on the wall against the shoulder blade (not the joint).
- Pin the shoulder blade and reach the arm across the chest.
- Roll gently for mobilization.
Sets: Do 12 reps per side.
Tip: Target the meaty part of your shoulder blade, avoiding direct joint pressure.
Test 3: Overhead Reach Screen
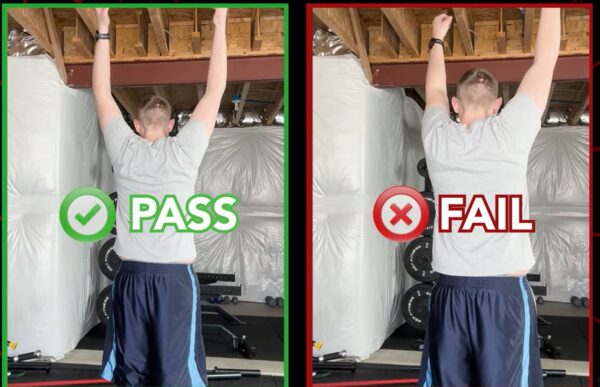
Purpose – Checks how the T-spine, scapula, and shoulder work together overhead
How to Do It
- Flexion – Arms straight in front, raise overhead without arching back.
- Abduction – Arms at sides; raise out to the sides into a “Y” position.
- Note tightness, pinching, or differences between sides.
Score: Rate flexion and abduction 0-10.
Exercise 3: Wall Slides

Purpose: Improves overhead mobility by coordinating all shoulder components
Equipment Needed: Wall
How to Do It
- Stand facing the wall with one foot slightly forward.
- Place forearms or hands on the wall at shoulder height.
- Gently press into the wall and slide arms upward.
- Let the chest move slightly toward the wall as arms rise.
Sets: Do 60 seconds of smooth, controlled movement.
Tip: Stop before any sharp pinch or hard block—work within a comfortable range.
Test 4: Median Nerve and Neck Screen.
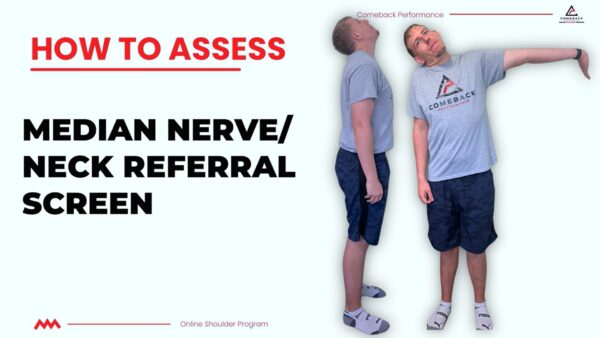
Purpose: Identify nerve involvement, especially with night pain and jolting sensations.
How to Do It
- Stand with arms at your side.
- Bend your elbow and bring your fingers toward your shoulder.
- Slowly extend elbow, wrist, and fingers toward the ground.
- Gently tilt your head away from that arm, then back to center.
Score: Rate 0-10 for tingling, burning, or pain reproduction.
Exercise 4: Belt Rib Mobilization

Purpose: Release nerve compression from the neck and first rib.
Equipment Needed: A belt or a dog leash.
How to Do It
- Loop the belt over the painful shoulder.
- Sit on the belt and pull down with both hands to create tension.
- Keeping pressure, move your head down toward your armpit.
- Then move up and away at a diagonal.
Sets: 10 slow reps.
Tip: This targets the often-missed first rib that can compress nerves
Test 5: T-Spine Rotation Screen
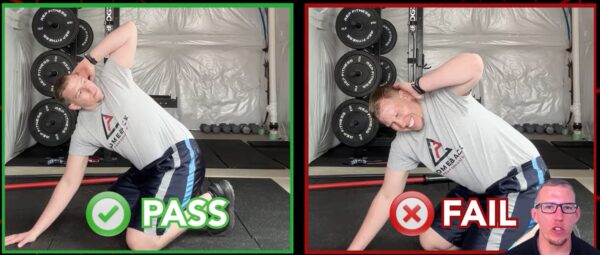
Purpose: Assesses the upper back rotation, crucial for shoulder freedom
How to Do It
- Get on your hands and knees, then rock your hips back toward your feet.
- Place one hand on your head.
- Rotate up and away as far as comfortable and compare both sides.
Score: Rate right and left 0-10 based on stiffness or pain
Exercise 5: Banded Wall Open Book
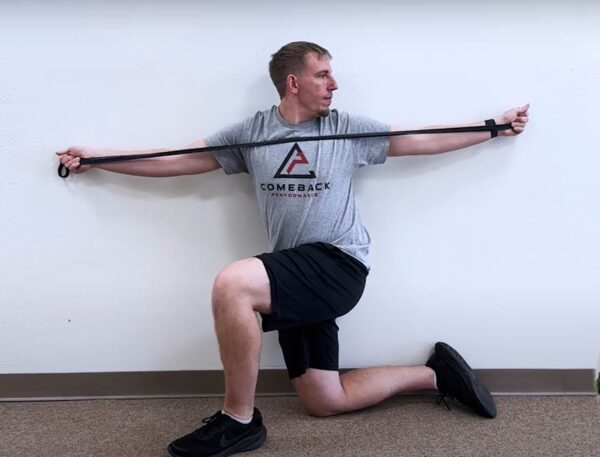
Purpose: Improves thoracic rotation for better shoulder mechanics ‘
Equipment Needed: Light resistance band
How to Do It
- Anchor band at chest height next to the wall.
- Kneel beside the wall, holding the band with both hands.
- Arms straight at chest height, hips facing forward.
- Rotate the chest and arms away from the wall, as if opening a book.
Sets: 10 reps each side
Tip: Focus on rotating from your upper back, not just your arms
Take Action Now
If two or more of your tests scored yellow or red, you don’t just have a “bad shoulder”—you have a system problem. The neck, thoracic spine, shoulder blade, shoulder joint, and nerves all work together. When we assess and treat all five components through the four phases, that’s when people finally stop bouncing between flare-ups.
Tired of guessing after trying PT, injections, and various treatments without a clear plan? It’s time for a systematic approach that addresses all five components of your shoulder system.


")