
The 4 Exercises That Actually Fix Shoulder Impingement Better Than Shoulder Stretches
If you feel like something’s jamming in the front of your shoulder when you put on a shirt, reach into a cabinet, or attempt overhead exercises, you likely have “shoulder impingement.” Most people treat shoulder impingement like it’s just inflammation. They stretch, foam roll, rest, and do basic PT exercises, but that same pinch returns the moment they go back to normal activities. That’s because shoulder impingement isn’t just an inflammation problem, it’s a movement problem.
In this blog, you’re going to learn a simple 15-minute exercise you can do to fix that impingement.
Quick Reference Box
- Total Time: 10-15 Minutes
- Targets: Shoulder joint mechanics, shoulder blade control, rotator cuff stability
- Goals: Pain reduction, improved mobility, enhanced shoulder stability
Test Yourself: Do You Have Impingement Mechanics?
Before jumping into exercises, let’s identify if movement mechanics are driving your pain.
Test 1: The Clearing Test
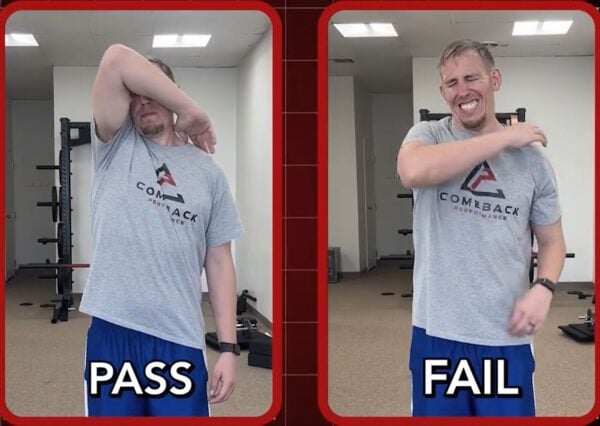
Purpose: Identifies impingement patterns during shoulder elevation
How to Do It
- Place your painful hand on the opposite shoulder.
- Keep your hand in position and lift your elbow toward the ceiling.
- Pay attention to any pinching sensation in the front of your shoulder.
- Rate any pain from 0-10 and remember this number.
What It Means: A positive test (front shoulder pinch) suggests impingement mechanics are involved.
Test 2 – Hawkins Kennedy Test
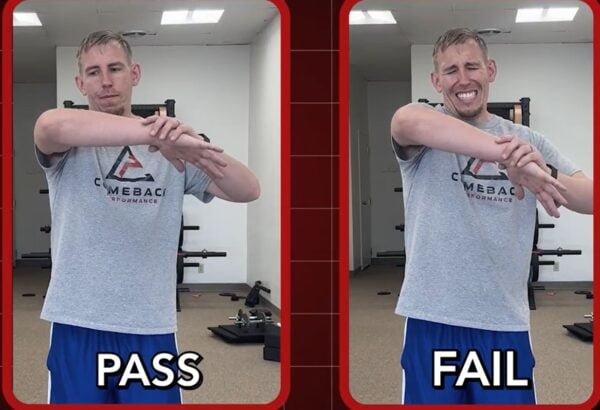
Purpose: To screen for shoulder impingement with internal rotation
How to Do It
- Raise your arm to shoulder height.
- Bend your elbow to 90 degrees.
- Rotate your forearm down toward the floor.
- Note any familiar front shoulder pain or pinching.
What It Means – Recreation of your typical shoulder pain indicates likely impingement mechanics.
The Exercises
Exercise 1 – Banded Posterior Mobilization
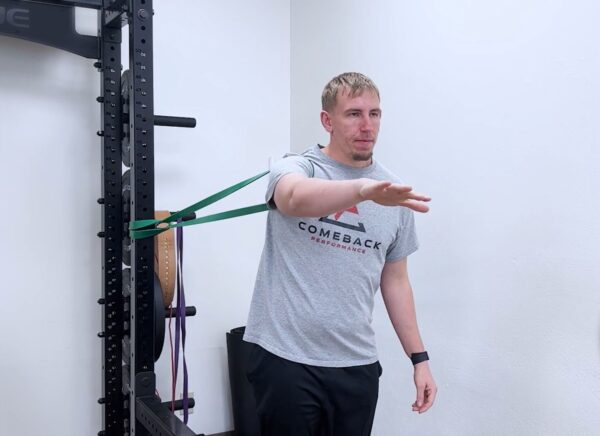
Purpose – To shift the shoulder ball back in the socket and create space in the front of the joint.
Equipment Needed: Resistance band, sturdy anchor point
How to Do It
- Attach resistance band to anchor at shoulder height.
- Step into the band so it wraps around the front of your shoulder near your armpit.
- Face away from the anchor and step forward until you feel a gentle backward pull on your shoulder.
- Perform small chest press motions, reaching forward then back with slow control.
Sets: Do 2 sets of 12-15 reps.
Tip: Let the band do the work and don’t crank it as hard as possible or force into the pinch.
Exercise 2: Banded Scap Angels
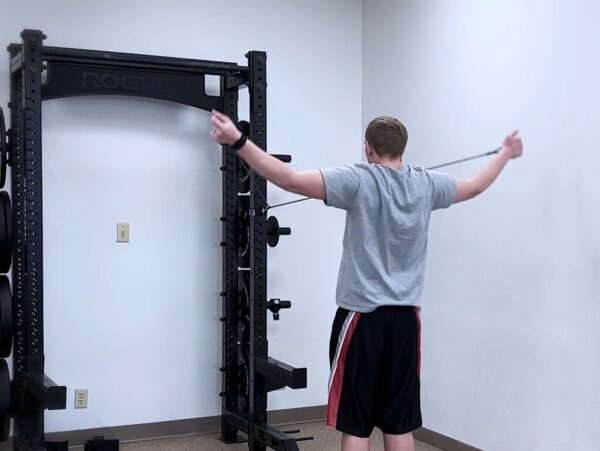
Purpose: To train the upward rotation and external rotation while the shoulder blade moves with the rib cage.
Equipment Needed – Light resistance band
How to Do It
- Anchor the light band in front of you at chest height.
- Grab the band with both hands, keeping elbows straight.
- Walk back until you feel light tension, then start with arms reaching forward.
- Pull hands down and back toward pockets, then up and out into a wide angel position.
Sets: Do 2 sets of 8-10 slow controlled reps.
Tip: Don’t arch your back to fake the overhead motion.
Exercise 3: Banded W Holds

Purpose – To strengthen the rotator cuff and build overhead control in one movement pattern
Equipment Needed: Light resistance band
How to Do It
- Hold a light band with both hands, elbows bent and close to the sides.
- Pull the band apart with palms up to form a “W” shape.
- Keep tension in the band and hold for 5 seconds.
- Take tension off and return to start.
Sets: 2-3 sets of 6-8 reps (5 sec holds)
Tip: Maintain band tension throughout the entire movement.
Exercise 4 – Bear Shoulder Taps
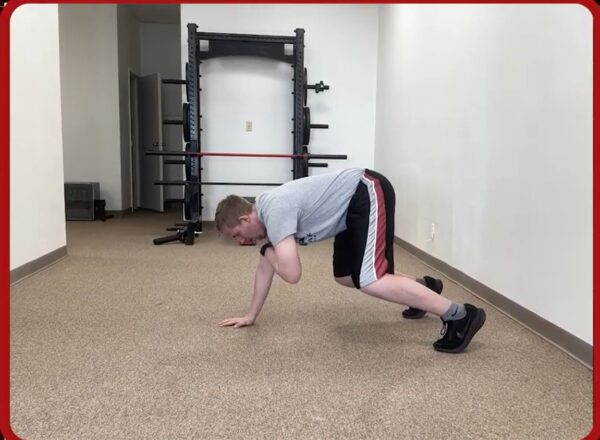
Purpose – To build dynamic shoulder stability under load while your body moves
Equipment Needed – None (can use bench/countertop for modifications)
How to Do It
- Get into a bear position with your hands under shoulders and your knees under hips.
- Lift knees slightly off the ground.
- Slowly tap one hand to the opposite shoulder, return to ground, switch sides.
- Keep the torso still and hips from twisting side to side.
Sets: 2 sets of 8-10 taps per side
Tip: Quality beats speed.
Bonus Exercise – Chin Tucks for Neck Screening

Purpose: To screen whether shoulder pain might actually be referred from the neck
Equipment Needed: None
How to Do It
- Sit tall and gently tuck your chin straight back like making a double chin.
- Don’t look down or jam your head backward.
- Hold 1-2 seconds, then relax.
- Retest your shoulder symptoms after completing the set.
Sets: 2 sets of 10-15 reps
Tip: This helps determine if neck issues are contributing to your shoulder pain
Putting It All Together
After completing this routine, retest both the Clearing Test and Hawkins Kennedy position. Even a 10-20% improvement is significant. Your shoulder needs better joint position and improved shoulder blade movement. If your shoulder is currently irritating you, start with these exercises and use them before upper body training, overhead work, or as a standalone shoulder reset.
About the Author: Dr. Joey Seyforth


