Fix Your Shoulder Impingement: 3 Essential Tests and Exercises for Lasting Pain Relief
Are you struggling with sharp shoulder pain that stops you from reaching overhead, grabbing items from high shelves, or even getting dressed without wincing? You might be dealing with shoulder impingement, one of the most common yet misunderstood shoulder conditions. You can perform these shoulder impingement tests and exercises at home to give yourself relief.
Think of your shoulder like a perfectly orchestrated symphony. When one instrument (your shoulder blade mobility) is out of tune, it affects the entire performance (your shoulder function). Poor shoulder blade movement creates a domino effect: your rotator cuff muscles work overtime, tendons get pinched, and suddenly you’re dealing with pain that seems to come out of nowhere. This interconnected system means that addressing just one area often isn’t enough for lasting relief.
With just 10-15 minutes a day, you can
- Reduce sharp, acute shoulder pain during overhead movements and reaching across your body.
- Improve shoulder blade mobility for smoother, pain-free arm movement.
- Strengthen posterior shoulder muscles to prevent future impingement episodes.
- Restore natural movement patterns that have been compromised by pain and compensation.
- Avoid costly medical interventions like injections, imaging, or surgery.
- Regain confidence in daily activities.
Quick Reference Guide
- Total Time: 10-15 Minutes.
- Targets: Shoulder joint, shoulder blade, rotator cuff, posterior shoulder muscles.
- Goals: Pain reduction, improved mobility, muscle activation.
Diagnostic Tests (Perform before starting exercises)
Test 1: Shoulder Clearing Test
Purpose: Identifies impingement pain when reaching across the body.
How to Perform
- Place your affected arm’s hand on your opposite shoulder.
- Keep your hand pressed against your chest.
- Slowly raise your elbow upward as high as comfortable.
- Compare both sides for pain differences.
Positive Sign: Sharp pain in the front of the shoulder that increases as you raise your elbow higher.
Test 2: Hawkins-Kennedy Test

Purpose: Detects impingement during internal rotation movements.
How to Perform (requires a partner)
- Have your partner bring your elbow to shoulder height in front of you.
- The partner places pressure on your hand while rotating your shoulder inward.
- Note any pain in the front of the shoulder.
- Compare both sides for differences in pain and range of motion.
Positive Sign: Pain in the front of the shoulder during the internal rotation movement.
Test 3: Neer’s Test
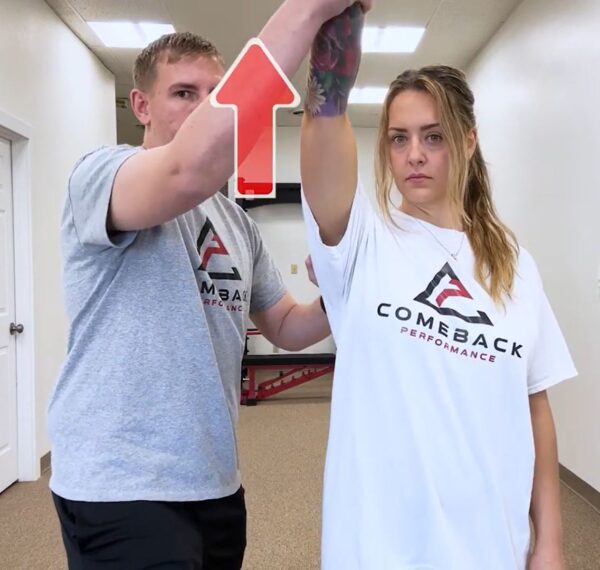
Purpose: Identifies impingement pain during overhead movements.
How to Perform (requires a partner)
- Turn your thumb downward (internal rotation position).
- Have your partner hold your shoulder blade down with one hand.
- Partner passively lifts your arm straight up toward the ceiling.
- Monitor for pain in the front of the shoulder.
Positive Sign: Pain in the front of the shoulder as your arm is lifted overhead.
Exercise Breakdown
Exercise 1: Banded Posterior Shoulder Mobilization
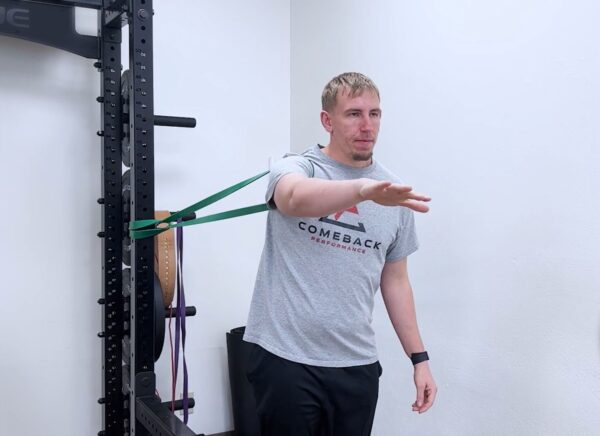
Purpose: Creates space in the shoulder joint by pulling the shoulder back and offloading compressed tissues.
Equipment Needed: Resistance band, secure anchor point (door frame, rack, or beam).
How to Do It
- Attach the resistance band to a secure anchor point at shoulder height.
- Place the band across the front of your affected shoulder.
- Allow the band to pull your shoulder backward gently.
- Move your arm in and out of a chest press position, extending forward and returning to your body.
Sets: 2-3 sets of 10-15 repetitions.
Tip: This should feel relieving, not painful. You should feel like pressure is being taken off the front of your shoulder. Never force the movement—let the band do the work.
Exercise 2: Wall Slides

Purpose: Mobilizes both the shoulder and shoulder blade together to restore natural movement patterns.
Equipment Needed: Wall space.
How to Do It
- Stand with one foot in front of the other, facing a wall.
- Place both hands on the wall with forearms not touching.
- Slide your arms up the wall while allowing your chest to move forward.
- Feel your shoulder blades moving up and around during the motion.
Sets: 2-3 sets of 8-12 repetitions.
Tip: Think of wearing an extremely tight shirt—without proper shoulder blade movement, lifting your arms overhead becomes nearly impossible. This exercise restores that crucial shoulder blade mobility often missed in traditional therapy.
Exercise 3: Banded W Hold

Purpose: Engages the posterior shoulder and rotator cuff muscles while offloading the front of the shoulder.
Equipment Needed: Resistance band.
How to Do It
- Hold a resistance band with both hands, elbows at your sides.
- Pull the band apart, creating a “W” shape with your arms.
- Hold the position for 3-5 seconds, feeling engagement in the back of your shoulders.
- Slowly return to the starting position with control.
Sets: 2-3 sets of 8-12 holds.
Tip: To progress this exercise, hold for longer durations or use a band with more resistance. Focus on feeling the muscles between your shoulder blades working.
Understanding Shoulder Impingement
When there’s compression between your shoulder and shoulder blade and this compression affects various tissues, including tendons, ligaments, muscles, and bursae (fluid-filled sacs that cushion joints), you’ll experience shoulder impingement. This compression typically happens in the front of the shoulder and creates that characteristic sharp, acute pain during specific movements. The most telling signs of shoulder impingement include
- Sharp pain in the front of the shoulder.
- Pain when reaching overhead (like grabbing something from a high shelf).
- Discomfort when reaching across your body.
- Acute pain during specific shoulder positions.
- Pain that worsens with continued activity.
Your Shoulders Will Thank You!
While these exercises are designed to be safe and effective, remember that proper form and listening to your body are crucial. If any exercise causes sharp pain or significant discomfort, stop immediately. These movements should feel relieving and gradually improve your symptoms over time. These exercises work like medication—the right prescription matters. Doing too little won’t be effective, and doing it too much can be counterproductive. Start and gradually progress as your symptoms improve, and ensure you are consistently practicing daily. While you may feel some immediate relief, lasting change requires patience and persistence. Commit to performing these exercises daily for at least 2-3 weeks to see significant improvement.
If you’re interested, you can get a personalized session and be guided to a stress-free shoulder.


")