
How to Fix Scapular Winging Without Surgery
If your shoulder blade sticks out like a “wing,” you’re not just dealing with a cosmetic issue—you’re likely feeling pain around the shoulder blade, neck, or upper back, plus weakness, difficulty lifting overhead, and trouble sleeping on the affected side.
Your shoulder blade doesn’t work in isolation. Scapular winging is rarely just a “weak shoulder” problem. It’s a movement system issue that involves your neck, upper back, shoulder joint, and even how your brain coordinates these areas.
When your cervical and thoracic spines aren’t positioned or moving well, your shoulder joint and shoulder blade compensate. Over time, this compensation manifests as winging, impingement, bursitis, and chronic tightness.
With 10–15 minutes a day of the right exercises and progression, you can retrain your shoulder blades to lie flat and move smoothly—no surgery required for most people.
Quick Reference Box
Total Time: 10–15 minutes
Targets: Serratus anterior, middle/lower traps, rhomboids; cervical and thoracic spine mechanics; shoulder joint mobility; nervous system coordination
Goals
- Reduce pain and scapular winging
- Improve mobility and control overhead
- Build strength and stability with proper movement patterns
Why Surgery Usually Isn’t Needed
Most people are told to consider surgery when “PT didn’t work.” The issue isn’t that winging can’t be fixed—it’s that generic programs underdose the correct movements. The key is progressive overload and targeted exercise selection across five areas (“The Big Five”)
- Cervical spine (neck) positioning.
- Thoracic spine (upper back) extension and rotation.
- Shoulder blade muscles (serratus anterior, middle/lower traps, rhomboids).
- Shoulder joint mobility and control.
- The nervous system coordinates all the above.
Even if a nerve (like the long thoracic nerve) is involved, function often improves dramatically with consistent, well-dosed exercise. Typical timelines range from 4 weeks to 12 months, depending on severity.
Exercise Breakdown
Exercise 1: Wall Slide + Liftoff

Purpose: Train upward rotation and controlled return of the shoulder blade while integrating thoracic extension.
Equipment Needed: Wall
How to Do It
- Stand facing a wall with one foot slightly in front, forearms on the wall, elbows lifted off.
- Slide your arms up while gently leaning your chest forward into the wall.
- At the top, lightly lift your hands off the wall if possible; then control the slide back down.
Sets: 2 sets of 10 reps
Tip: Can’t lift off yet? No problem, perform the wall slide and build range gradually. Avoid shrugging your shoulders toward your ears.
Exercise 2: Banded Bear Hug
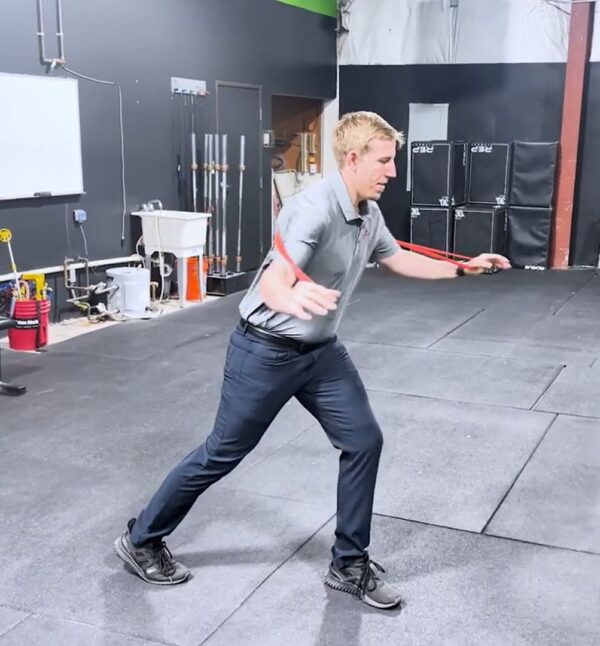
Purpose: Target the serratus anterior to reduce winging by training protraction and wrapping the shoulder blade around the ribcage.
Equipment Needed: Light resistance band
How to Do It
- Anchor the band around your back at the shoulder-blade level and hold the ends with your thumbs up.
- Stagger your stance for balance.
- Reach your arms forward and “around” as if hugging a barrel; return with control.
Sets: 2 sets of 8–10 reps.
Tip: Think “reach from the shoulder blade,” not the neck. Keep ribs down—don’t arch your lower back to get range.
Exercise 3: Banded Scap Angel
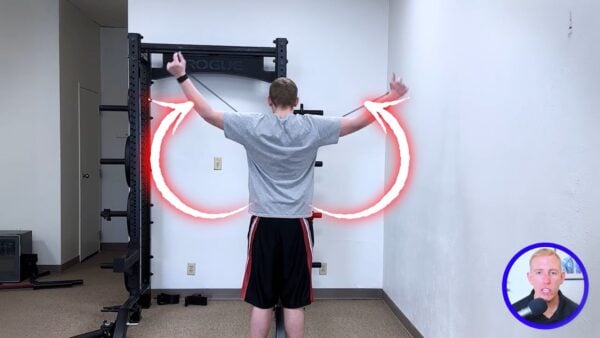
Purpose: Train posterior tilt and external rotation of the shoulder blade while moving the arm overhead.
Equipment Needed: Light resistance band anchored in front
How to Do It
- Pull the band back with straight elbows until your hands are just outside your torso.
- Sweep the arms out and up into a snow-angel motion, finishing with biceps by your ears.
- Return along the same path with control.
Sets: 2 sets of 10 reps
Tip: Keep the ribcage stacked over the pelvis (no flaring). Move slowly enough to feel the shoulder blade glide smoothly.
Exercise 4: Single-Arm Serratus Press
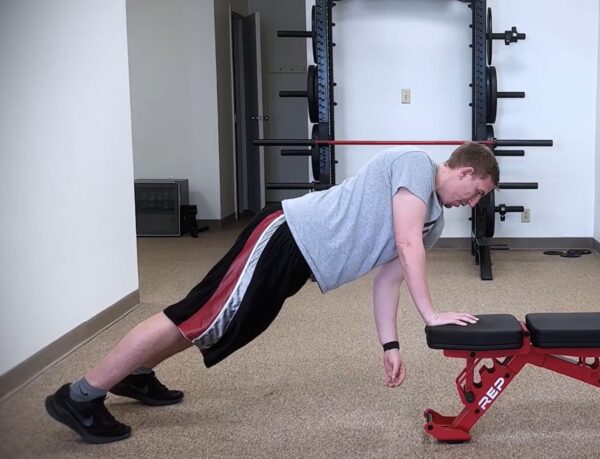
Purpose: Strengthen the serratus anterior in its primary functions—protraction and upward rotation—for direct anti-winging control.
Equipment Needed: Floor or bench (optionally an elevated surface)
How to Do It
- Get into a single-arm high plank (or elevated surface to regress).
- With a straight elbow, push the floor away to round the upper back slightly as the ribcage moves forward.
- Lower with control, then press up again without bending the elbow.
Sets: 3 sets of 6–8 reps per side
Tip: Keep the elbow locked and neck long—don’t let the shoulder collapse toward the ear. If it’s too hard, do a two-arm version or elevate your hands.
You should feel muscle effort, not sharp pain, numbness, or tingling. Stop and consult a clinician if those occur. Mild muscle burn and light fatigue are normal; joint pain is not. If you’ve had recent trauma, progressive neurological symptoms, or a confirmed severe nerve palsy, seek an in-person evaluation to individualise care.
Your Winning Formula
Perform these exercises 3–5 days per week for 10–15 minutes, and gradually increase resistance or range as control improves. Expect smoother arm elevation, less “pinchy” shoulder blade pain, and better control/ For full resolution, address all “Big Five” areas with progressive programming—not just isolated strengthening and getting to your ROOT CAUSE.
Book a virtual assessment with a shoulder rehab specialist or start a guided program that targets your Big Five limitations and scales your progression week by week.
About the Author: Dr. Joey Seyforth


