
Stop Shoulder Impingement Pain: The Complete Guide for Lifters Over 40
Shoulder impingement isn’t a life sentence, despite what you may have been told. The real problem behind it is that your current movement pattern isn’t giving your shoulder enough room to move properly.
Most people make the mistake of only focusing on the shoulder joint itself. They do the standard PT exercises, stretch their shoulders, maybe get some injections, and wonder why the pain keeps coming back the moment they return to real training.
The truth is, your shoulder doesn’t work in isolation. It’s part of what Dr. Joey Seyforth calls the “Big Five” system, which includes your neck, upper back (thoracic spine), shoulder blade, the shoulder joint, and nervous system.
When this five-part team breaks down, that’s when you get that familiar pinch at shoulder height or just above – right where you need the most space and best mechanics.
This is why addressing only the shoulder joint gives you short-term relief but long-term frustration.
With just 10 minutes a day, you can
- Eliminate that sharp shoulder pinch during overhead movements.
- Return to pain-free bench pressing, rows, and pull-ups.
- Build lasting shoulder mobility and stability.
- Prevent future impingement episodes.
- Regain confidence in your training.
- Stop living in fear of shoulder pain flare-ups.
Quick Reference Box
- Total Time: 10 Minutes
- Targets: Thoracic spine, shoulder blade mechanics, joint stability
- Goals: Increase joint space, improve movement patterns, reduce impingement pain
Two Essential Tests to Confirm Your Pattern
Before diving into the exercises, let’s determine if you’re dealing with classic impingement patterns.
Test 1: The Clearing Test
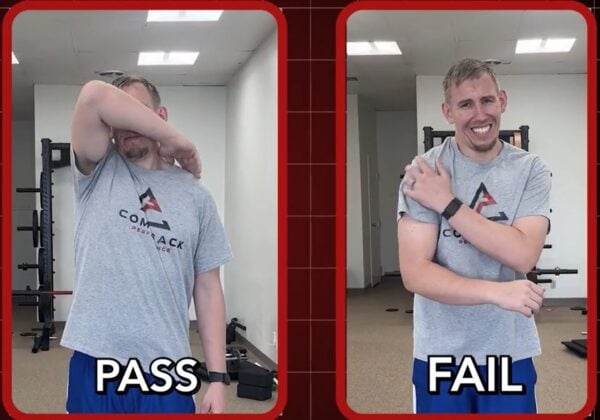
Purpose: Identify exactly where in your range of motion the impingement occurs
How to Do It:
- Bring your hand to your opposite shoulder
- Actively lift your elbow as high as possible while keeping your hand on your shoulder
- Note any pain or pinching sensation
- Compare both sides
What to Look For: If you get that familiar pinch in the same spot every time, especially compared to a smooth motion on the other side, this confirms an impingement pattern.
Test 2: Hawkins-Kennedy Test
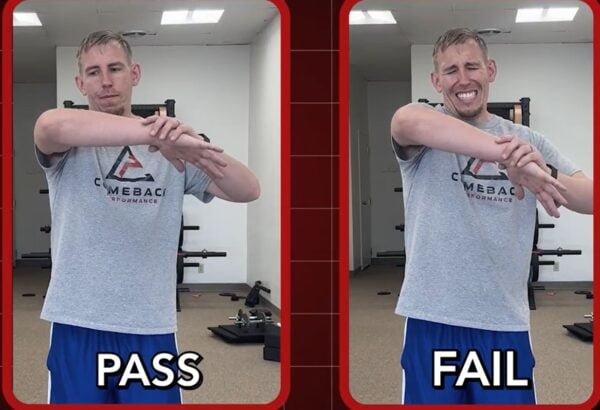
Purpose: To stress the tissues at the top and front of the shoulder to reproduce impingement symptoms
How to Do It
- Raise your arm straight out in front, at shoulder height, with the elbow bent 90 degrees.
- Use your other hand to rotate your forearm and hand down toward the floor gently.
- Move slowly until you feel resistance or that familiar pinch.
- Compare sides for differences.
What to Look For: Sharp top and front shoulder pain during this movement strongly suggests impingement-type patterns.
Three Big Five Exercises to Stop the Pinch
Exercise 1: Bench Opener

Purpose: To open up your thoracic spine and front shoulders to create more overhead space.
Equipment Needed: Bench or sturdy chair, optional dowel
How to Do It:
- Kneel in front of a bench and place your elbows on the surface
- Hold your hands together or grip a dowel between them
- Slowly sit your hips back and let your chest drop between your arms
- Feel the stretch across your front shoulders and upper back
Sets: 2 sets of 8-10 reps
Tip: Stay in the green to low yellow pain range – you should feel a good stretch, not sharp pain.
Exercise 2: Banded Scap Angels
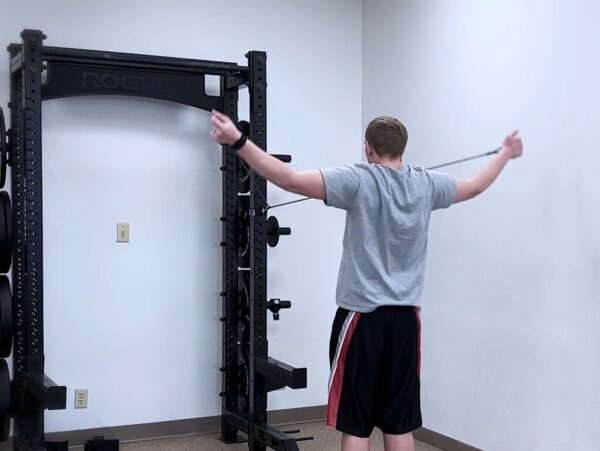
Purpose: To train your shoulder blades to move properly with your shoulder joint during overhead motion
Equipment Needed: Light resistance band
How to Do It:
- Anchor a light band at chest height and hold with both hands, arms straight
- Step back to create light tension
- Slowly sweep your arms up into a wide “Y” overhead
- Let your shoulder blades rotate up and around your ribs, then return to the start
Sets: 2 sets of 8-10 reps
Tip: Focus on feeling your shoulder blade muscles working, not a sharp bite at the top of your shoulder joint.
Exercise 3: Kettlebell Pull-Throughs
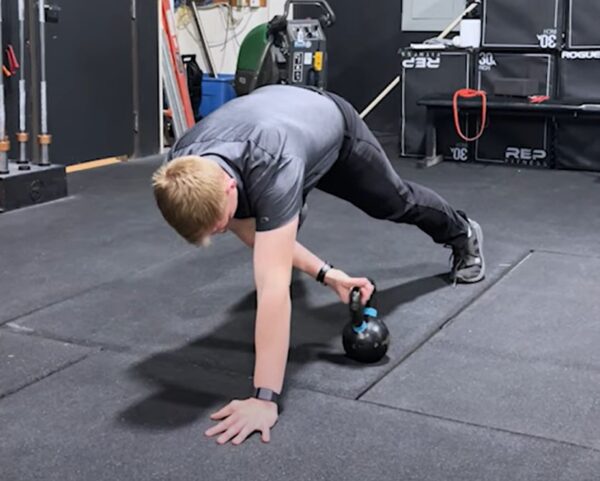
Purpose: To build closed-chain shoulder stability in positions your shoulder must tolerate during training
Equipment Needed: Light kettlebell or dumbbell
How to Do It
- Get into a plank position with hands under shoulders
- Place a lightweight just to one side of your body
- Reach under your body with the opposite hand and drag the weight across to the other side
- Switch hands and pull it back, keeping your hips as steady as possible
Sets: 2 sets of 6-10 pull-throughs per side
Tip: This builds real-world shoulder stability without relying on that problematic mid-range where impingement typically occurs.
Your Next Steps to Pain-Free Lifting
For lifters over 40, the goal isn’t perfect imaging results; it’s strong, stable, and smart shoulders that let you lift on your own terms. If you’ve tried traditional PT, injections, and other treatments without lasting results, it’s time for a comprehensive approach that addresses your entire shoulder system, not just the joint itself.
About the Author: Dr. Joey Seyforth


