Bicep vs Labrum Tear Test: Identify Which Is Causing Your Shoulder Pain
Most active adults over 40 have likely received different diagnoses for their shoulder pain, leaving them frustrated and confused.
Here’s what typically happens when you develop shoulder pain: You see a doctor, get an MRI, and receive a diagnosis like bicep tendinitis or labrum tear. Then you’re either told to rest, referred to physical therapy, or put into a surgery conversation.
Before you go down that road, there are some simple tests you can do to identify your shoulder pain and some exercises that you can also do to get relief from that shoulder pain. It’ll save you from a lot of stress.
Quick Reference Guide
- Total Time – 5 Minutes
- Target – Bicep tendon, labrum, shoulder joint mechanics
- Goals – Pain pattern identification, treatment direction, immediate relief
Test 1: Speed’s Test

Purpose: To identify the bicep tendon’s involvement as the primary pain driver.
Equipment Needed: None
How to Do It
- Extend one arm straight out in front of you.
- Use your other hand to press down while you resist upward.
- Note the location and quality of any pain you feel.
Sets: 1 test, hold resistance for 3-5 seconds.
Tip: Sharp pain right at the front of the shoulder near the bicep groove indicates bicep-dominant involvement.
Test 2 – O’Brien’s Active Compression Test
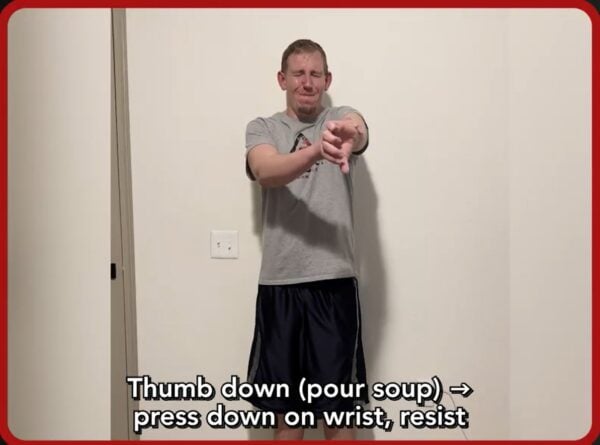
Purpose: To distinguish labrum-related pain from surface tendon irritation.
Equipment Needed: None
How to Do It
- Raise your arm straight out at 90 degrees, then bring it slightly across your body.
- Turn your thumb down like pouring soup, and have someone press on your wrist while you resist.
- Flip your thumb up toward the ceiling and repeat the same pressure.
- Compare pain levels between the thumb-down and thumb-up positions.
Sets: 1 test in each position, hold for 3-5 seconds
Tip: Note the pain you expereince as significantly worse pain with thumb down that improves with thumb up, shows feeling deep inside the joint and suggests labrum involvement.
Test 3 – 90/90 Rotation Screen
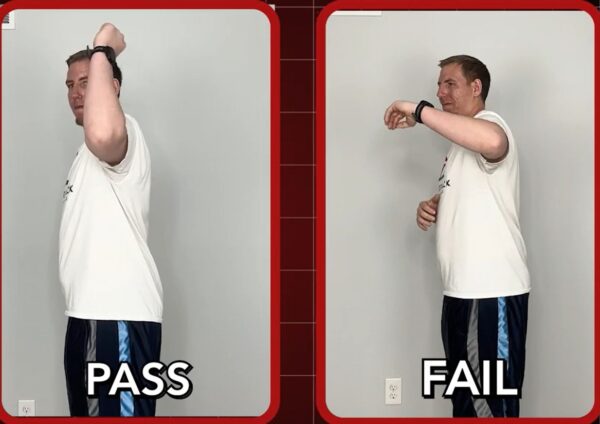
Purpose- To evaluate your joint’s ability to handle rotational stress and identify instability patterns.
Equipment Needed: None
How to Do It
- Bring your arm out to the side at 90 degrees, with your elbow bent like a throwing position.
- Slowly rotate your hand and forearm backward as far as comfortable.
- Note any catching, sharp pain, or sense of instability.
- Compare to the uninvolved side, if possible.
Sets: 1 test, slow controlled movement
Tip: Watch out for instability during the arc as it indicates joint-dominant behavior requiring stability-focused treatment.
Exercise For Relief
Exercise 1: Wall Slides

Purpose: To restore proper shoulder blade movement to reduce loading on both the bicep tendon and labrum.
Equipment Needed: Wall
How to Do It
- Stand in a staggered stance facing the wall, hands at shoulder height with pinkies touching.
- Push slightly into the wall and slide arms upward while leaning chest forward.
- Feel shoulder blades moving up and around, not just arms lifting.
- Slowly return to the starting position with control.
Sets: 2-3 sets of 10-12 reps.
Tip: Avoid shrugging your shoulders toward your ears. Also, the motion should come from blade movement.
Exercise 2 – Banded Extension + External Rotation

Purpose: To build posterior rotator cuff strength to keep the ball centered in the socket.
Equipment Needed: Light resistance band
How to Do It
- Put your arms behind back with a band looped around wrists.
- Create outward tension by pulling hands apart against the band.
- While maintaining tension, move your shoulders backward into extension.
- Keep your shoulders down throughout without shrugging.
Sets: 2-3 sets of 8-10 reps
Tip: You should feel this in the back of your shoulders, not your neck.
Your Next Steps
After completing the exercises, re-test your original positive tests. Even a 10-15% reduction in pain intensity indicates your shoulder is responding and treatable; you need the right roadmap. We offer a systematic treatment approach that addresses why these structures became overloaded in the first place, not just treating the symptoms they’re producing.
Want to learn about it?


")