How to Fix Delayed Shoulder Pain After Bench Press
Delayed shoulder pain after bench pressing is one of the most frustrating types of shoulder pain lifters experience because the shoulder doesn’t warn during workouts.
That delayed pain is a specific mechanical signature telling you your shoulder was forced into a position it couldn’t handle for an entire training session. While you’re focused on hitting your bench PR, your shoulder is silently accumulating damage that only reveals itself once you stop loading it.
In this blog, you’ll learn to identify which of the 3 pain patterns is causing your bench press shoulder pain. And also what you should do to restore proper shoulder mechanics.
Quick Reference Box
- Total Time – 15 Minutes
- Targets: Posterior shoulder capsule, shoulder blade mechanics, shoulder extension mobility
- Goals – Pain reduction, improved bench press mechanics, long-term shoulder health
The 3 Bench Press Pain Patterns You Need to Know
Before jumping into exercises, you need to identify which pattern is driving your pain. Most lifters have a dominant pattern, though you may test positive for more than one.
Pattern 1: Front Bicep Tendon Pain
This occurs when the ball of your shoulder glides forward at the bottom of the bench press due to posterior capsule tightness and poor shoulder blade retraction. Your bicep tendon gets compressed and loaded in this faulty position for your entire session.
Pattern 2: Top of Shoulder (AC Joint) Pain
This is acromioclavicular joint irritation that happens when your shoulder doesn’t track smoothly through the bench press arc. Poor scapular mechanics cause the AC joint to take excessive compressive forces at the top of every press.
Pattern 3: Mid-Range Impingement
Classic shoulder impingement where your rotator cuff or bursa gets pinched in the middle range of motion. This occurs when your shoulder blade lacks posterior tilt or your rotator cuff is weak.
3 Tests to Identify Your Pain Pattern
Test 1 – Bench Shoulder Extension Test (Pattern 1)
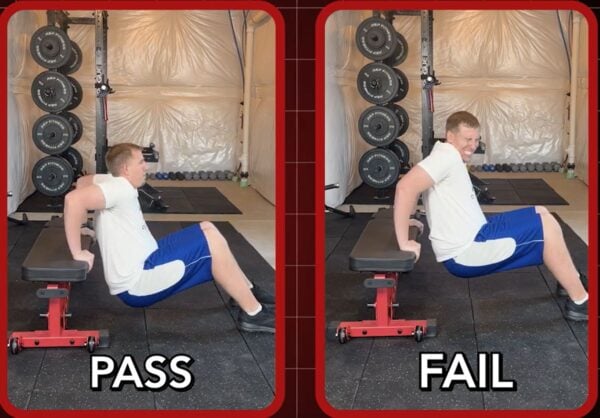
Purpose: Identify front shoulder and bicep tendon irritation
How to Do It
- Stand facing away from a bench or stable surface.
- Place your hands flat on the surface behind you.
- Walk your feet forward and slowly lower your hips like performing a dip.
- Note where you feel shoulder pain—if it’s in the front before getting deep, that’s Pattern 1.
What It Reveals: Front shoulder pain indicates posterior capsule tightness, forcing your shoulder into a compromised position.
Test 2 – Cross-Body AC Screen (Pattern 2)
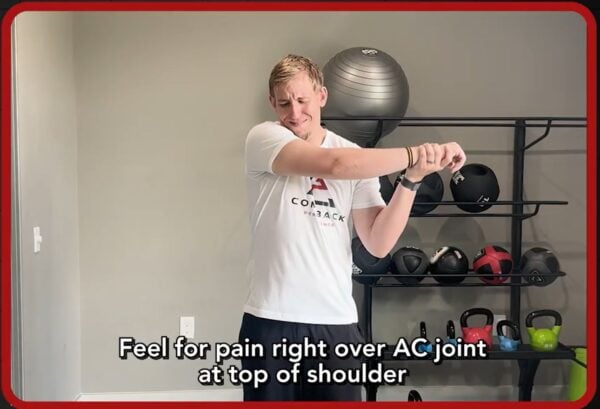
Purpose: Detect AC joint irritation
How to Do It
- Extend your arm straight out in front of you.
- Use your other hand to pull it across your chest toward your opposite shoulder.
- Note any sharp pain directly at the top of your shoulder.
What It Reveals: Sharp pain at the AC joint confirms Pattern 2 mechanics issues.
Test 3 – Painful Arc Test (Pattern 3)
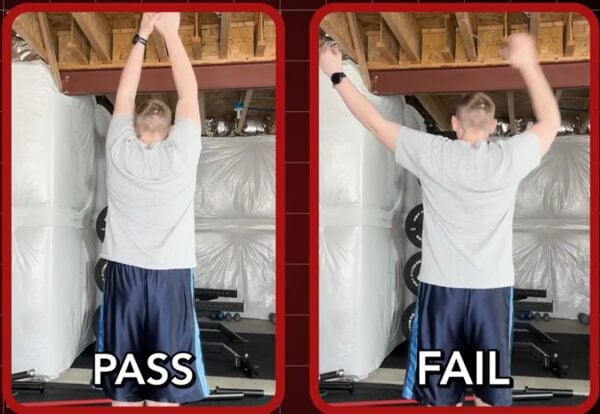
Purpose: To identify classic shoulder impingement.
How to Do It
- Raise your arm straight out to the side.
- Lift it toward the ceiling in a smooth, controlled arc.
- Note any painful zone between 60-120 degrees.
- Check if pain clears past that range.
What It Reveals: A painful window in mid-range motion confirms impingement mechanics.
Exercise 1 – Banded Posterior Shoulder Mobilization
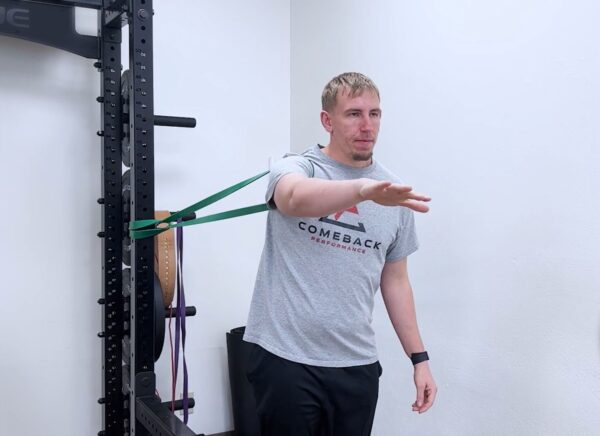
Purpose: To free up the tight posterior capsule that drives all three pain patterns.
Equipment Needed: Resistance band, anchor point at shoulder height
How to Do It
- Attach the band to the anchor point at shoulder height and face away from it.
- Place the band around the front of your shoulder near your armpit.
- Step forward to create tension, pulling your shoulder backward.
- Slowly perform a bench press motion while the band guides better mechanics.
Sets: 2 sets of 15-20 reps
Tip: The band should guide your movement, not wrench your shoulder, and stay in complete control throughout the motion.
Exercise 2 – Quad Kneel Scap Depression
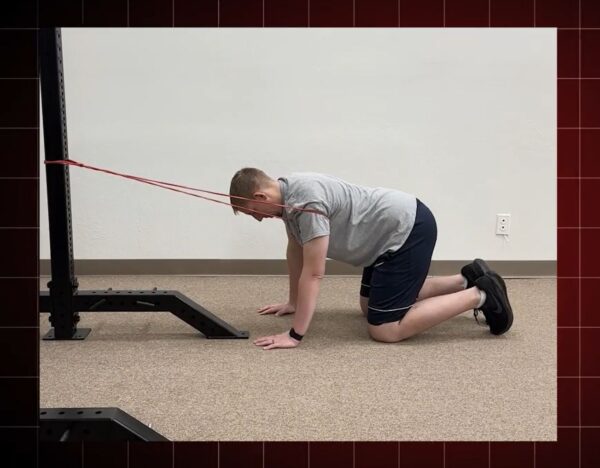
Purpose: To teach your shoulder blade to anchor down and back instead of living in a shrugged, forward position.
Equipment Needed: Resistance band, door frame, or rig anchor
How to Do It
- Get into a quadruped position facing the anchor point.
- Loop the band around the top of your shoulder so it pulls forward and up.
- Press your hands into the floor and actively draw your shoulder down toward the back pocket.
- Focus on shoulder blade movement without bending elbows or sagging chest.
Sets: 2 sets of 12 controlled reps per side
Tip: Keep your trunk stable and think of the scapula gliding down and back.
Exercise 3 – Crab Rocking
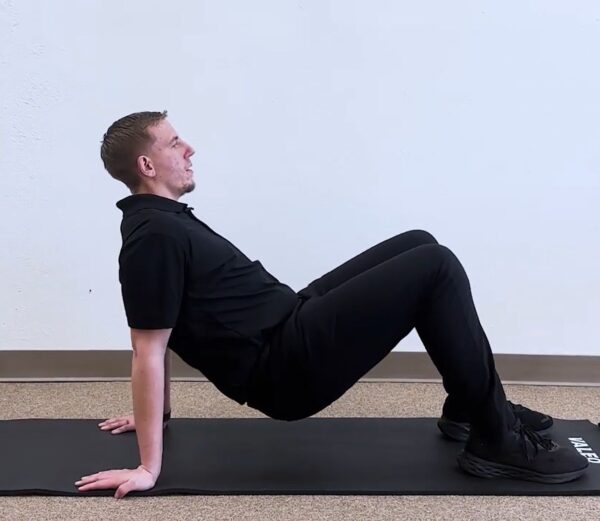
Purpose: To build shoulder extension mobility and stability in the exact range that the bench press demands.
Equipment Needed: None
How to Do It
- Sit on the floor with your hands behind you, fingers pointing to the sides or slightly back.
- Lift hips a few inches off the floor into crab position.
- Gently rock forward and backward within a comfortable range.
- Keep your shoulders away from your ears with a proud chest posture.
Sets: 2-3 sets of 8-10 rocks
Tip: You should feel this in your posterior shoulders and upper back, not just your wrists or low back.
Ready to Take the Next Step?
After completing these exercises, retest your three screening movements. These exercises provide immediate relief, but permanently solving bench press shoulder pain requires addressing your entire shoulder system.
Every shoulder has a different presentation and responds different to exercise. Being specific for what you need is key for long term success with the shoulder.


")