
Why Shoulder Bursitis Is Not a Bursa Problem (3 Exercises That Fix It)
If you’ve been diagnosed with shoulder bursitis and you’re still dealing with that deep, aching throb that gets worse when you lift your arm to the side, reach overhead, or try to sleep on it, you’re not alone. And more importantly, you’re not going to be stuck with it forever.
With just three targeted exercises taking less than 15 minutes a day, you can start creating that space back and finally get lasting relief.
Quick Reference Box
- Total Time – 15 Minutes
- Targets: Shoulder joint, shoulder blade, core, and stabilizing muscles.
- Goals: Joint decompression, improved shoulder mechanics, long-term stability
Exercise 1 – Banded Posterior Shoulder Mobilization
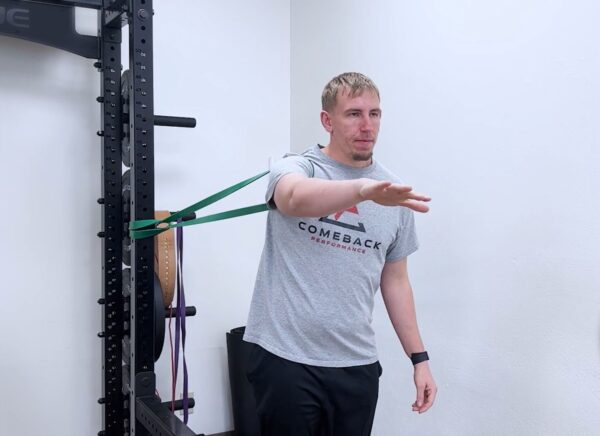
Purpose – To create space in the shoulder joint by pulling the ball of the shoulder back into proper position
Equipment Needed: Heavy resistance band and a sturdy anchor point.
How to Do It
- Attach the band at shoulder height and wrap it around the front of your affected shoulder, close to the armpit.
- Face away from the anchor and step forward until you feel strong tension pulling your shoulder backward.
- Perform slow, controlled chest press motions, letting the band pull your shoulder back; don’t muscle through it.
- Stay relaxed and feel the decompression in the front of your joint.
Sets: Do 2 sets of 15 slow, controlled reps.
Tip: Let the band do the work. You should feel immediate relief in the front of your shoulder.
Exercise 2 – Banded Scap Angels
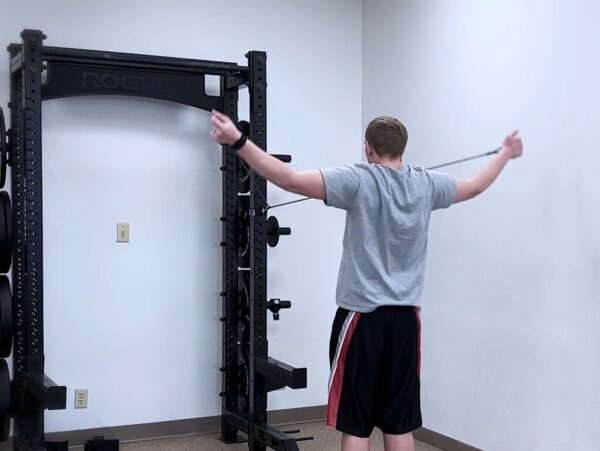
Purpose: To retrain your shoulder blade to rotate properly, creating space for the bursa.
Equipment Needed: Light resistance band, anchor point at chest height.
How to Do It
- Hold the band with both hands while keeping your elbows straight, and create light tension.
- Start by pulling hands down toward pockets to set shoulder blades down and back.
- Slowly raise arms up and out into a wide Y position, focusing on shoulder blade rotation.
- Control the movement of your hand down and don’t let the band yank you.
Sets: Do 3 sets of 10 slow controlled reps.
Tip: Keep ribs down and avoid arching your back.
Exercise 3: Kettlebell Pull-Through
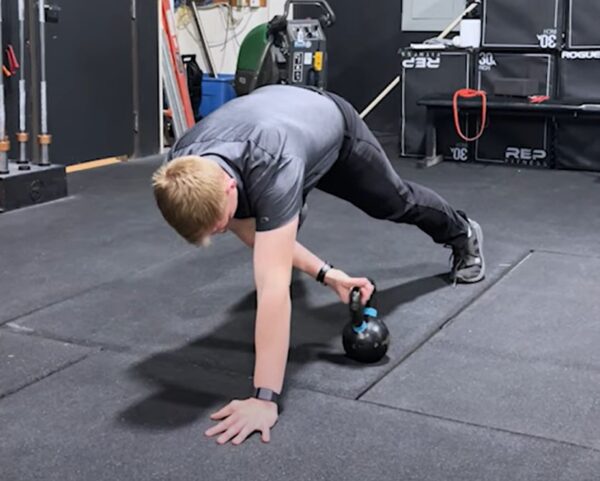
Purpose: To build your core and shoulder stability to maintain proper positioning under real-world loads.
Equipment Needed: One kettlebell
How to Do It
- Start in a high plank position with feet wider than normal for stability.
- Place the kettlebell outside one hand.
- Reach under your body with the opposite hand to grab the kettlebell and pull it across.
- Keep hips square to the floor with zero rocking; stability is everything.
Sets: Do 3 sets of 6-8 reps per side.
Tip: If your hips are swinging, you’ve lost the stability benefit.
Making The Difference
Do these exercises 4-5 times per week (daily for fastest results), preferably in the morning when stiffness is worst or before any overhead activities. Most people feel a significant shift within 5-7 days because the space is opening back up and mechanics are improving.
These three exercises are your starting point for immediate relief. But for a complete, personalized approach to permanently fixing your shoulder bursitis and understanding which of “The Big 5” is your specific weak link, professional guidance makes all the difference.
About the Author: Dr. Joey Seyforth


