
Rotator Cuff Tear on MRI? 3 Exercises to Avoid Surgery and Fix It
You just got the MRI results back. The report says “rotator cuff tear,” and now your doctor is discussing surgery options. But before you schedule anything, there’s something crucial you need to understand. And it’s that a rotator cuff tear on imaging does not automatically mean your shoulder is broken, and it absolutely does not mean surgery is your only option.
The tear on the image is not automatically the cause of your pain. An MRI shows structure, but it doesn’t reveal how your shoulder actually moves and functions in real life.
The real problem almost always lies in five interconnected areas that control how your shoulder loads and moves. When all five areas are addressed, that’s when people transition from surgery conversations to confidently returning to their favorite activities.
Simple Self-Assessment: The Gerber Liftoff Test
Before we dive into the exercises, let’s assess your current shoulder function with the Gerber Liftoff Test. The Gerber Liftoff Test checks your subscapularis muscle, one of the four rotator cuff muscles that controls internal rotation and prevents the ball of your shoulder from sliding forward.
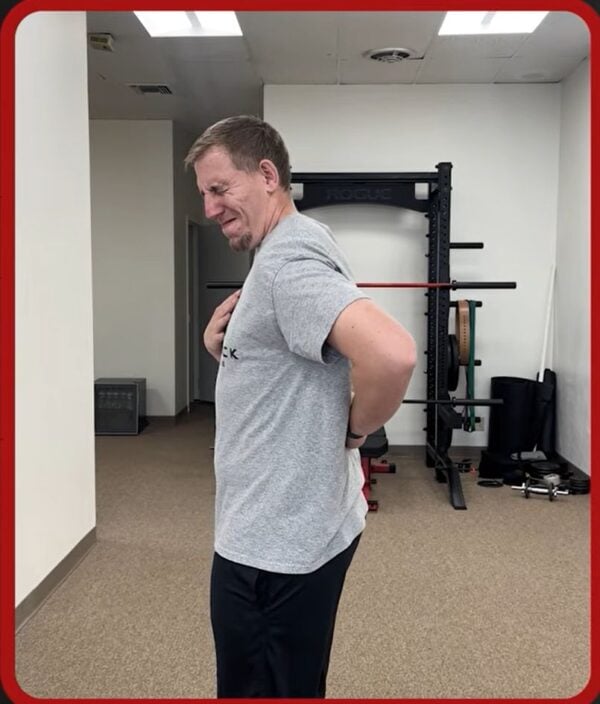
How to perform it:
- Place the back of your hand against your lower back, palm facing away from you
- Try to lift your hand away from your back, pressing it forward into space
- Assess your strength and control
What it means:
- Strong and controlled movement: Your subscapularis is functioning well
- Weak, painful, or barely able to move: Your subscapularis needs retraining (which is exactly what these exercises address)
If you experience pain with this test, don’t panic. This is normal for people dealing with rotator cuff issues, and it’s completely changeable.
Quick Reference Guide
Total Time – 10-15 Minutes Daily
Equipment Needed – Resistance band, wall access, bench/countertop
Targets – The thoracic spine, rotator cuff, scapular stability.
Goals – Pain reduction, mobility restoration, functional strength
Exercise 1 – Wall Open Book

Purpose – To unlock your thoracic spine mobility to prevent shoulder compensation
Equipment Needed: Wall
Targets: Thoracic spine rotation and extension
How to Do It
- Stand with your hip connected to the wall.
- Place hands together in front of your chest.
- Open up into a rotational position like opening a book, following your eyes with your hands.
- Go as far as you can with control, trying to get your back hand to touch the wall.
- Slowly return to the starting position.
Sets: 2 sets of 8-10 reps per side
Key Tip: Keep your hip connected throughout the entire movement.
Exercise 2 – Banded Scaption
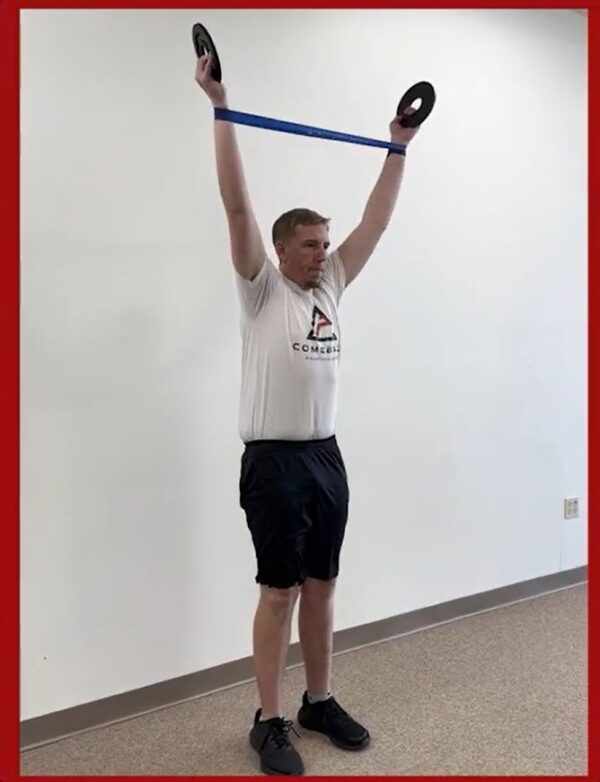
Purpose – To rebuild the rotator cuff strength in your shoulder.
Equipment Needed: Resistance band or light weights.
Targets: Shoulder blade and shoulder joint.
How to Do It
- Place a resistance band around your wrists or hold light weights.
- Arms at sides, thumbs pointing up.
- Raise arms diagonally at 45° (scapular plane)—not straight out to the side, not straight forward.
- Pause for one second at the top.
- Control the descent back to starting position.
Sets: Do 3 sets of 8 slow controlled reps
Key Tip: Keep your neck long and focus on your shoulder blades moving, not your upper traps taking over.
Exercise 3 – Shoulder Taps from Bench
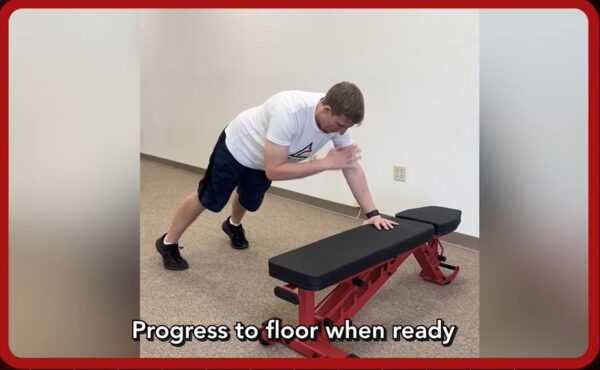
Purpose – To build closed-chain stability and confidence in weight-bearing.
Equipment Needed: The bench, countertop, or floor
Targets: Integrated shoulder stability and confidence.
How to Do It
- Place both hands on a bench or sturdy countertop.
- Put your feet slightly wider than normal for stability.
- With core braced, shift weight to one arm and tap the opposite shoulder with the free hand.
- Alternate sides with slow, controlled movements.
- No hip swinging, no collapsing through the supporting shoulder.
Sets: 2 sets of 8-10 taps per side.
Key Tip: The supporting shoulder should feel stable, not sinking or “winging” out from your ribcage.
It’s Not Just About Your Shoulder
Your comeback story starts with understanding that the tear on your MRI doesn’t define your limitations—how you move and function does. And movement patterns can always be improved, regardless of what shows up on imaging.
These three exercises provide a powerful starting point for addressing the most common dysfunctions that lead to rotator cuff symptoms. Thousands of people with confirmed rotator cuff tears have avoided surgery and returned to full, confident use of their shoulders through proper movement and targeted rehabilitation.
Ready to take control of your shoulder recovery?
About the Author: Dr. Joey Seyforth


