Shoulder Bursitis: 4 Simple Exercises to Reduce Inflammation and Get Pain-Free in Minutes
Are you struggling to reach overhead to grab something from a high shelf? Does lifting your arm across your body send shooting pain through your shoulder? If these simple movements have become daily challenges, you might be dealing with shoulder bursitis – a painful condition that affects thousands of people worldwide. Although the pain might feel localized to your shoulder joint, the real culprits are often hidden in connected areas like your shoulder blade mobility and rotator cuff stability. However, doing these exercises for shoulder bursitis pain can bring relief within a short while.
We’ll delve into the exercises after highlighting a few key points below.
Your shoulder doesn’t work in isolation. When your shoulder blade can’t move properly, it creates a domino effect that compresses the bursa (a fluid-filled sac between your joints). Similarly, when your rotator cuff muscles are weak or injured, your shoulder joint becomes unstable, leading to impingement and inflammation.
Just 10-15 minutes of targeted exercises daily can address both the mobility restrictions and stability issues causing your bursitis pain.
In 10-15 minutes a day, you can
- Reduce inflammation and pain when reaching overhead.
- Enhance your shoulder mobility for daily tasks like washing your hair or getting dressed.
- Improve stability to prevent future flare-ups.
- Create more joint space to eliminate that pinching sensation.
- Strengthen supporting muscles for long-term shoulder health.
- Get back to activities you’ve been avoiding due to pain.
Quick Reference Guide
- Total Time: 10-15 Minutes.
- Targets: Shoulder joint space, posterior capsule, rotator cuff, lower trapezius.
- Goals: Reduce inflammation, improve mobility, enhance stability.
The 4-Exercise Solution for Shoulder Bursitis Relief
Exercise 1: Banded Inferior Mobilization
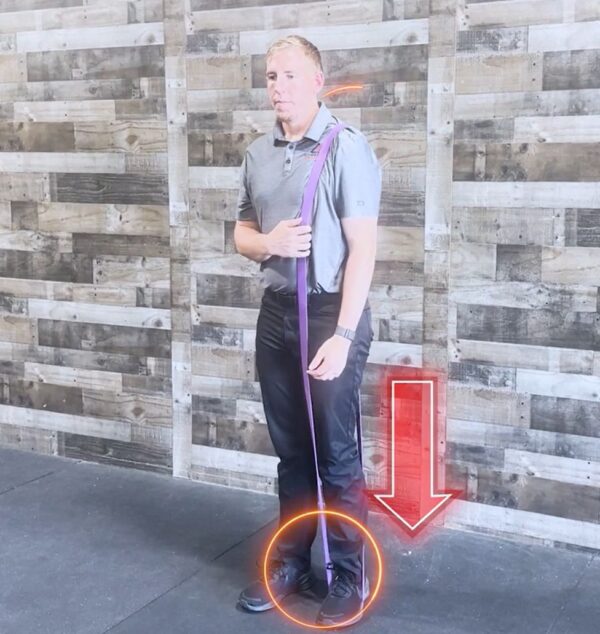
Purpose: Creates space in the shoulder joint by decompressing the bursa sac.
Equipment Needed: Resistance band.
How to Do It
- Stand on one end of a resistance band and place the other end over your affected shoulder.
- With the band pulling downward, slowly raise your arm straight out in front of you.
- Move through comfortable ranges of motion, avoiding any positions that increase pain.
- Focus on the gentle traction the band provides to decompress your shoulder joint.
Sets: 2 sets of 12 repetitions.
Tip: The band should create a gentle downward pull – if it’s too tight, step closer to reduce tension.
Exercise 2: Ball Posterior Capsule Mobilization

Purpose: Releases tension in the back of the shoulder capsule to improve cross-body movement.
Equipment Needed: Lacrosse ball or baseball, wall.
How to Do It
- Place the ball between your shoulder blade and a wall.
- Use the ball to anchor your shoulder blade in place.
- Bring your affected arm across your body while using your other hand to pull it further gently.
- You should feel a stretch in the back or side of your shoulder.
Sets: 15 repetitions.
Tip: Move slowly and breathe deeply – rushing through this movement reduces its effectiveness.
Exercise 3: Banded W Hold

Purpose: Strengthens the infraspinatus and teres minor muscles of the rotator cuff for better stability.
Equipment Needed: Resistance band.
How to Do It
- Hold a resistance band with both hands, elbows tucked by your sides.
- Pull the band apart by squeezing your shoulder blades together.
- Form a “W” shape with your arms while maintaining the squeeze.
- Hold the position while feeling tension in the back of your shoulder blades.
Sets: 2 sets of 4 repetitions with 5-second holds.
Tip: If your shoulders aren’t burning by the end, increase the hold time to 10 seconds for greater challenge.
Exercise 4: Prone I
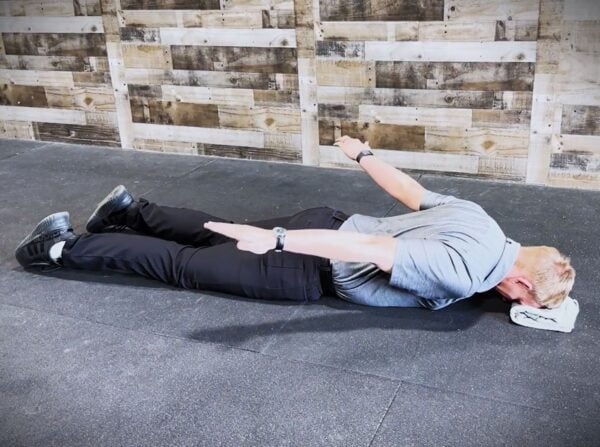
Purpose: Targets the posterior rotator cuff and lower trapezius to improve shoulder depression and reduce impingement.
Equipment Needed: None (floor space).
How to Do It
- Lie face down with your forehead resting on the ground.
- Place your arms by your sides with elbows straight.
- Lift both arms off the ground, forming an “I” shape with your body.
- Hold the top position for 3 seconds before slowly lowering.
Sets: 2 sets of 8 repetitions with 3-second holds.
Tip: Focus on lifting from your shoulder blades rather than straining your neck – you should feel activation between your shoulder blades.
Shoulder Bursitis Has To Go!
These four exercises work together as a comprehensive system, and if you do them consistently, you’ll be relieved. Many people notice reduced pain and improved range of motion within the first two weeks of consistent practice. Every person’s shoulder pain has unique contributing factors that require personalized assessment and treatment.
Although these exercises provide excellent relief for many people with shoulder bursitis, they often scratch the surface of addressing the root causes of your shoulder pain. If you’re tired of letting shoulder pain dictate what you can and can’t do, it’s time to get help from a professional.


")