
Fix Shoulder Bursitis for Good: 4 Exercises That Target the Real Problem
If you’ve been dealing with shoulder bursitis that keeps coming back no matter how much you rest, ice, or get cortisone shots, this post will be very helpful. Shoulder bursitis is a symptom, not the root cause of your shoulder pain.
Something deeper in the way your shoulder moves is what keeps squeezing and irritating it over and over again. This is why traditional treatments like rest, ice, physical therapy exercises, and cortisone injections often only provide temporary relief.
With just 15 minutes a day, you can
- Create immediate space and breathing room for your irritated bursa
- Restore proper shoulder blade mechanics to reduce pinching
- Strengthen the posterior rotator cuff to support healthy movement patterns
- Build shoulder stability that prevents future flare-ups
- Improve your ability to reach overhead and across your body pain-free
- Sleep through the night without shoulder discomfort
Quick Reference Box
- Total Time: 15 Minutes
- Targets: Shoulder joint, shoulder blade, posterior rotator cuff
- Goals: Pain reduction, improved mobility, movement pattern correction
Exercise 1: Banded Posterior Shoulder Mobilization
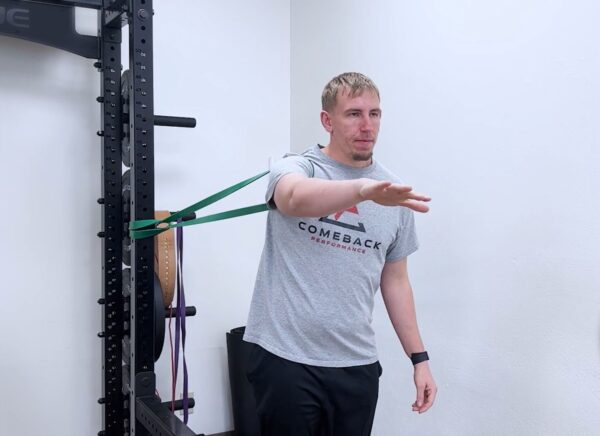
Purpose – To offload the front of your shoulder and give your bursa much-needed breathing room by decompressing the joint.
Equipment Needed: Resistance band, anchor point at shoulder height.
How to Do It
- Anchor the band at shoulder height and face away from the anchor point.
- Place the band around the front of your shoulder, near your armpit.
- Step forward until you feel a gentle backward pull on your shoulder.
- Move through a slow chest press motion, letting the band guide your joint—stay relaxed and don’t fight the band.
Sets: 2 sets of 15 reps.
Tip: If you’re muscling against the band, you’re working too hard. Let the band do the work.
Exercise 2 – Banded Scap Angels
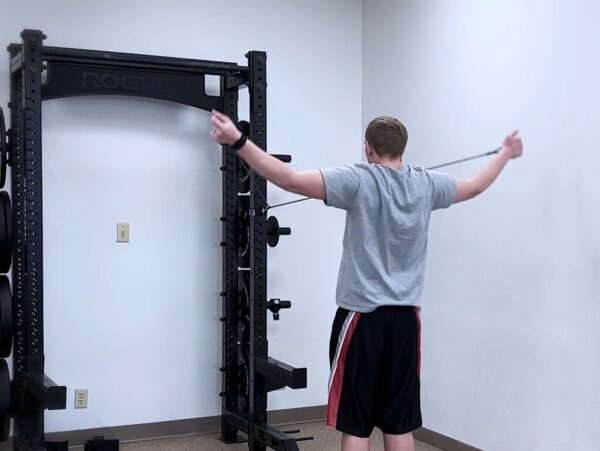
Purpose – To restore proper shoulder blade mobility and teach the upward rotation pattern that reduces bursa pinching.
Equipment Needed: Light resistance band, anchor point in front of you.
How to Do It
- Anchor a light band in front of you at chest height.
- Start with hands down toward your pockets, elbows straight.
- Raise your arms up and out into a wide “Y” position while pulling against the band.
- Keep your ribs down and focus on your shoulder blades tipping back and rotating upward.
Sets: 2 sets of 8-10 reps
Tip: Think “shoulder blades down and back” as you lift your arms. This teaches the proper scapular mechanics your shoulder needs.
Exercise 3 – Banded Extension with External Rotation

Purpose – To strengthen the posterior rotator cuff muscles that support healthy shoulder mechanics and reduce anterior shoulder stress.
Equipment Needed: Light resistance band
How to Do It
- Place a light band around both wrists behind your back.
- Pull the band apart to create tension between your wrists.
- While maintaining tension, move both arms slightly backward.
- Focus on feeling the back of your shoulders working, not your neck or front deltoids.
Sets: 2 sets of 10 reps.
Tip: Start with light resistance; this exercise is about activation and control, not maximum strength.
Exercise 4: Banded Bear Slider
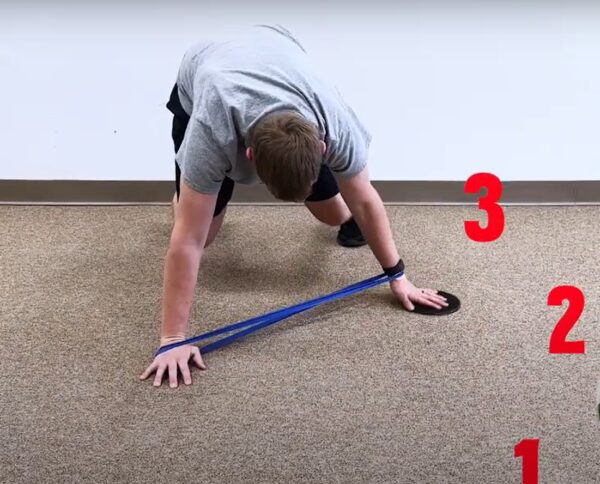
Purpose – To build integrated shoulder stability under load while teaching your shoulder to maintain proper position during movement.
Equipment Needed: Resistance band, smooth surface for sliding
How to Do It
- Get into a bear crawl position with the band around your wrists and knees slightly off the floor.
- Keep one arm stable while sliding the other hand in three directions: forward, out to the side, and diagonally.
- Maintain downward pressure through your support arm and don’t let your body twist
- Switch sides and repeat.
Sets: 3 sets of 5 slides in each direction per arm
Tip: Move slowly and focus on keeping your supporting shoulder locked in place. If you can’t maintain stability, reduce the range of motion.
Why This Approach Works When Others Fail
Traditional bursitis treatment focuses solely on the inflamed tissue—the “pillow” that’s getting squeezed. But calming the pillow doesn’t fix why it keeps getting crushed. Every shoulder has unique movement restrictions and compensation patterns. What works perfectly for one person may need modification for another.
The key to long-term success lies in identifying your specific movement dysfunctions and addressing them systematically. This is why a comprehensive assessment of your “Big Five” areas—neck, thoracic spine, shoulder blade, shoulder joint, and nerves—is crucial for lasting results.
About the Author: Dr. Joey Seyforth


