
The Truth About Rotator Cuff Tears: Why Your MRI Isn’t Telling the Whole Story
Your MRI results don’t have to be a life sentence, especially if you’re over 40 and have been told your MRI shows a rotator cuff tear. You’ve likely heard the same discouraging advice: stop lifting weights, book surgery, or just “live with it.” Meanwhile, you’re struggling to sleep on that shoulder, can’t lift without pain, and feel like your active lifestyle is slipping away.
The real problem isn’t just your rotator cuff; it’s that most people (including many healthcare providers) don’t understand how your shoulder actually works as part of a larger system.
In this article, I’ll reveal three truths about rotator cuff tears that your MRI doesn’t show, teach you simple tests to assess your actual shoulder function, and share the exact exercises that helped my client return to whitewater kayaking and mountain biking, despite having a “bad” MRI showing a torn supraspinatus with 14mm retraction.
Quick Reference Box
- Total Time: 15-20 Minutes.
- Targets: The neck/nerves, thoracic spine, shoulder blade, shoulder joint, and the loading patterns.
- Goals: Pain reduction, improved mobility, system-wide shoulder strength
3 Simple Home Tests for Your Shoulder
Use these “pain rules” to test your shoulders before starting any exercise program.
- Green (0-1/10) – Feels good, push zone
- Yellow (2-4/10): Uncomfortable but tolerable, generally okay with modifications
- Red (6+/10) – Sharp or lingering pain, back off or modify
Test 1 – The Overhead Reach Test
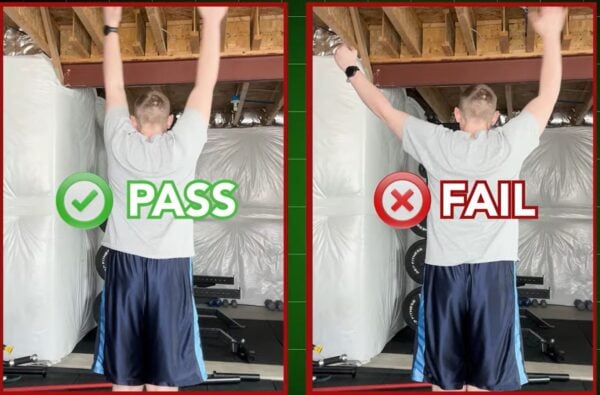
Purpose: Assess your ability to reach overhead without compensation
How to Do It
- Stand tall with thumbs pointing up.
- Slowly raise your arm straight to the side and up overhead.
- Try to get as close to your ear as comfortable without leaning back.
What to Look For: Can you get reasonably close to your ear? Is it a smooth pull or a pinch/catch sensation?
Pass: An overhead movement with mild discomfort that settles quickly.
Test 2 – The Bench Extension Test
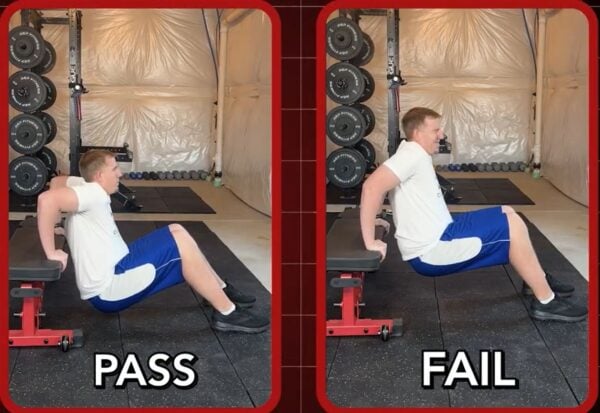
Purpose: Check your range for movements like dips and bench press.
How to Do It
- Sit on the edge of the bench or sturdy chair.
- Then place your hands behind you on the surface, fingers pointing away.
- Walk feet out and slowly lower like a shallow dip.
What to Look For: Can elbows approach 90° without sharp front shoulder pain?
Pass: Good range without red zone pain.
Test 3 – External Rotation Test
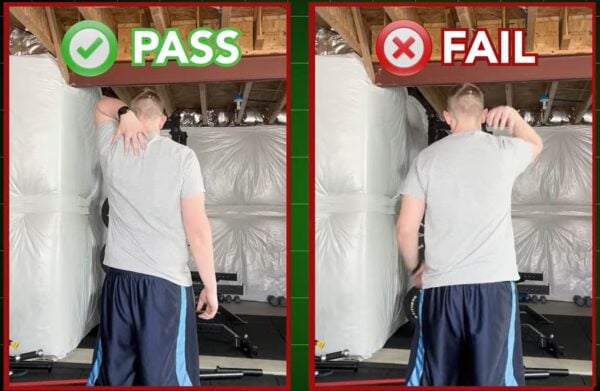
Purpose: Evaluate shoulder mobility.
How to Do It
- Lift arm out in front of your
- Bench elbow and reach arm as far back down your upper back.
- Compare to the other side.
What to Look For: Pain location, weakness, or instability compared to the other side
Pass: Good control without sharp pain.
The Big 5 Exercise System
Exercise 1: Banded Wall Open Books
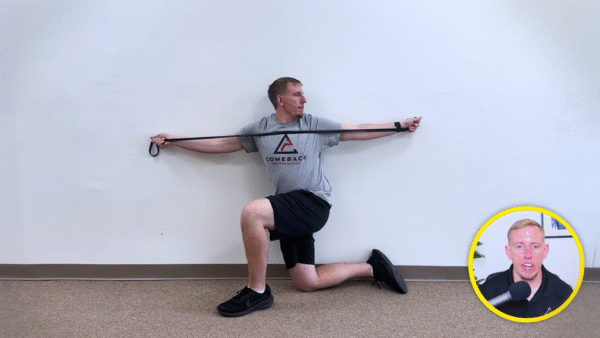
Purpose – to free up your thoracic spine so your shoulder has room to move.
Equipment Needed: Resistance band.
How to Do It
- Anchor band at chest height, stand sideways to the wall.
- Hold the band with the outside hand, the inside hand on the hip.
- Rotate the chest open like opening a book.
- Keep hips facing forward.
Sets: 2-3 sets of 10-12 reps each side.
Tip: Focus on rotating through your upper back, not your lower back.
Exercise 2: Banded Scap Angels
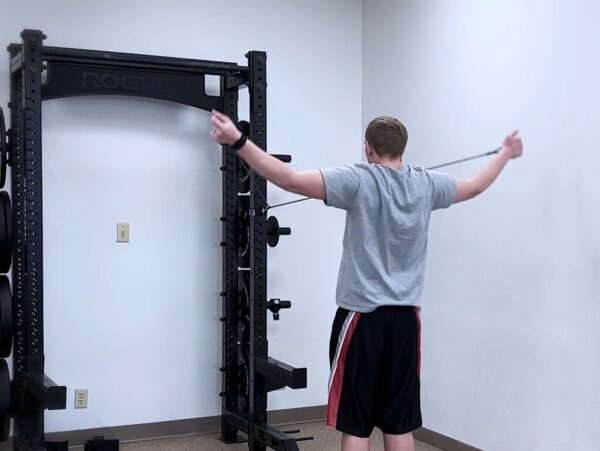
Purpose: Train shoulder blade movement for better overhead motion.
Equipment Needed: Resistance band.
How to Do It
- Face band anchored at chest height.
- Arms start down by the sides.
- Sweep arms up and out into a big Y position.
- Let shoulder blades tip back and rotate up.
Sets: 2-3 sets of 12-15 reps.
Tip: Think about your shoulder blades gliding around your ribs, not just pinching together.
Exercise 3: Posterior Shoulder Extension

Purpose: Wake up the back of your shoulder for better joint centering.
Equipment Needed: Light resistance band.
How to Do It
- Hold the band behind your back with both hands.
- Gently pull hands apart.
- Extend arms slightly backward.
- Hold for 2-3 seconds.
Sets: 2-3 sets of 10-12 reps.
Tip: This should feel like gentle activation, not a max effort exercise.
Exercise 4: Kettlebell Pull-Throughs
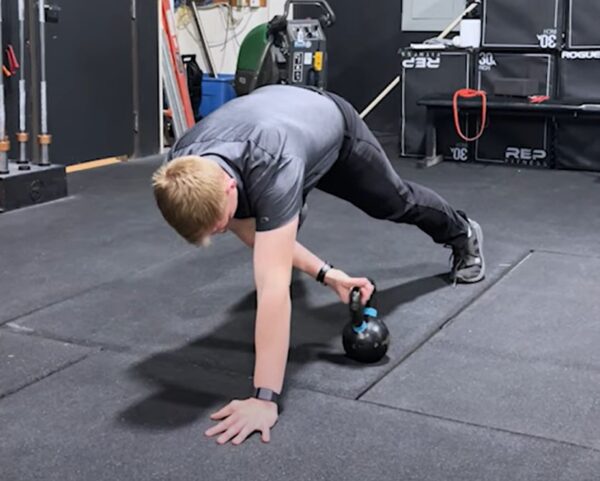
Purpose: Build shoulder stability in positions closer to real lifting.
Equipment Needed: Light kettlebell (or dumbbell).
How to Do It
- Start in high plank or elevated plank position.
- Place the kettlebell to one side.
- Reach under with the opposite hand to drag it across.
- Alternate sides, maintaining a stable plank.
Sets: 2-3 sets of 8-10 passes each direction.
Tip: Keep your hips level—the movement comes from the shoulder, not twisting your body.
The 3 Truths Your MRI Doesn’t Tell You
Truth #1: Your MRI Is a Picture, Not a Permission Slip
Your MRI shows how tissues look, not how they function. Plenty of people have rotator cuff tears on imaging with zero pain, while others have “perfect” MRIs but can’t lift a coffee mug without wincing.
Studies show that in people over 40, it’s actually common to see tears, tendinosis, or degeneration in people who are lifting, working, and sleeping just fine. The scan doesn’t reveal:
- How strong your shoulder actually is
- How well do your upper back and shoulder blades move
- How your nervous system responds to load
The real question isn’t “What does my MRI show?” It’s “What can my shoulder do, and how does it feel when I do it?”
Truth #2: Your Rotator Cuff Is Only 1 Part of the Big 5 System
Most treatment approaches fail because they focus solely on the rotator cuff. But your shoulder operates within a five-part system:
- Neck and nerves – Control sensitivity and function downstream
- Thoracic spine (upper back) – Creates space for shoulder movement
- Shoulder blade – The foundation for all shoulder motion
- Shoulder joint – Where the tear shows on imaging
- Loading patterns – How you use it (bench press, rows, daily activities)
When your upper back is stiff, your shoulder blade doesn’t rotate properly, and your nerves are on edge, your rotator cuff works overtime. No wonder it hurts!
Truth #3: After 40, Smart Training Beats Doing Nothing
Waiting for a “magic surgery date” while avoiding all activity often makes things worse. The longer you rest:
- Your joint gets stiffer
- Your Big 5 system gets weaker and tighter
- Your pain sensitivity actually increases
- Your shoulder becomes more guarded and fearful of movement
The goal isn’t to ignore pain and push through—it’s to understand what your shoulder can do now and train intelligently within safe zones.
Making The Difference
If you want to see significant improvements in your shoulder health, practice this while respecting your pain rules and progressively loading your shoulder with what it can handle. And if you’ve tried physical therapy, taken time off from the gym, or even had injections without lasting relief, it might be time for a comprehensive Big 5 approach tailored to your specific situation.
About the Author: Dr. Joey Seyforth


