Why Your Shoulders Hurt After Push-Ups (And How to Fix It)
Despite being one of the most basic exercises, push-ups send thousands of people to physical therapy every year with shoulder pain and impingement issues. Your shoulder pain during push-ups isn’t about the exercise being “too advanced” for you. The real problem runs deeper than your shoulder joint itself.
The solution isn’t switching to knee push-ups forever or avoiding the exercise entirely. With just a few mobility exercises like the ones we shared in this blog post, you can address the root cause and return to full push-ups without pain.
Quick Reference Box
- Total Time: 10 Minutes
- Targets: Shoulder joint, shoulder blade, rotator cuff
- Goals: Increase mobility, build control, eliminate pain
Quick Self-Assessment
Before starting the exercises, let’s identify where your limitations are
Test 1: Shoulder Extension Bench Test
Sit on the edge of a bench or chair with your hands behind you, fingers pointing away. Scoot forward and lower down slightly. Can you comfortably bend your elbows to about 45° without pain? This tests the 20-25° of extension needed for push-ups. Pain or difficulty reaching this range indicates a lack of basic push-up mobility.
Test 2: 90/90 Internal Rotation Test
Bring your arm up like you’re throwing a ball, with your elbow at 90°. Rotate your hand down toward the floor. Your hand should easily reach past horizontal (55-65° for push-ups). The limited range here makes the bottom of your push-up feel unstable.
Exercise Breakdown
Exercise 1: Banded Posterior Mobilization
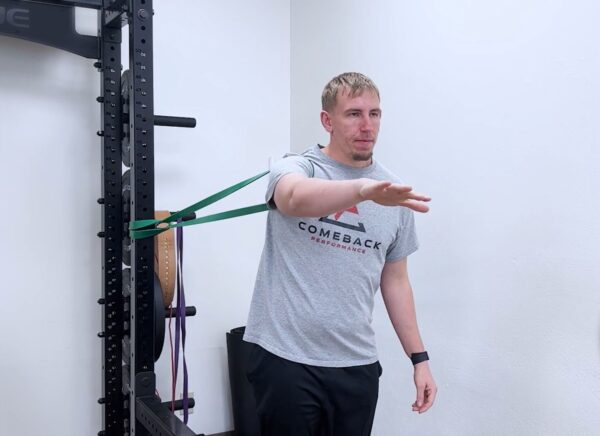
Purpose: Opens up the shoulder capsule to improve joint mobility and teaches proper movement patterns
Equipment Needed: Resistance band and anchor point at shoulder height.
How to Do It
- Attach the band at shoulder height and face away from the anchor point.
- Place the band around the front of your shoulder, close to your armpit.
- Step forward to create tension, allowing the band to pull your shoulder back.
- Perform small bench press motions, letting the band guide your shoulder into a better position.
Sets: 2 sets of 15-20 reps.
Tip: Move slowly and controlled—the band is creating space in the joint while teaching your shoulder the correct path for push-ups.
Exercise 2: External Rotation Eccentric
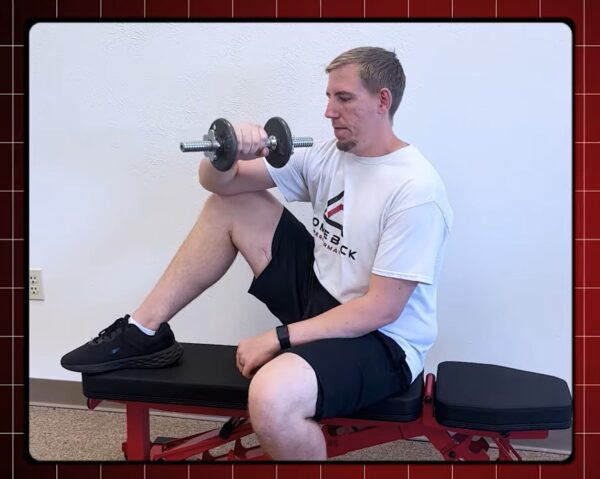
Purpose: Builds control in the internal rotation pattern needed at the bottom of push-ups.
Equipment Needed: Light dumbbell (2-5 lbs).
How to Do It
- Sit with your elbow resting on your knee and hold the dumbbell.
- Slowly lower your hand into internal rotation, taking 3-4 seconds.
- Once at the bottom, use your other hand to assist in returning the weight.
- Focus entirely on the slow, controlled lowering phase.
Sets: 2 sets of 8 reps.
Tip: This isn’t about the weight—focus on building control during the slow eccentric phase, when most people lose stability.
Exercise 3: Crab Rock
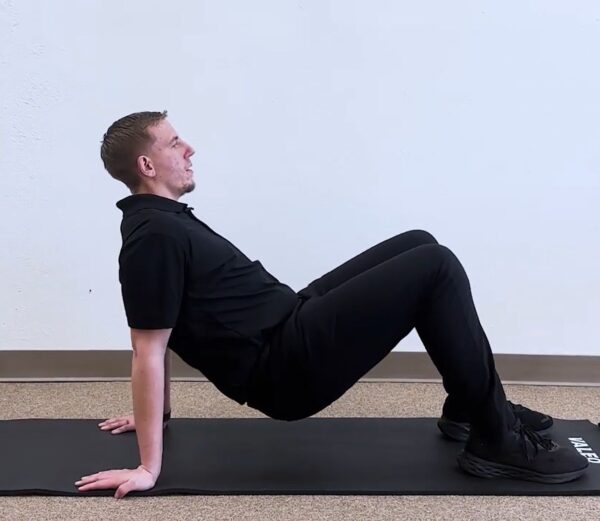
Purpose: Trains extension and shoulder blade control together in a functional pattern.
Equipment Needed: None (can use bench or chair for modifications).
How to Do It
- Sit with your hands behind you and lift into a reverse tabletop position.
- Rock forward and backward, allowing your shoulders to move through push-up extension range.
- Focus on smooth, controlled movement while maintaining the tabletop position.
- Keep your shoulder blades engaged throughout the movement.
Sets: 2 sets of 10 rocks.
Tip: To make it easier, bring your feet closer or perform on an elevated surface like a bench. The key is building end-range control, not struggling through the movement.
Your Progressive Return to Full Push-Ups
Follow this progression strategy while building this new mobility and control,
- Wall Push-ups: Start here to limit load while building pattern.
- Incline Push-ups: Use a bench to increase difficulty gradually.
- Knee Push-ups: Focus on perfect form over quantity.
- Full Push-ups: Only when you can pass both self-tests pain-free.
The key is matching difficulty to your current ability level. Forcing push-ups before you’re ready keeps you trapped in the pain cycle.
Retest and Track Your Progress
After completing the exercise sequence, retest both assessments:
- Extension test: Notice even a 10% improvement in range or comfort
- Internal rotation test: Look for smoother, less restricted movement
Any improvement proves the exercises are working. Consistency with these movements will transform your push-ups from painful to powerful.
Your Next Steps
For most people experiencing shoulder pain during push-ups, these three exercises are an excellent starting point. However, lasting relief requires addressing all five areas of the shoulder system through comprehensive movement assessment. With proper mobility work and progressive loading, even people with shoulder replacements have returned to full push-ups on their toes.


")