SLAP Tear Diagnosis: Why Surgery Isn’t Your Only Option (4 Exercises to Start Today)
If your MRI shows a SLAP tear and you’ve been told to stop lifting and avoid overhead movements, or schedule surgery immediately, pause. That scan is just a snapshot; it doesn’t show your movement patterns, strength potential, or the stability you can build around that tear.
SLAP tears don’t automatically sentence you to surgery or a life of limitations. Your shoulder is part of an interconnected system, and when we address the whole chain, remarkable recoveries happen.
With the exercises we’ve shared in this blog, you can address the chain reaction that causes your shoulder discomfort.
Quick Reference Box
Total Time: 15 Minutes Daily
Target: To improve your shoulder stability system, rotator cuff, thoracic spine, and shoulder blade mechanics.
Goals: Pain reduction, movement confidence, functional strength
Before you begin, try this simple test and consider the traffic-light system below.
At-Home Assessment: O’Brien’s Active Compression Test
This isn’t a diagnosis, but it provides valuable clues. To do it,
- Stand tall with your affected arm extended in front.
- Turn your thumb downward (as if pouring from a can).
- Have someone apply pressure to your wrist while you resist.
- Notice pain location and intensity.
- Repeat with thumb up and compare.
What it means: If pain is worse with the thumb down and feels deep in the shoulder, but improves with the thumb up, this suggests possible labral involvement. Remember—this is one piece of information, not the complete picture.
The Traffic Light Pain System
Before starting these exercises, understand our safety approach:
- 🟢 GREEN: Good feeling, working muscles, mild discomfort—generally okay to proceed
- 🟡 YELLOW: Slight increase in discomfort that settles within 24 hours—monitor closely
- 🔴 RED: Sharp, catching pain that spikes and lingers—back off immediately.
The Exercises
Exercise 1: Leaning Slider Wall Axial Rotation

Purpose: To improve your shoulder rotation without joint compression while improving control.
Equipment Needed: Wall space, optional slider or towel.
How to Do It
- Stand facing a wall with your affected arm extended, hand flat against the surface.
- Lean gently into that arm so your shoulder is supported.
- Rotate your forearm like a windshield wiper—down toward internal rotation, up toward external rotation.
- Keep movements small and controlled, staying within pain-free ranges.
Sets: 2-3 sets of 8-10 slow rotations.
Tip: Focus on smooth, controlled movement that teaches the shoulder and shoulder blade to work together.
Exercise 2: Angels Over Cones

Purpose: Build shoulder blade and rotator cuff control without aggressively loading the labrum.
Equipment Needed: 3 small objects as targets (cones, water bottles, etc.)
How to Do It
- Place three objects in different positions as movement targets.
- Lie face down and lift your arms up and over these positions.
- Move slowly and controlled, focusing on smooth arcs rather than maximum range.
- Keep your ribs down and avoid over-arching your back.
Sets: 2 sets of 5 movements down and back.
Tip: Quality beats quantity—worry less about how high your arms go and more about the smoothness of movement.
Exercise 3: Banded External Rotation + Extension

Purpose: Strengthen the posterior rotator cuff and improve shoulder extension for pressing and pulling.
Equipment Needed: Resistance band
How to Do It
- Place a band around your wrists with your arms behind your back.
- Create tension by pulling the band apart.
- Move shoulders into extension while maintaining band tension.
- Control the movement in both directions—no jerking motions.
Sets: 2-3 sets of 8-10 repetitions.
Tip: Try to feel this exercise in the back of your shoulders, not your neck.
Exercise 4: Shoulder Taps
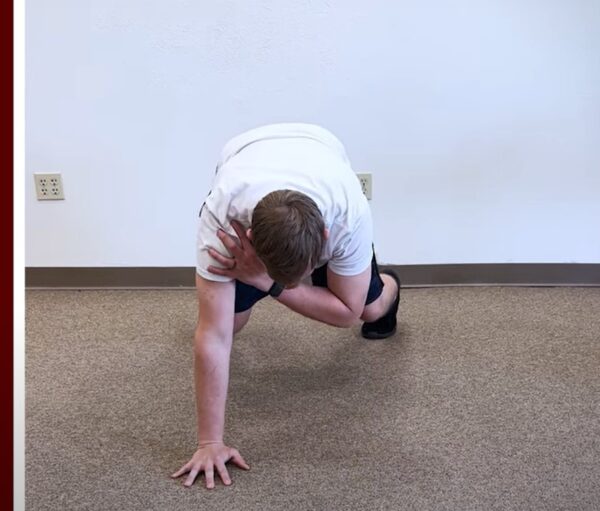
Purpose: To build closed-chain stability so your shoulder can confidently support your body weight.
Equipment Needed: None (optional: bench or countertop for modification).
How to Do It
- Get into a push-up position (or use an elevated surface if needed).
- Place your feet slightly wider to increase stability.
- Shift weight slightly and tap the opposite shoulder with one hand.
- Switch sides while keeping your torso as still as possible.
Sets: 2 sets of 8-10 taps per side.
Tip: Start slow and prioritize control over speed. Avoid big hip swings—the challenge is maintaining stability while moving one arm.
Understanding SLAP Tears: What They Really Mean
What Is a SLAP Tear? A SLAP (Superior Labrum Anterior to Posterior) tear affects the cartilage rim at the top of your shoulder socket where the bicep tendon attaches. Common symptoms include
- Deep, aching shoulder pain
- Catching or pain with overhead movements
- Cross-body position discomfort
- Clicking, popping, or instability sensations
- Feeling like your shoulder “doesn’t trust” certain ranges
Labral tears are incredibly common, especially in active adults. Many people with confirmed tears on MRI experience zero shoulder pain. Your labrum is just one piece of a larger stability puzzle—when the muscles and mechanics around it are solid, your shoulder often functions beautifully despite the tear.
Why Surgery Isn’t Always the Answer
SLAP surgery typically uses anchors to reattach or tighten the labrum. While this can help with severe traumatic instability, the trade-offs include:
- Lost external rotation range (crucial for throwing, overhead sports, back squats)
- Tighter, more stressful overhead movements post-surgery
- No automatic improvement in movement patterns
The bigger problem? For most active adults, the issue isn’t the torn labrum—it’s that the shoulder never had adequate stability and control from the surrounding system.
Don’t Let a Diagnosis Define Your Future
If your SLAP tear has you thinking “I’m screwed” or “I’ll never lift or play overhead again,” that’s not the end. The key is addressing the system, not just the structure. When we improve how your neck, thoracic spine, shoulder blades, and nerves work together, remarkable things happen, even with confirmed tears on imaging.
Perform these exercises daily, adhere to the traffic-light pain system, and focus on gradual improvements in your shoulder. Have a session with our professional.


")