Stop Shoulder Impingement Pain: 3 Simple Exercises for Immediate Relief
Do you wince every time you reach overhead to grab something from a shelf? Does putting on a shirt or reaching behind your back send sharp pain shooting through your shoulder? If you’re nodding along, you’re likely dealing with shoulder impingement – one of the most common yet misunderstood shoulder conditions that affects millions of people daily. I’ve put together the top 3 shoulder impingement exercises you can do at home and get rid of the pain!
The root cause often stems from a complex web of mobility restrictions throughout your upper body although the pain manifests in the front of your shoulder, t. Your thoracic spine, neck, and posterior shoulder capsule all play crucial roles in how your shoulder functions. When your thoracic spine loses mobility, your shoulder blade can’t move properly. When your neck gets stiff from poor posture, it affects shoulder positioning. When the back of your shoulder capsule tightens up, it forces other structures to compensate. This creates a domino effect that leads to compression of your rotator cuff tendons and bursae – resulting in that familiar shoulder impingement pain.
You can begin addressing the root causes of your shoulder impingement and experience noticeable relief – often within the first session by doing these exercises.
Quick Reference Guide
- Total Time: 10 Minutes.
- Targets: Posterior shoulder capsule, thoracic spine, cervical spine.
- Goals: Pain reduction, improved mobility, restored function.
Exercise Breakdown
Exercise 1: Ball Posterior Capsule Mobilization
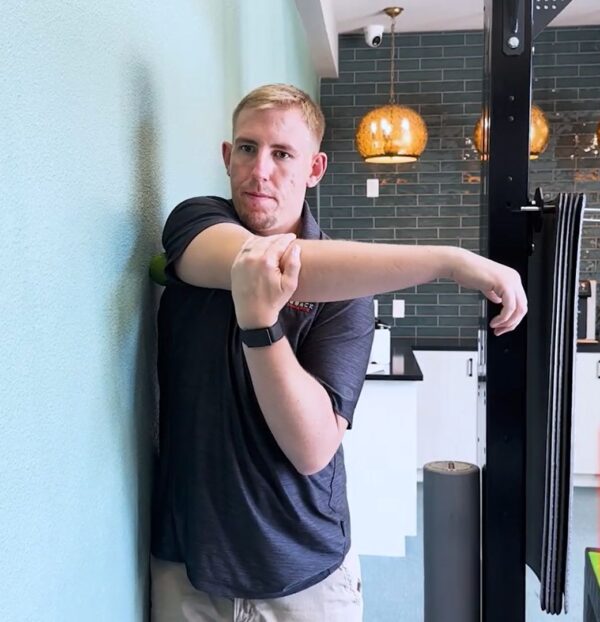
Purpose: Release tension in the back of the shoulder to improve forward and across-body movement.
Equipment Needed: Tennis ball, lacrosse ball, or baseball + wall.
How to Do It
- Place the ball between your shoulder blade and the wall.
- Bring your arm across your chest, pulling it through with your opposite hand.
- Hold for 2-3 seconds, then release and repeat.
- Focus on the stretch in the back of your shoulder, but don’t force into pain.
Sets: 20 repetitions
Tip: Let your shoulder’s current range of motion guide you – don’t force the movement beyond what feels comfortable today.
Exercise 2: Wall Open Book

Purpose: Restore thoracic spine mobility to improve shoulder blade movement and positioning.
Equipment Needed: Wall
How to Do It
- Get into a half-kneeling position with the knee furthest from the wall down.
- Keep your hip connected to the wall throughout the movement.
- Rotate your hand away from the wall, following it with your eyes.
- Focus on opening up through your mid-back and shoulders.
Sets: 12 repetitions each side.
Tip: Keep your hip glued to the wall to ensure you’re getting true thoracic rotation rather than compensating through your lower back.
Exercise 3: Chin Tuck for Cervical Mobility

Purpose: To improve neck positioning and mobility to optimize shoulder function.
Equipment Needed: None
How to Do It
- Use two fingers to guide your chin straight back into a retracted position.
- Avoid tilting your head up or down – move purely in the horizontal plane.
- Hold for 2-3 seconds, feeling the stretch in the back of your neck.
- Return to the starting position and repeat.
Sets: 2 sets of 12 repetitions with 2-3 second holds.
Tip: Think about creating length in the back of your neck rather than just pulling your chin back – this ensures proper cervical alignment.
Test Your Progress: The Hawkins-Kennedy Retest
After completing these three exercises, it’s time to see how you’ve improved. Return to the Hawkins-Kennedy test
- Bring your arm into forward flexion (90 degrees in front of you).
- Bend your elbow to 90 degrees.
- Use your other hand to provide gentle pressure, internally rotating your shoulder.
- Compare the pain level and range of motion to your initial test.
What to Look For. These improvements indicate that you’ve successfully addressed some of the mobility restrictions contributing to your shoulder impingement.
- Decreased pain in the front of your shoulder.
- Increased range of motion.
- Improved tolerance to the test position.
Your Next Steps to Lasting Relief
These exercises work best when performed daily. The improvements you feel after your first session are just the beginning – consistent practice over the next few weeks will compound these benefits and help prevent future flare-ups. Although these exercises are a great start they are not the final solution for front shoulder pain.
A movement assessment can pinpoint the big 5 areas that impact shoulder pain and a proper plan that is needed to address the root cause and prevent the pain from coming back in the future.
Get assessed now!


")