Can You Heal a Rotator Cuff Tear Without Surgery? (YES—Here’s How)
If you’ve been told you have a rotator cuff tear, you’ve probably also been told that surgery is your only option for real relief. The truth is, there are some exercises to heal a rotator cuff tear without surgery that you can do instead of surgery. And doing them will take care of that sharp, stabbing pain when you reach overhead for a coffee mug, the aching throb that keeps you awake at night when you roll onto your shoulder, and the frustrating inability to throw a ball with your kids or complete a simple workout without wincing.
You can heal a rotator cuff tear without going under the knife, especially when you understand what your rotator cuff actually does and target the right muscles with the right approach.
The problem isn’t just the tear itself – it’s the chain reaction it creates throughout your entire shoulder complex. When one part of your rotator cuff fails, the other muscles compensate poorly, leading to muscle imbalances, joint instability, and that persistent pain that seems to get worse over time. Your shoulder joint starts operating like a car with misaligned wheels – everything wears down faster, and nothing moves smoothly.
Your rotator cuff is designed to work as a coordinated team of four muscles. When you strengthen and retrain them to work together again, you can restore proper shoulder mechanics, eliminate pain, and get back to the activities you love—all without surgery.
With just 15-20 minutes a day, you can
- Eliminate shoulder pain during overhead movements like reaching, throwing, or lifting.
- Restore a full range of motion without that catching or pinching sensation.
- Rebuild functional strength for real-world activities and sports.
- Improve sleep quality by reducing nighttime shoulder pain.
- Prevent future injuries by creating lasting shoulder stability.
- Avoid surgery, injections, and expensive treatments that only mask the problem.
Quick Reference Guide
- Total Time: 15-20 Minutes.
- Targets: All four rotator cuff muscles, scapular stabilizers, and shoulder joint mechanics.
- Goals: Pain reduction, joint stability, functional strength restoration.
Four Powerful Exercises to Heal Your Rotator Cuff
These four movements are specifically designed to retrain your rotator cuff’s coordination, rebuild stability, and eliminate pain. They’re simple enough to do at home but incredibly effective at addressing the root cause of your shoulder problems.
Exercise 1: Banded W Hold

Purpose: Activates the posterior rotator cuff and builds endurance for joint stability.
Equipment Needed: Light resistance band.
How to Do It
- Hold a light resistance band with both hands, palms facing up, elbows tucked by your sides.
- Pull the band apart to create a “W” shape with your arms, squeezing your shoulder blades together.
- Hold this position while maintaining the squeeze, feeling the burn in the back of your shoulders.
- Keep your elbows glued to your sides throughout the entire hold.
Sets: 3 sets of 10-15 second holds.
Tip: This exercise should create a burning sensation in the back of your shoulders (infraspinatus and teres minor). If you don’t feel this, increase the band tension or check your form.
Exercise 2: Subscapularis Punch

Purpose: Strengthens the front stabilizer and pulls the shoulder joint into proper alignment.
Equipment Needed: Resistance band anchored at hip height.
How to Do It
- Stand sideways to an anchored band, holding the handle with your inside hand.
- Keep your elbow tucked against your side and start with your hand positioned across your body.
- “Punch” straight up toward the ceiling, bringing your hand near your ear.
- Control the movement slowly back to the starting position.
Sets: 2 sets of 12 reps on each side.
Tip: Focus on the upward punching motion while keeping your elbow close to your body. This creates the internal rotation strength that’s often missing in shoulder rehab programs.
Exercise 3: Banded Scapular Angels
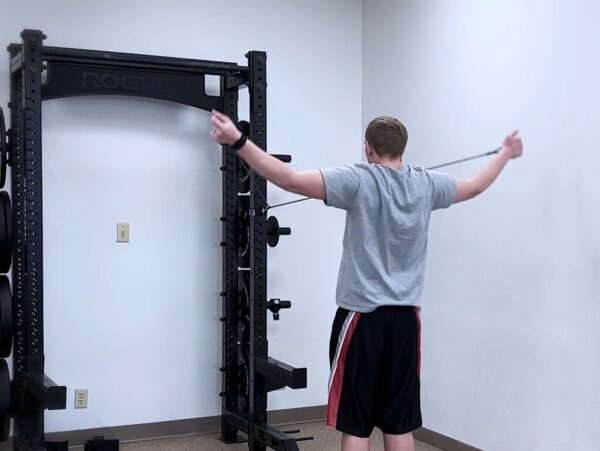
Purpose: Builds external rotation strength while improving scapular control and positioning.
Equipment Needed: Resistance band anchored at chest height.
How to Do It
- Face the anchor point with arms extended straight out in front, holding the band handles.
- Pull the band back by bringing your hands toward your pants pockets, keeping your arms straight.
- Continue the movement by raising your arms out to the sides into an “angel” position.
- Bring your biceps up toward your ears, then reverse the movement back to the starting position.
Sets: 2 sets of 10 reps, moving smoothly and steadily.
Tip: This exercise combines external rotation strength with scapular posterior tilt—two critical components for safe overhead movement. Focus on smooth, controlled movement rather than speed.
Exercise 4: Shoulder Taps
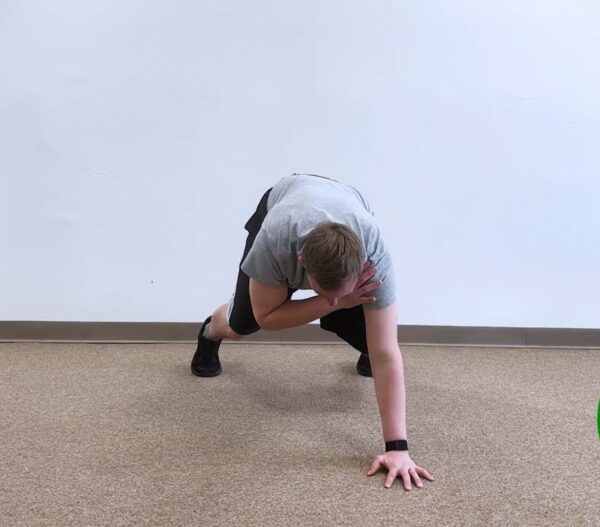
Purpose: Develops dynamic rotator cuff stability under real-world loading conditions.
Equipment Needed: None (use stairs or a bench for modification).
How to Do It
- Get into a plank position with your hands directly under your shoulders.
- Lift one hand and tap the opposite shoulder, then return to the plank.
- Alternate sides while keeping your hips level and core engaged.
- If it’s too challenging from the full plank, elevate your hands on the stairs or a bench.
Sets: 3 sets of 8-12 reps per side.
Tip: The key is maintaining torso stability—don’t let your hips sway or rotate. This teaches your rotator cuff to stabilize dynamically, which is exactly what it needs to do in daily activities.
Understanding Your Rotator Cuff: The Four-Muscle Team
Before diving into the exercises, it’s crucial to understand what you’re actually training. Your rotator cuff isn’t just one muscle – it’s a sophisticated team of four muscles working together to keep your shoulder joint stable and pain-free.
The Supraspinatus: Your Shoulder’s Starter Motor
This muscle sits on top of your shoulder blade and is responsible for initiating the first 15 degrees of arm elevation. It’s the most commonly torn rotator cuff muscle because it faces the most stress during overhead movements. But here’s what’s important: its real job isn’t just lifting your arm. It’s keeping your upper arm bone (humeral head) pulled snugly into the shoulder socket, especially when you’re carrying weight or moving dynamically.
The Infraspinatus: Your Posterior Stabilizer
Located on the back of your shoulder blade, this muscle handles external rotation (turning your arm outward). More importantly, it prevents your shoulder from drifting forward—a common problem in our forward-head, rounded-shoulder society. When the infraspinatus is weak, your shoulder loses its posterior anchor.
The Teres Minor: Your Fine-Tuning Specialist
This smaller muscle works alongside the infraspinatus to provide external rotation and helps stabilize the joint during dynamic movements. Think of it as your shoulder’s precision instrument—it fine-tunes movement patterns and provides stability in challenging positions.
The Subscapularis: Your Front-Line Defense
Sitting on the front surface of your shoulder blade, this muscle controls internal rotation and serves as your shoulder’s front-line defense. It keeps the ball from sliding forward in the socket—a critical function that’s often overlooked. If you experience front shoulder pain, there’s a good chance your subscapularis is weak and not doing its job.
Together, these four muscles work like a pit crew, keeping your shoulder joint centered—imagine a golf ball sitting perfectly on a tee. Your larger muscles (deltoids, lats, pecs) provide the power to move your arm, but the rotator cuff keeps everything stable and aligned. When any one of these muscles is weak, injured, or not firing properly, that golf ball starts sliding around, creating impingement, pain, and further injury.
Why Most Rotator Cuff Rehab Fails
If you’ve tried physical therapy before and didn’t get lasting results, you’re not alone. Most traditional rotator cuff rehabilitation focuses on the wrong things. You probably received a generic list of stretches, some basic strengthening exercises with light weights, and maybe some band work. While these aren’t inherently bad, they miss the fundamental point: you need to teach your entire rotator cuff to stabilize your shoulder under real-world loads.
The problem with most approaches is that they treat symptoms rather than addressing the root cause. More stretching won’t help if your shoulder isn’t stable. Random strengthening won’t work if your muscles aren’t learning to coordinate properly. And generic exercises can’t address your specific movement patterns and compensations.
What you need is targeted stability-first activation—exercises that teach your rotator cuff muscles to work together as a team while gradually building strength and endurance under progressively challenging conditions.
Your Path to Pain-Free Shoulders
You don’t have to accept shoulder pain as part of aging, and you don’t need surgery to heal a rotator cuff tear. When you understand that your rotator cuff works as a coordinated team and trains all four muscles together—not just the one that hurts—you can restore proper shoulder mechanics and eliminate pain naturally.
Even after your first session, you may notice improved shoulder positioning and reduced tension. These exercises work by retraining movement patterns your body has forgotten.
While these exercises provide an excellent foundation, complete rotator cuff rehabilitation often requires progressive loading, sport-specific training, and addressing movement patterns throughout your entire kinetic chain.
If you’ve tried physical therapy, chiropractic care, injections, or even surgery without lasting results, it may be time for a more targeted approach.


")