Stop Shoulder Impingement Pain Instantly: 4 Proven Exercises That Actually Work
Do you wince every time you reach overhead for a coffee mug? Does that sharp pinch in the front of your shoulder wake you up at night when you roll over? You’re not alone. Shoulder impingement affects millions of people, turning simple daily activities into painful ordeals. You can do these exercises for shoulder impingement pain relief at home and get some relief.
That nagging shoulder pain isn’t just “something you have to live with.” The even better news? You can start feeling relief in just minutes with the right approach.
Your shoulder pain isn’t just about your shoulder. It’s a complex chain reaction involving your shoulder blade movement, rotator cuff stability, and joint positioning. When one link in this chain breaks down, the entire system compensates – and that’s when impingement strikes.
Most people focus on stretching or strengthening the wrong areas, which is why their pain keeps coming back. But when you address the root causes in the right order, you can break this painful cycle for good.
With just 15 minutes a day, you can
- Eliminate that sharp pinching sensation when reaching overhead.
- Sleep through the night without shoulder pain waking you up.
- Press, pull, and lift without fear of triggering pain.
- Restore the full range of motion for everyday activities.
- Build lasting stability to prevent future flare-ups.
- Get back to your favorite activities with confidence.
Quick Reference Guide
- Total Time: 15 Minutes.
- Targets: Shoulder joint, rotator cuff, and shoulder blades.
- Goals: Immediate pain relief, restored mobility, long-term stability.
The 4-Step Shoulder Impingement Fix
Exercise 1: Banded Posterior Glides
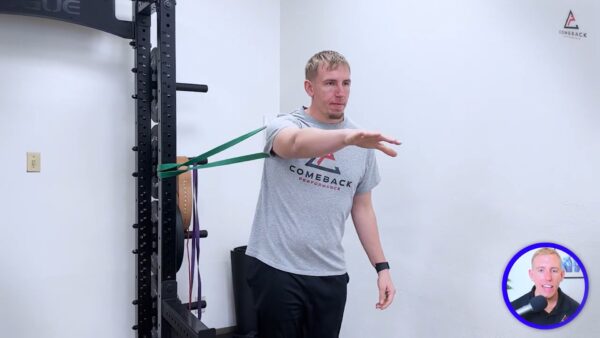
Purpose: Create immediate space in the crowded shoulder joint to relieve front-of-shoulder pain.
Equipment Needed: Resistance band, anchor point at shoulder height.
How to Do It
- Anchor the resistance band at shoulder height and face away from the anchor.
- Loop the band around the front of your shoulder and step forward to create tension.
- Gently move your arm in and out of a chest press motion, letting the band guide your shoulder back.
- Allow the band to glide your shoulder into better positioning while you move.
Sets: 2 sets of 15 reps.
Tip: Focus on feeling the space opening up in the front of your shoulder rather than forcing the movement. The band should do most of the work.
Exercise 2: Wall Slides

Purpose: Retrain proper shoulder blade mechanics so your arm can move freely overhead without impingement.
Equipment Needed: Wall.
How to Do It
- Stand facing a wall with one foot in front of the other.
- Place both hands on the wall with elbows slightly off the wall.
- Apply gentle pressure to the wall while sliding your arms upward as you lean your chest forward.
- Slowly return to the starting position, focusing on shoulder blade rotation.
Sets: 2-3 sets of 10-12 reps.
Tip: Think about your shoulder blades rotating up and around the ribcage rather than just moving your arms up the wall.
Exercise 3: Banded W Holds

Purpose: Activate and strengthen the rotator cuff muscles that provide crucial shoulder stability.
Equipment Needed: Light resistance band.
How to Do It
- Hold a light band with palms facing up and elbows at your sides.
- Pull the band apart into a “W” shape by squeezing your shoulder blades together.
- Hold this position for 5 seconds while keeping your shoulder blades engaged.
- Slowly return to the starting position with control.
Sets: 2 sets of 5-8 reps.
Tip: Your shoulders should feel like they’re burning by the end; that’s the rotator cuff activating properly when that sensation occurs. If it’s too easy, use a stronger band.
Exercise 4: Banded Bear Sliders
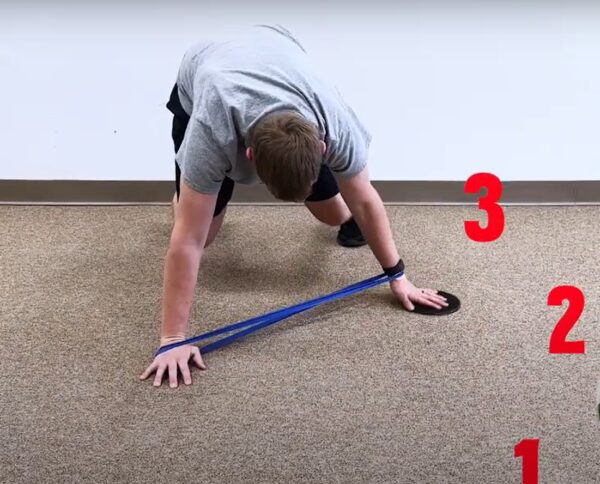
Purpose: Integrate all the improvements into functional movement patterns for bulletproof shoulder stability.
Equipment Needed: Resistance band, slick surface (towel on smooth floor or sliders).
How to Do It
- Get into a bear crawl position with hands and toes on the ground, knees hovering.
- Loop the band around both wrists and place one hand on a slick surface.
- Slowly slide one hand into three different positions (forward, out to the side, diagonally), while maintaining band tension.
- Return to the center and repeat with the other arm.
Sets: 2-3 sets of 5 slow reps each arm (all three directions = 1 rep)
Tip: Quality over speed – this exercise builds total shoulder control, so focus on maintaining perfect form throughout the entire range of motion.
Finally, Be Consistent
These four exercises work because they address the root causes of shoulder impingement in the right order: creating space, restoring movement, activating stabilizers, and integrating everything.
You’ll likely feel some immediate relief after your first session, but the real magic happens when you commit to this routine daily. Within just a few weeks, you’ll notice dramatically improved shoulder function and significantly less pain.
While these exercises provide excellent starting relief and can keep you moving in the right direction, persistent shoulder impingement often requires a comprehensive movement assessment to identify and address the specific root causes unique to your situation.
Ready to take the next step toward permanent shoulder pain relief?


")