The Shocking Truth About Shoulder Impingement: It’s Not Just Your Shoulder
If your shoulder pinches when you reach overhead, put on a jacket, lift a bag, or sleep on your side—you’re not alone. And you’ve probably been told to “stretch and strengthen your shoulder.” Here’s the surprising part: the shoulder itself usually isn’t the real problem.
Shoulder impingement is often a movement problem, not a structural one. When your neck, upper back, and shoulder blade aren’t moving well, your shoulder joint has to do too much. That overload creates the pinching you feel at the front of the shoulder. Think of it like a busy roundabout with one exit blocked. Traffic backs up in one spot. Most treatments try to repave that worn exit (your shoulder) instead of fixing the traffic flow (how the rest of your body moves). That’s why relief is often temporary.
The good news: fix the “traffic flow,” and the shoulder calms down. You do that by improving five key areas that support the shoulder: the neck, upper back (thoracic spine), shoulder blade movement, shoulder joint mechanics, nerve tension from higher up,
With just 15 minutes a day, you can
- Reduce or eliminate that sharp front-of-shoulder pinch overhead
- Regain pain-free motion for reaching, lifting, and daily tasks
- Improve posture and shoulder blade control so the joint isn’t overloaded
- Prevent flare-ups by addressing the real causes, not just symptoms
- Avoid unnecessary imaging, injections, or surgery in many cases
- Get back to workouts, sports, and hobbies with confidence
Quick Reference Guide
Total Time: 15 minutes
Targets: Neck, upper back, shoulder blade, shoulder joint, nerve pathways
Goals: Better movement patterns, less impingement, long-term prevention
The Big Five Exercise Circuit
Do these in order. Move slowly, breathe, and stay pain-free. Mild stretch or muscle effort is okay—sharp pain is not.
Exercise 1: Banded Posterior Shoulder Mobilization
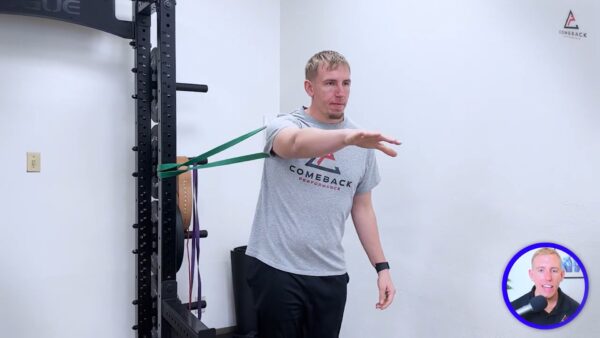
Purpose: Create space in the front of the shoulder by gently guiding the joint back into a better position.
Equipment: Light to medium resistance band + sturdy anchor at shoulder height
How to:
- Anchor the band at shoulder height and loop it across the front of your shoulder.
- Step forward so the band gently pulls the shoulder backward.
- Keep your chest tall and move the shoulder in and out of a chest press position.
Sets: 2 sets of 10 slow reps
Tip: You should feel relief or a gentle stretch in front—not pinching.
Exercise 2: Windmill Lift-Off (Wall)
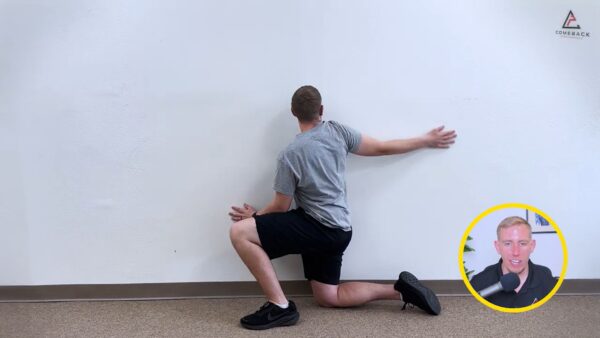
Purpose: Sync upper back mobility, shoulder blade movement, and shoulder control for overhead motion.
Equipment: Wall
How to
- Half-kneel facing the wall with your hip touching it; reach your near-side arm up the wall in a smooth “rainbow.”
- At your comfortable top position, lightly lift your hand off the wall for a moment.
- Slide back down with control.
Sets: 2 sets of 8 reps per side
Tip: Don’t force range. Notice differences side to side—imbalances are common and informative.
Exercise 3: Wall Slides

Purpose: Teach your shoulder blades to move “up and around” your ribcage for pain-free overhead reach.
Equipment: Wall
How to
- Stand facing the wall, one foot slightly forward. Hands on the wall at shoulder height.
- Slide your arms up while gently leaning your chest forward near the top.
- Think “shoulder blades glide up and wrap around.”
Sets: 15 controlled reps
Tip: Focus on smooth shoulder blade motion, not just lifting the arms higher.
Exercise 4: Extension Rocks (Reverse Tabletop Rocks)

Purpose: Open the chest and improve upper back extension and shoulder mobility together.
Equipment: None
How to:
- Sit with knees bent, hands on the floor behind you, fingers pointing away or slightly out.
- Lift your hips into a gentle reverse tabletop.
- Slowly rock forward and back, feeling the chest open and the upper back/shoulders move.
Sets: 2 sets of 8 rocks
Tip: Keep the movement smooth and comfortable. Adjust hand position if your wrists feel strained.
Exercise 5: Shoulder Taps
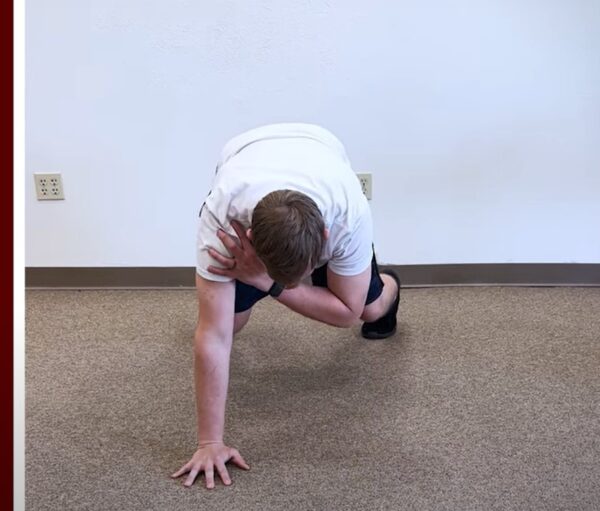
Purpose: Integrate everything—neck position, upper back, shoulder blade control, and shoulder stability—while building strength.
Equipment: None (use a counter or bench for an easier version)
How to:
- Get into a solid push-up position (or hands elevated on a counter/bench).
- Feet slightly wider than hips. Brace your core.
- Tap one hand to the opposite shoulder without letting your hips sway.
Sets: 3 sets of 6–8 taps per side
Tip: Slow and steady. Quality beats speed. Keep your ribs and pelvis quiet.
Your path to relief starts now.
Good news: you don’t have to overhaul your life. Do these five exercises consistently—about 15 minutes a day—and you’ll start improving how your body moves. That’s what reduces the pinching, restores motion, and keeps pain from coming back. Even people with “significant impingement” on imaging often get back to pain-free activity when they improve these movement patterns. The structure may not change, but how your body moves can—and that’s what matters.


")