Front Shoulder Pain With Dips? Here’s The Real Fix (Test & Correct)
Your shoulder pain during dips isn’t a life sentence, and it’s not because you’re “just not built for dips.” Dips demand more from your shoulder than virtually any other upper-body exercise. We’re talking about 60-70 degrees of shoulder extension combined with 70-80 degrees of internal rotation. When you force your body into these extreme positions without proper mobility, you create a perfect storm for injury.
The solution isn’t to avoid dips forever. With just 10-15 minutes of targeted exercises you’re going to learn in this blog, you can build the mobility and control your shoulders need to handle dips safely and pain-free.
Quick Reference Guide
- Total Time: 15 Minutes.
- Targets: Shoulder joint, posterior capsule, rotator cuff, and shoulder extension patterns.
- Goals: Increase shoulder extension mobility, improve internal rotation control, and build end-range strength
Self-Assessment: Do You Have Dip-Ready Shoulders?
Before diving into the fix, let’s identify exactly what’s limiting your shoulder mobility. These two simple tests will reveal whether you have the necessary ranges for safe dipping.
Test 1: Shoulder Extension Assessment
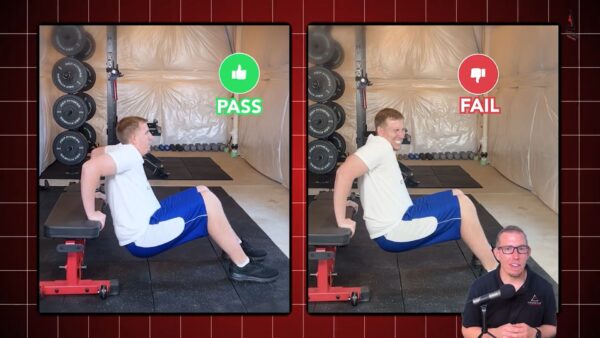
Purpose: Determine if you have the 60-70 degrees of shoulder extension required for dips.
Equipment Needed: Chair or bench.
How to Do It
- Sit on the edge of a chair with your hands resting on the surface behind you, fingers pointing away.
- Scoot forward and lower down like you’re performing a bench dip.
- Attempt to reach 90° of elbow flexion without pain or restriction.
- Note any front shoulder pinching or inability to reach the position.
What It Reveals: If you feel pinching or can’t reach 90° comfortably, you’re missing the extension range dips demand.
Test 2: Internal Rotation Assessment
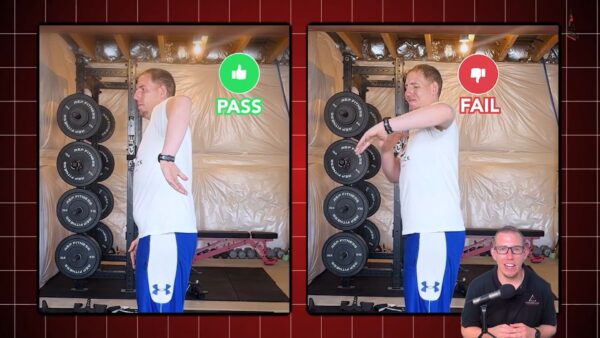
Purpose: Evaluate your shoulder’s ability to handle the internal rotation component of dips.
Equipment Needed: None.
How to Do It
- Raise your arm as if you’re about to throw a ball, elbow bent to 90 degrees.
- Keep your elbow stationary and rotate your hand down toward the floor.
- Your hand should rotate easily past horizontal (approximately 70-80 degrees).
- Note any early stopping point or tightness in the front or back of your shoulder.
What It Reveals: Limited rotation or early tightness indicates insufficient internal rotation for safe dipping.
The Exercises
Exercise 1: Banded Posterior Shoulder Mobilization

Purpose: Creates joint space and improves both extension and rotation mobility simultaneously.
Equipment Needed: Resistance band, anchor point at shoulder height.
How to Do It
- Attach the band at shoulder height and face away from the anchor point.
- Place the band around the front of your shoulder near your armpit.
- Step forward to create tension, feeling the band pull your shoulder backward.
- Perform gentle chest presses, allowing the band to guide your shoulders into a better position.
Sets: 2 sets of 15 reps.
Tip: Focus on the sensation of joint decompression rather than forcing the movement—let the band do the work of creating space.
Exercise 2: Shoulder External Rotation Eccentric
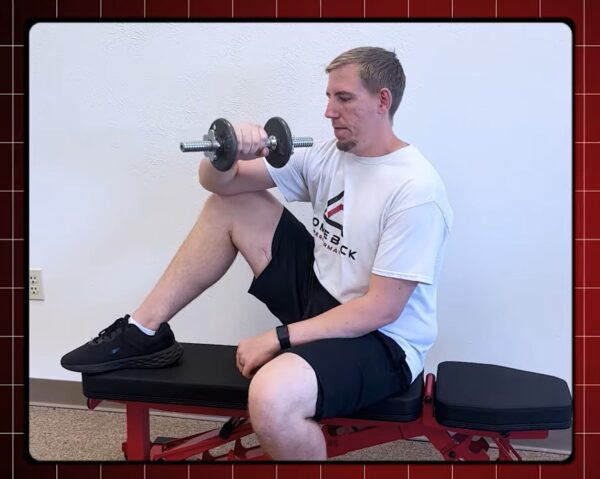
Purpose: Builds controlled strength in internal rotation while improving mobility.
Equipment Needed: Light dumbbell (2-5 lbs maximum).
How to Do It
- Sit with your elbow resting on your knee and hold a light weight.
- Slowly lower your hand and weight into internal rotation over 3-4 seconds.
- Use your opposite hand to assist in returning the weight to the starting position.
- Repeat the controlled lowering phase, focusing on the eccentric portion.
Sets: 2 sets of 8 reps.
Tip: Start extremely light—this exercise is about control, not strength. The lowering phase should feel challenging but manageable.
Exercise 3: Crab Rock
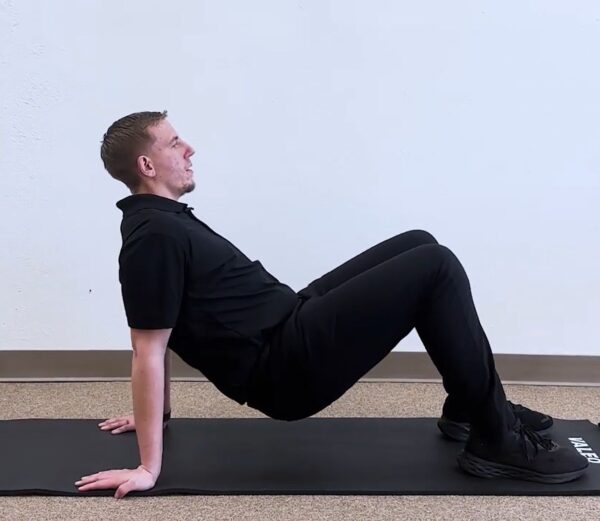
Purpose: Builds extension strength in the exact movement pattern that dips require.
Equipment Needed: None (optional: bench for easier variation).
How to Do It
- Sit on the floor with your hands behind you, fingers pointing away from your body.
- Lift your hips into a reverse tabletop position.
- Slowly rock forward and backward, allowing your shoulders to move through extension.
- Focus on controlled movement and building tolerance in the end range.
Sets: 2 sets of 10 rocks.
Tip: If too challenging, elevate your hands on a bench or adjust your foot position closer to your body. Progress gradually to the floor version.
Smart Progression Strategy
While building your shoulder mobility, don’t abandon dips entirely. Use these modifications to maintain the movement pattern safely:
Modification Options
- Bench Dips: Limit range of motion while building tolerance
- Band-Assisted Dips: Reduce load while practicing the full pattern
- Eccentric-Only Dips: Jump to the top position and lower slowly with control
The key is to work within your current mobility while progressively building it. As your assessment scores improve, gradually progress toward full-range dips.
After completing your first session, immediately retest both assessments. Even a 10-20% improvement in range or reduction in discomfort indicates these exercises are working. Your shoulder can handle dips—it just needs the proper preparation.
Your Path to Pain-Free Dips Starts Today
Practice these exercises daily, and you’ll notice improvements such as reduced shoulder tension and pain-free movement. Over the long term, you’ll develop bulletproof shoulders that can handle any upper-body challenge. However, these exercises address the symptoms of poor shoulder mobility rather than the root cause. A comprehensive movement assessment should evaluate your neck, thoracic spine, scapulae, and nervous system—all potential contributors to front shoulder pain.
Eliminate your shoulder pain permanently and get back to confident, pain-free training!


")