
The 5-Minute Pull Day Warm-Up That Stops Shoulder and Bicep Pain for Lifters Over 40
If you’re over 40 and still hitting the gym hard, but your shoulder or bicep flares up every time you do rows, pull-ups, or lat pulldowns, you’re not alone. That nagging pain in the front of your shoulder or burning in your bicep tendon isn’t just “part of aging” – it’s your body telling you something needs to change.
The good news? You don’t need to stop lifting or live with the pain. This comprehensive warm-up targets the “Big Five” – your neck, upper back, shoulder blades, shoulder joints, and nerves.
Quick Reference Box
- Total Time: 5 Minutes.
- Targets: Your upper back, shoulder blades, posterior shoulder, lower traps, nerve pathways.
- Goals: Pain reduction, improved mobility, better pulling mechanics
The Complete 5-Exercise Warm-Up Routine
Exercise 1: Wall Contours (or Wall Open Books)

Purpose – To unlock your stiff upper back and get your shoulder blades moving properly.
Equipment Needed: Wall.
How to Do It
- Stand in a half-kneel position with your hip lightly touching the wall.
- Place both hands slightly in front of your chest.
- Slowly rotate your top arm and chest away from the wall, like opening a book.
- Let your eyes follow your hands, pause at a comfortable end range, then return.
Sets: 8-10 reps each side (about 30 seconds per side)
Tip: The motion should come from your ribs and upper back, not by cranking your lower back. If one side opens more than the other, that imbalance could be contributing to your pain.
Exercise 2 – Banded Scap Angels
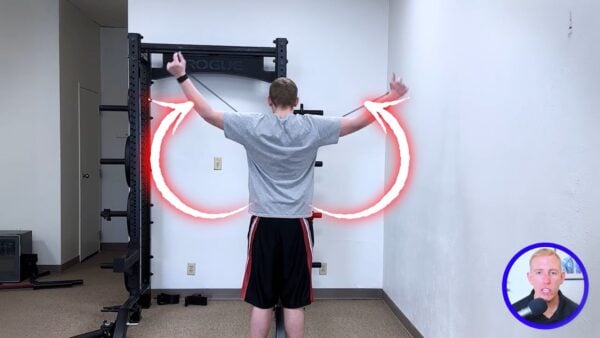
Purpose – Train your shoulder blade to rotate and tilt properly so you don’t jam the front of your shoulder.
Equipment: A resistance band.
How to Do It
- Anchor band at chest height and grab with both hands, arms straight.
- Ensure you keep your hands by your pockets when starting.
- Sweep arms up and out into a wide Y position like a standing snow angel.
- Pause before any sharp pinch, then return with control.
Sets: 1 minute of reps.
Tip: Keep your ribs gently tucked and don’t arch your back to fake the range.
Exercise 3: Infinity Hovers
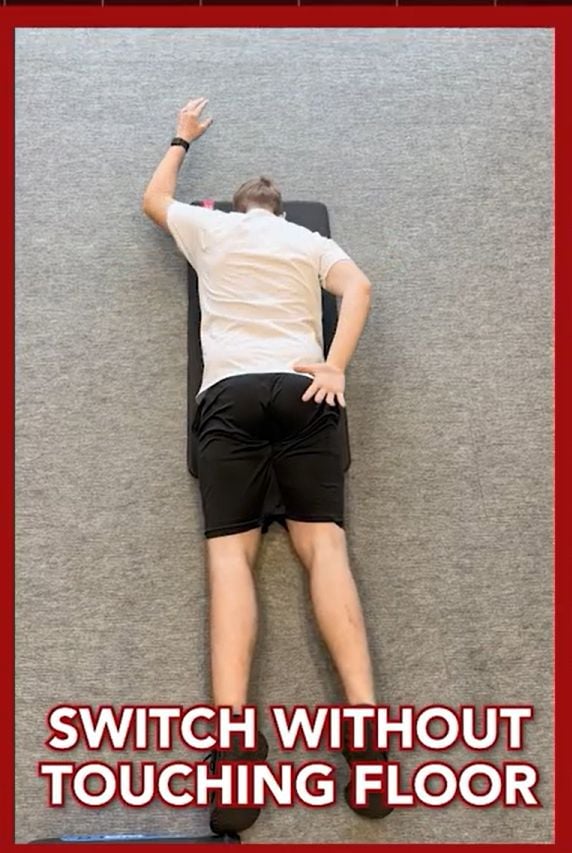
Purpose: Build rotational control and endurance in the muscles that stabilize your shoulder.
Equipment: None
How to Do It:
- Lie face down with neck relaxed, one arm up in a wide position, the other behind your butt.
- Slowly switch positions – top arm down, bottom arm up.
- Avoid touching the floor during the movement.
- Continue alternating for the full duration.
Sets: 60 seconds continuous.
Tip: You should feel this in the back of your shoulders, not your neck. Keep your chin slightly tucked.
Exercise 4: Banded Y’s
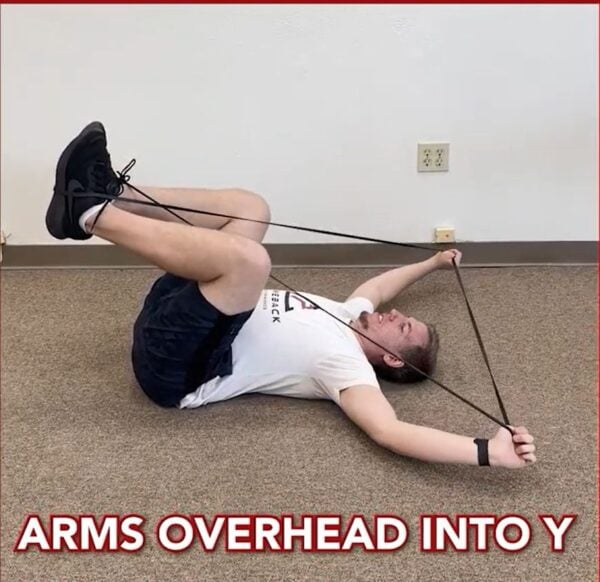
Purpose: Activate your lower traps and posterior shoulder for better pulling positions
Equipment Needed: Resistance band
How to Do It
- Lie on your back, loop the band around your feet, and cross to the opposite hand.
- Keep back flat on the ground.
- Bring arms overhead into a Y position.
- Pause briefly, then lower with control.
Sets: 2 sets of 8-10 reps or 1 minute total.
Tip: Don’t arch your lower back to cheat the movement. This engages your lower traps before heavy pulling.
Exercise 5: Downward Dog
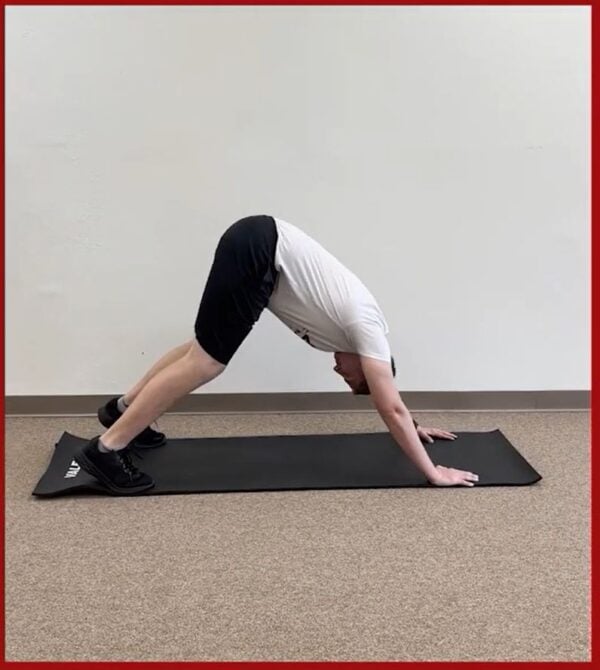
Purpose: Integrate everything with closed-chain overhead stability for pull-ups and pulldowns
Equipment Needed: None (or bench/box for modification)
How to Do It
- Start in push-up position
- Lift your hips and bring your chin and chest toward your feet
- Focus on pushing the floor away and lengthening through the shoulders
- Return to the start position without forcing the end range
Sets: 8-10 slow reps or 1 minute total
Tip: If the floor is too aggressive, elevate your hands on a bench or box. This is prep work, not a max stretch.
Make This Your New Pull Day Standard
Do this warm-up before every pull day workout. If you’re coming back from bicep tendinitis or front shoulder pain, stick with this routine for a few weeks and notice how your rows feel smoother at both the top and bottom positions. Your pull-ups and pulldowns should stop pinching, and that next-day shoulder and bicep soreness should significantly decrease.
Remember to use the “pain traffic light” system: green (feels good, mild stretch) means keep going; yellow (2-3/10 discomfort that settles quickly) is generally okay; red (6/10 or higher, sharp, or getting worse) means shorten the range or skip that exercise.
Get a comprehensive assessment and personalized plan to permanently fix your shoulder pain and get back to the lifting you love.
About the Author: Dr. Joey Seyforth


