
Stop That Nagging Shoulder Pain: Your Complete Guide to Healing Bicep Tendonitis
Does that sharp, stabbing pain in the front of your shoulder keep haunting you? You’ve tried ice packs, stretching, maybe even taken weeks off from the gym—but every time you reach overhead, lift something, or try to sleep on that side, the pain comes roaring back. If this sounds familiar, you’re likely dealing with bicep tendonitis, and here’s the truth: until you address the real underlying issues, that pain isn’t going anywhere.
The good news? Your shoulder pain isn’t just about your bicep tendon—it’s about how your entire shoulder system works together. When one part fails, others compensate, creating a domino effect that leads to chronic pain and frustration.
In this guide, I’ll show you a simple test to confirm if you have bicep tendonitis, plus three targeted exercises that can start relieving your pain in just minutes a day—without making things worse.
Quick Reference Box
- Total Time: 15 Minutes
- Targets: Bicep tendon, shoulder blade (scapula), rotator cuff muscles, thoracic spine
- Goals: Pain reduction, improved shoulder mechanics, long-term stability
Exercise Breakdown
Before we begin the exercise, first, let’s confirm what you’re dealing with…
The Speeds Test: Your At-Home Diagnosis

Purpose: Quickly identify if bicep tendonitis is causing your shoulder pain
Equipment Needed: None
How to Do It
- Extend your affected arm straight out in front of you with your thumb pointing up, keeping your elbow completely straight.
- Use your other hand to press down on the extended arm while resisting the downward pressure.
- If you feel sharp pain at the front of your shoulder during resistance, that’s a positive test for bicep tendonitis.
Tip: Don’t push through severe pain—moderate discomfort during the test is enough to confirm the diagnosis.
Now that you’ve identified the problem, here are your three go-to exercises
Exercise 1: Wall Slides

Purpose: Improves upward rotation of your shoulder blade, reducing stress on the bicep tendon.
Equipment Needed: A wall.
How to Do It
- Stand with your feet staggered, facing a wall, with your hands at shoulder height and your elbows slightly bent.
- Press firmly into the wall and slowly slide your arms upward while leaning your chest forward.
- Pause at the top of the movement, feeling your shoulder blades rotate upward.
- Slowly return to the starting position with control.
Sets: 2-3 sets of 10-12 reps.
Tip: Focus on slow, controlled movements—this isn’t about speed but about retraining proper shoulder blade movement.
Exercise 2: Banded Open Books
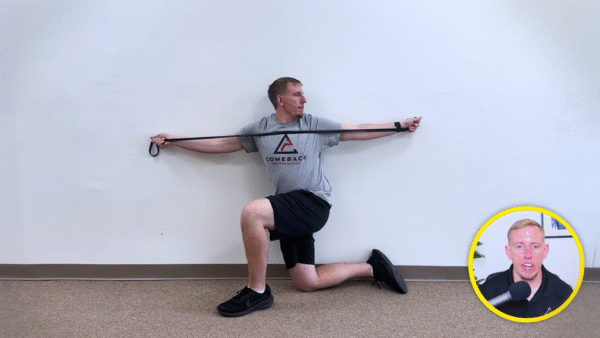
Purpose: Opens up your thoracic spine, allowing your shoulder to move without compensation from the bicep.
Equipment Needed: Resistance band.
How to Do It
- Get into a half-kneeling position next to a wall, holding a resistance band with both hands, palms up.
- Keep one hand centered on your chest while rotating the other arm away from the wall.
- Follow your moving hand with your eyes, rotating as far as comfortable while maintaining band tension.
- Return slowly to the starting position.
Sets: 2 sets of 8-10 reps per side.
Tip: Notice if one side opens up more than the other—this asymmetry often contributes to shoulder problems.
Exercise 3: Banded Uppercuts

Purpose: Builds rotator cuff strength and control without aggravating the inflamed tendon.
Equipment Needed: Resistance band.
How to Do It
- Hold a resistance band with both hands, elbows at your sides, and palms facing up.
- Pull the band apart while simultaneously lifting your arms up and outward.
- Stop when your hands reach eye level, maintaining tension in the band.
- Lower slowly with control back to the starting position.
Sets: 2-3 sets of 8 reps.
Tip: Your shoulders should feel a good burn after this exercise—that’s your rotator cuff waking up and getting stronger.
It’s Effective.
As we always encourage, you must be consistent with these exercises to see results. Sparing 15 minutes daily to do these exercises can go a long way, and the long-term reward is a shoulder that’s strong and stable.
Ready to take the next step? Consider working with a shoulder specialist.
About the Author: Dr. Joey Seyforth


