Stop Bicep Tendonitis Pain in Just 10 Minutes: 3 Proven Exercises That Actually Work
Are you tired of that persistent, nagging pain in the front of your shoulder every time you reach overhead or carry groceries? If you’re dealing with bicep tendonitis, you’re not alone—and the good news is that relief doesn’t have to take weeks or months. Especially not when you have these exercises you can do to relieve bicep tendonitis pain.
Here’s what most people don’t realize: bicep tendonitis isn’t actually the problem—it’s a symptom of deeper issues in your shoulder complex. When your rotator cuff muscles are weak, your bicep tendon has to work overtime, leading to that painful inflammation you’re experiencing. Even more surprising? That pain might actually be coming from nerve tension in your neck that’s referring down to your bicep area.
This chain reaction means that simply resting or icing your bicep won’t solve the root cause. You need to address the weak rotator cuff muscles and potential nerve issues that are forcing your bicep tendon to compensate. The three targeted exercises below will help you break this cycle and start feeling relief today—all in just 10 minutes.
With just 10 minutes a day, you can
- Reduce bicep and shoulder pain immediately through targeted nerve mobilization.
- Strengthen weak rotator cuff muscles that are causing your bicep to overwork.
- Improve shoulder stability to prevent future flare-ups.
- Increase blood flow to promote natural healing in the bicep tendon.
- Restore pain-free overhead reaching for daily activities.
- Build long-term shoulder resilience to keep you active without limitations.
Quick Reference Guide
- Total Time: 10 Minutes.
- Targets: Bicep tendon, rotator cuff muscles, median nerve.
- Goals: Pain reduction, nerve mobility, and shoulder stability.
Before You Start: Do This Simple Self-Test
Before diving into the exercises, let’s confirm you’re dealing with bicep tendonitis using the Speed Test:
- Position your arm straight out in front of you at 90 degrees with your palm facing up.
- Use your other hand to provide downward resistance while you try to lift your arm.
- Note any pain in the bicep tendon area at the front of your shoulder.
If this test reproduces your pain, you likely have bicep tendonitis. Don’t worry—this is entirely normal, and the exercises below will help address the root causes.
Exercise Breakdown
Exercise 1: Median Nerve Glide

Purpose: Releases nerve tension that may be referring pain to your bicep area.
Equipment Needed: None.
How to Do It
- Begin in a “teapot” position, with your fingers touching your shoulders.
- Extend your elbow, wrist, and fingers down toward the ground while side-bending your neck to the opposite side.
- Move smoothly between positions—when your hand moves, your neck should move too.
- Complete the movement slowly and controlled, “flossing” the nerve from neck to fingertips.
Sets: 2 sets of 10 reps on both sides.
Tip: You may experience tingling, shaking, or tightness—this is entirely normal and indicates the nerve is being mobilized. Don’t be alarmed by these sensations.
Exercise 2: Banded W Hold

Purpose: Strengthens rotator cuff muscles to reduce bicep tendon overuse.
Equipment Needed: Light resistance band.
How to Do It
- Hold the band with both hands, keeping your elbows tucked by your sides.
- Pull the band apart by squeezing your shoulder blades together, creating a “W” shape with your arms.
- Hold the position for 5 seconds, feeling tension in the back of your shoulders.
- Slowly return to the starting position while maintaining control.
Sets: 2 sets of 8 reps with 5-second holds.
Tip: Your shoulders should feel like they’re burning by the end. It’s a sign you’re effectively targeting the right muscles. If it’s too easy, use a stronger band or pull wider.
Exercise 3: Two-Position Banded Shoulder Flexion Hold
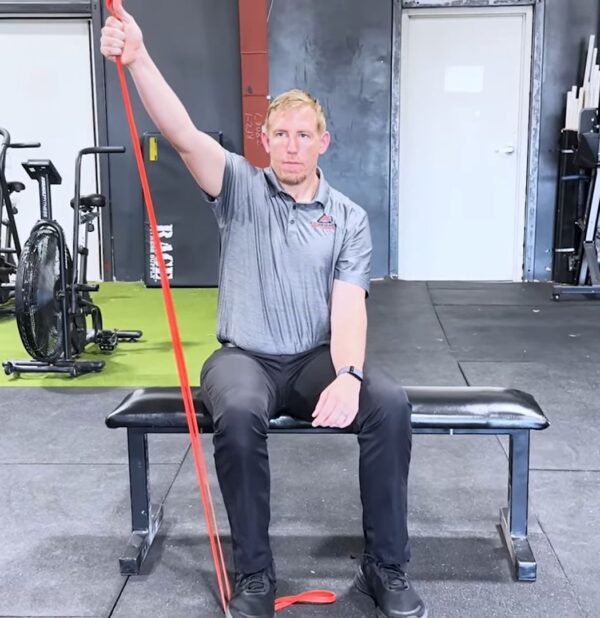
Purpose: Increases blood flow and nutrients to the bicep tendon for healing.
Equipment Needed: Resistance band.
How to Do It
- Step on the band and hold the other end with your thumb pointing up.
- Lift your arm to 45 degrees and hold for 5 seconds.
- Transition to shoulder height (90 degrees) and hold for another 5 seconds.
- Alternate between these two positions for the entire duration, maintaining constant tension.
Sets: 2 sets of 30-50 seconds.
Tip: This exercise should feel “spicy” in a good way—your shoulder should be shaking and burning. If you can complete 50 seconds easily, increase the resistance or extend the time.
Time To Get Better
Stick with these exercises every day. You might feel a little relief after your first session, but real, lasting results come from consistency. Most people start noticing significant changes within just a few days of sticking to the routine. The best part? These exercises don’t just mask the pain; they tackle what’s really causing your bicep tendonitis. That said, listen to your body. If your pain isn’t getting better — or if it actually feels worse — after about a week of daily practice, it’s time to get checked out by a professional. Everyone’s situation is different, and sometimes there’s more going on beneath the surface that needs extra attention.


")