Bicep Pain Won’t Go Away? These 4 Bicep Tendonitis Rehab Exercises Will Make It
Are you tired of that nagging pain in the front of your shoulder every time you lift, reach overhead, or even try to get through your day? If you’ve been diagnosed with bicep tendinitis and feel like you’re stuck in a frustrating cycle of rest, ice, and physical therapy exercises that just aren’t working, you’re in the right place.
The good news is that the pain you’re feeling is often a symptom, not the source of the problem. Traditional approaches usually fail because they focus only on the bicep tendon itself.
However, your bicep tendon is part of a complex system, and it usually becomes overworked and inflamed when other areas aren’t pulling their weight. The real issue is a chain reaction that starts in your neck, upper back, and shoulder blades.
This article will show you four specific drills designed to address the root cause of your bicep tendon pain. By focusing on the entire movement system, you can finally find relief and get back to your life without pain.
By investing less than 10 minutes a day into this targeted routine, you can:
- Significantly reduce the sharp, nagging pain in the front of your shoulder.
- Regain the ability to lift objects, reach overhead, and work out without wincing.
- Improve the mobility of your upper back and the mechanics of your shoulder blade.
- Strengthen the key stabilizing muscles that protect your shoulder joint.
- Address the underlying cause of the pain to prevent it from coming back.
- Feel more confident and in control of your body again.
Quick Reference
- Total Time: Under 10 minutes
- Targets: Biceps Tendon, Shoulder Blade (Scapula), Thoracic Spine, Rotator Cuff, Neck (First Rib Area)
- Goals: Reduce bicep tendon pain, improve shoulder mobility, and retrain proper movement patterns.
The 4 Drills to Fix Bicep Tendinitis for Good
Here are the four exercises that address the entire system, not just the symptom. Remember to move carefully and never push into sharp pain.
Exercise 1: Belt First Rib Mobilization

Purpose: This Belt First Rib Mobilization drill is one exercise we recommend because it releases nerve tension that can keep your neck and chest muscles in a constant state of tightness. If they’re not released, they end up contributing directly to your shoulder dysfunction.
Equipment Needed: A sturdy belt, yoga strap, or non-stretchy resistance band.
How to Do It:
- Sit down and tuck one end of your belt underneath you to anchor it firmly.
- Next, drape the other end over your opposite shoulder while you allow it to rest on the muscular area of the upper trap near your neck.
- Gently pull down on the belt with your hands to create downward tension.
- Slowly look down and in towards the armpit of the belted shoulder, then reverse the motion by looking up and away towards the opposite side of the room.
This is a gentle mobilization, not an aggressive stretch. Focus on smooth, controlled movements to open up space for the nerves that run from your neck into your arm.
Sets: Perform for 60-90 seconds on each side.
Exercise 2: Wall Slides

Purpose: The purpose of doing wall slides is to retrain the proper upward movement of your shoulder blade (scapula), which is essential for preventing impingement and irritation during overhead movements.
Equipment Needed: A smooth wall.
How to Do It:
- Stand facing a wall with a staggered stance for balance (one foot in front of the other).
- Place your forearms on the wall with your hands up and elbows slightly below shoulder height.
- Slide your arms up the wall as high as you can comfortably go, allowing your chest to lean forward towards the wall at the top.
- Focus on feeling your shoulder blades moving up and wrapping around your rib cage. Return to the start and repeat.
Don’t shrug your shoulders up to your ears. The goal is to feel the shoulder blades glide, not to force the motion with your neck and trap muscles. Your range will improve over time.
Sets: 2 sets of 10 repetitions.
Exercise 3: Banded “I”
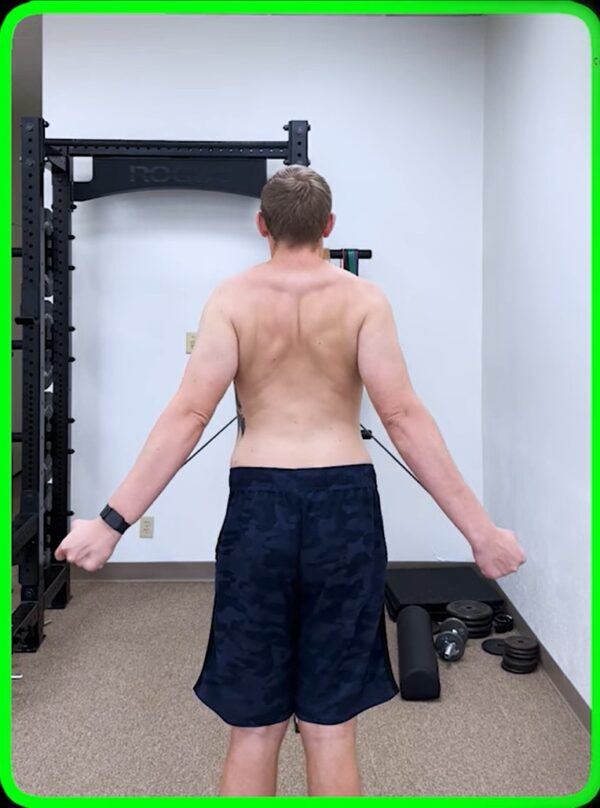
Purpose: This Banded I is another simple exercise that strengthens the posterior shoulder muscles responsible for pulling your shoulder blades into a healthier position, reducing stress on the front of the shoulder where the bicep tendon lies.
Equipment Needed: A light resistance band.
How to Do It:
- Anchor your resistance band in front of you around chest height.
- Hold the band with both hands and extend your arms straight out in front of you.
- Keeping your arms straight, pull the band back until your hands are next to your hips, forming an “I” shape with your body.
- Squeeze your shoulder blades together and slightly down at the end of the movement.
Avoid arching your lower back. Keep your core engaged and focus all the effort on the muscles in your mid-back and the back of your shoulders.
Sets: 2 sets of 10 repetitions.
Exercise 4: Row + External Rotation + Press
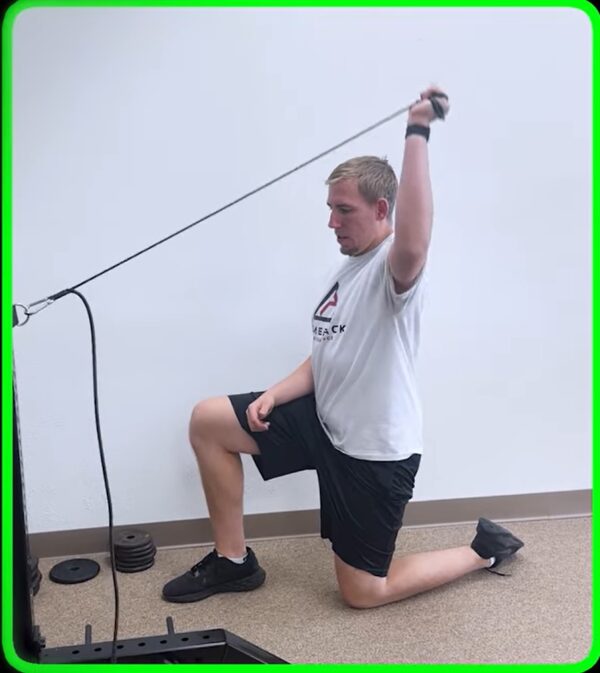
Purpose: This powerful compound movement integrates proper shoulder mechanics into a functional pattern, teaching your muscles and joints to work together correctly while building strength.
Equipment Needed: A resistance band.
How to Do It:
- Row: Begin by rowing the band back, pulling your elbows towards your ribs.
- External Rotation: At the peak of the row, rotate your forearms upward so your palms face forward, keeping your elbows bent at 90 degrees.
- Press: From this position, press your hands straight overhead.
- Reverse the motion with control: lower your hands, rotate them back down, and then extend your arms forward to the starting position. That is one rep.
Perform this movement slowly and with intention. The quality of the sequence is more important than the speed or resistance. This drill retrains your brain-body connection for safer, stronger movement.
Sets: 2 sets of 8 repetitions.
Your Path to a Pain-Free Shoulder
As long as you’re consistent with these exercises, you’ll unlock the benefits of these drills. By performing this short routine daily, you are actively re-educating your body, correcting imbalances, and building the resilient strength needed for long-term health.
These exercises are a fantastic start if you want to address the most common root causes of bicep tendinitis. Keep in mind that everyone’s body is unique.
If you’ve tried everything—PT, chiropractic, injections, or even surgery—and you’re still struggling with persistent pain, you may need a more personalized approach. To get a targeted, step-by-step plan based on a proper movement assessment,


")