4 Rotator Cuff Rehab Exercises to Eliminate Shoulder Pain
If your shoulders are feeling weak, painful, or less mobile than they used to be, it could be your rotator cuff that’s holding you back. Your rotator cuff is part of a critical support system that affects everything from your neck posture to your spine alignment. When your rotator cuff is compromised, your body compensates by overusing other muscle groups, leading to additional pain and dysfunction throughout your upper body chain. In this article, you’ll learn a few practical rotator cuff rehab exercises you can do at home.
With just 15 minutes a day, you can
- Reduce shoulder pain during overhead movements and daily activities.
- Improve shoulder stability for better athletic performance and functional strength.
- Restore the full range of motion for reaching, lifting, and throwing.
- Strengthen the rotator cuff muscles to prevent future injuries.
- Enhance blood flow to promote natural healing and tissue repair.
- Build confidence in your shoulder’s ability to handle daily demands.
Quick Reference Guide
- Total Time: 15 Minutes.
- Targets: The rotator cuff muscles, shoulder blade stabilizers, and anterior shoulder.
- Goals: To reduce the pain and to improve shoulder stability and mobility.
Understanding Your Rotator Cuff
The rotator cuff consists of four small muscles that attach from your shoulder blade to your shoulder, providing crucial stability to the joint. Think of your shoulder as a golf ball on a tee. If there’s damage or weakness to the rotator cuff, the support system becomes compromised. This compromise causes the ball and socket to move too freely and lack stability. In turn, it brings instability, which then leads to pain and mobility issues, preventing you from using your shoulder to its fullest potential. The rotator cuff can be damaged through falls, repetitive overuse, or simply the natural aging process. In fact, over half the population over age 60 has a rotator cuff tear. Surprisingly, the majority experience zero pain.
Exercise Breakdown
Exercise 1: Banded W Hold

Purpose: Targets the external rotators of the rotator cuff and strengthens the posterior shoulder blade muscles.
Equipment Needed: Resistance band.
How to Do It
- Grab a resistance band and keep your elbows by your sides with palms facing up.
- Pull the band apart while engaging the back of your shoulders.
- Hold the position for 5 seconds, feeling the burn in the back of your shoulders.
- Return to the starting position with control.
Sets: 10 reps with 5-second holds.
Tip: Focus on squeezing your shoulder blades together rather than just pulling with your arms when you’re doing this exercise. This ensures proper muscle activation.
Exercise 2: Side-Lying Shoulder Flexion
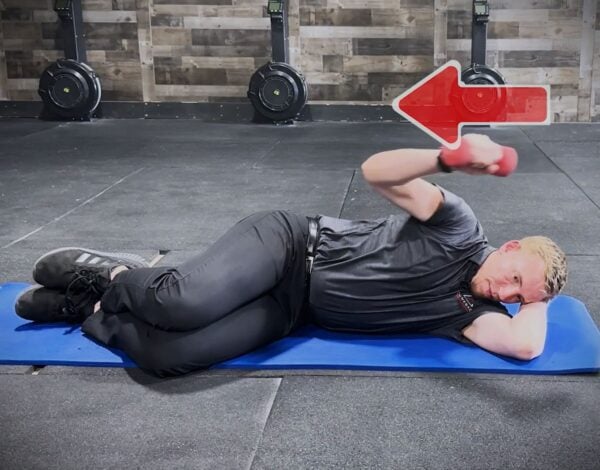
Purpose: To train the shoulder for overhead movement while working against gravity to build functional strength.
Equipment Needed: Light weights (2-5 pounds)
How to Do It
- Lie on your side with your affected shoulder on top and your arm by your side.
- Lift your arm up and over your head, bringing your bicep toward your ear.
- Focus on slow, controlled movement both up and down.
- Keep your pain levels minimal throughout the movement.
Sets: 2 sets of 10 reps.
Tip: If you experience pain, reduce the weight or range of motion – progress should be gradual and pain-free.
Exercise 3: Banded Subscap Punch
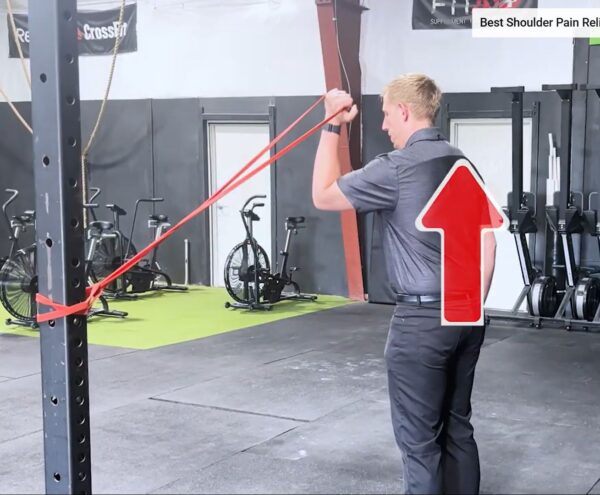
Purpose: Strengthens the subscapularis rotator cuff muscle, providing stability to the front of the shoulder.
Equipment Needed: Resistance band attached to a stable anchor point.
How to Do It
- Attach the band to a stable point with your working shoulder closest to the anchor.
- Start with your elbow bent at your side, creating tension on the band.
- Keep your elbow bent and bring your bicep up toward your ear in a punching motion.
- Move slowly and controlled, alternating up and down movements.
Sets: 3 sets of 10 reps.
Tip: This exercise is particularly beneficial if you experience clicking or pain in the front of your shoulder during bench press or shoulder press movements.
Exercise 4: Medicine Ball ABCs
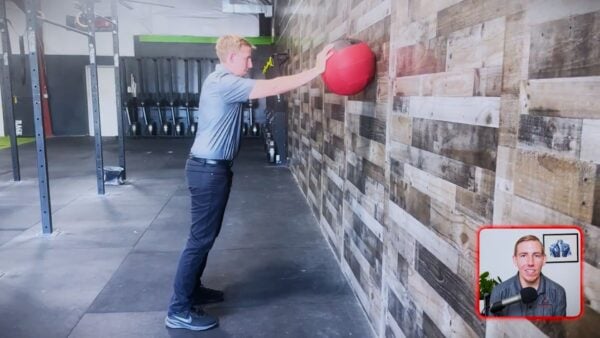
Purpose: Builds strength and endurance of the entire rotator cuff while improving shoulder control and stability.
Equipment Needed: Light medicine ball (2-4 pounds).
How to Do It
- Hold a light medicine ball with your arm extended and press it against a wall.
- Slowly spell out the alphabet with the ball, making each letter as clear and even as possible.
- Don’t rush through the letters – focus on control and proper form.
- Try to complete the entire alphabet without taking a break.
Sets: 1-3 sets of the complete alphabet (based on your current strength level).
Tip: This exercise will create significant burning in your shoulder muscles – this is precisely the stimulus needed for strengthening and healing.
Your Path to Pain-Free Shoulders Starts Today
You will get immediate benefits like reduced pain and improved shoulder mobility if you diligently perform this 15-minute routine daily. They promote blood flow to the rotator cuff area, delivering essential nutrients needed for healing and strength building. If you want a personalized treatment plan, we’ve got you covered. Get started below!


")