End Bicep Tendonitis Pain Forever: The “Big Five” System That Actually Works
If you’ve been stuck in the frustrating cycle of front shoulder pain disappearing for a week or two, then returning, you likely have biceps tendonitis. However, your bicep tendonitis isn’t actually a bicep problem at all. It’s a system problem involving five interconnected areas of your body. When you address all five areas, what we call the “Big Five”, instead of just the tender spot, you can finally break free from the relapse cycle and get back to training pain-free.
In this blog, you will find out the right things you can do to improve your shoulder blade mechanics and positioning, strengthen the posterior shoulder to prevent future issues, so that you can get back to lifting, working, and sleeping without limitations.
Quick Reference Box
Total Time – 10 Minutes
Targets: Neck/nerves, thoracic spine, shoulder blade, rotator cuff
Goals – Pain reduction, improved mechanics, long-term prevention
Exercise 1 – Speed’s Test for Bicep Tendonitis

Purpose. Confirm bicep tendon involvement and establish baseline pain levels
Equipment Needed – None.
How to Do It
- Stand tall and raise your painful arm straight out in front of you, palm facing up at shoulder height.
- With your other hand, press straight down on your wrist while resisting the pressure.
- Keep your body still and don’t lean or twist to compensate.
- Hold for 3-5 seconds and assess pain level.
Sets: 1 test, rate pain 0-10
Tip: Remember your exact pain rating—we’ll retest this at the end to measure your improvement.
Exercise 2: Belt Rib Mobilization

Purpose – Free up compressed nerves and reduce hypersensitivity in the shoulder region
Equipment Needed: Belt or dog leash
How to Do It
- Loop the belt over the top of your painful shoulder, across the upper trap muscle.
- Grab the belt in front of you and pull down to create tension.
- While maintaining that pressure, slowly tilt your head down and toward the same-side armpit.
- Then tilt your head up and away at a diagonal angle.
Sets: 10 slow, controlled repetitions
Tip: You should feel firm pressure on top of the shoulder and a mild stretch along your neck—stay in the comfortable “green zone” and avoid any sharp shooting pains down your arm.
Exercise 3: Band Y-Raise for Shoulder Blade Mobility
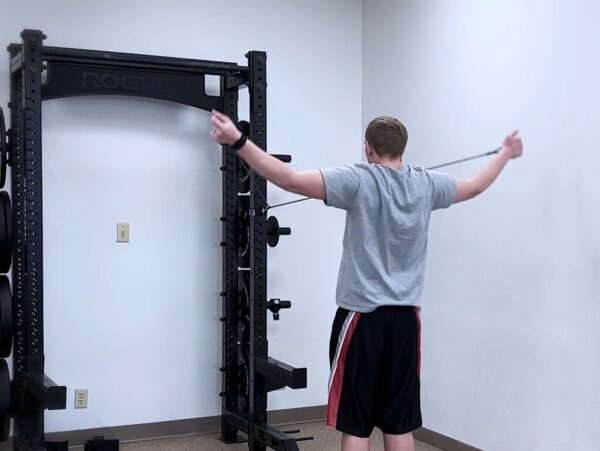
Purpose: Teach proper shoulder blade rotation and create space in the front of the joint.
Equipment Needed – Light resistance band.
How to Do It
- Anchor the band at chest height in front of you and grab with both hands, arms straight.
- Walk back until you feel light tension, starting with your hands by your pockets.
- Slowly sweep your arms out into a wide Y-shape like a standing snow angel.
- Stop before any sharp pinching sensation, pause, then return with control.
Sets: 2-3 sets of 8-12 repetitions.
Tip: Focus on shoulder blades tipping back and rotating up, not just moving your arms—keep your ribs down and avoid arching your lower back to fake the range of motion
Exercise 4: Band External Rotation with Extension

Purpose: Strengthen the posterior shoulder to center the ball joint and reduce bicep overload.
Equipment Needed: Light resistance band
How to Do It
- Place the band around both wrists behind your back, standing tall with relaxed shoulders.
- Gently pull your hands apart a few inches to create tension in external rotation.
- While maintaining that tension, slide your hands slightly back to move your shoulders into extension.
- Hold for 2-3 seconds, then return slowly to the starting position.
Sets: 2-3 sets of 8-10 repetitions.
Tip: You should feel this working the back of your shoulders, not your neck—keep your shoulders down and back, avoiding any shrugging motion.
Want to Get Permanent Relief?
One of Dr. Joey Seyforth’s clients perfectly illustrates this concept. After years of failed PT attempts and multiple injections, he was finally able to perform dips pain-free once the “Big Five” system was corrected. As he put it, “I could finally do dips. I was never able to do dips for years… it tells me I’m moving in the right direction.”
Perform these exercises consistently for the next few weeks, especially before upper body training sessions. After completing all three exercises, retest your Speed Test using the same arm position, pressure, and direction. Rate your pain again on the 0-10 scale. If it dropped even a couple of points, that’s proof your system is changeable—you didn’t heal the tendon in 10 minutes, but you did change the mechanical factors that were overloading it.


")