
4 Exercises to Get Scapular Winging Under Control
Scapular winging isn’t simply bad posture. And it isn’t automatically permanent nerve damage either. It’s a control problem, and that means you can work on it. The cause doesn’t always sit in the shoulder blade alone. Your neck, thoracic spine, shoulder blade, shoulder joint, and nervous system all work together. When any one of these is off, it can lead to scapular winging. Scapular winging can happen in two ways:
Muscular: The serratus is weak or isn’t being recruited.
Nerve-related: The connection between the long thoracic nerve and the serratus is off, so the shoulder blade isn’t sure how to do its job. The nerve can be irritated through compression or inflammation.
So instead of guessing, this guide shows you how to check your shoulder blade from behind, explains what’s going on underneath, and gives you four exercises for scapular winging that you can start using right away.
Quick Reference Guide
- Total Time: 4 exercises, 4–5 days per week
- Targets: Serratus anterior, shoulder blade (scapula)
- Goals: Improve shoulder blade control, build serratus strength and coordination, make pressing and overhead movement feel more stable
How to Check Your Shoulder Blades at Home
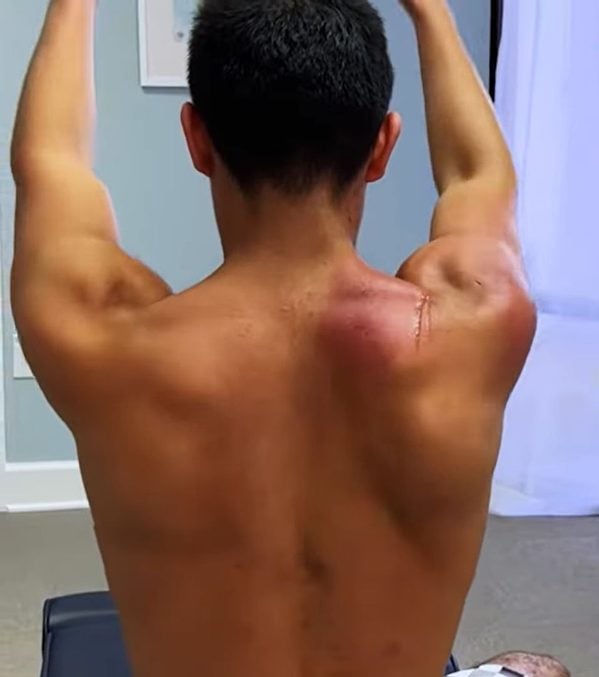
- Stand with your back to a mirror, or have someone film you from behind.
- Slowly raise both arms straight out in front of you, all the way overhead.
- Lower them back down slowly.
- Watch for a shoulder blade that lifts off the rib cage instead of staying flat and gliding around it.
Pay just as much attention on the way down as on the way up. The lowering phase is usually where winging shows itself first. If one shoulder blade pops off the ribs, that’s your side.
The 4 Exercises for Scapular Winging
Exercise 1: Wall Slide Liftoff

Purpose: Teaches the shoulder blade to rotate upward and stay connected to the ribs overhead.
Equipment Needed: A wall
How to Do It
- Stand facing a wall with one of your foot in front of the other for stability.
- Place your hands flat on the wall at shoulder height, elbows hovering just off the surface.
- Slowly slide your arms straight up, leaning your chest slightly forward at the top.
- At the peak, lift your hands off the wall for a brief second, then return them to the wall and slide back down.
Sets: Do 2 sets of 10 reps.
Tip: Can’t lift your hands off the wall yet? That’s totally fine. Just do the slide and build tolerance.
Exercise 2: Banded Bear Hug
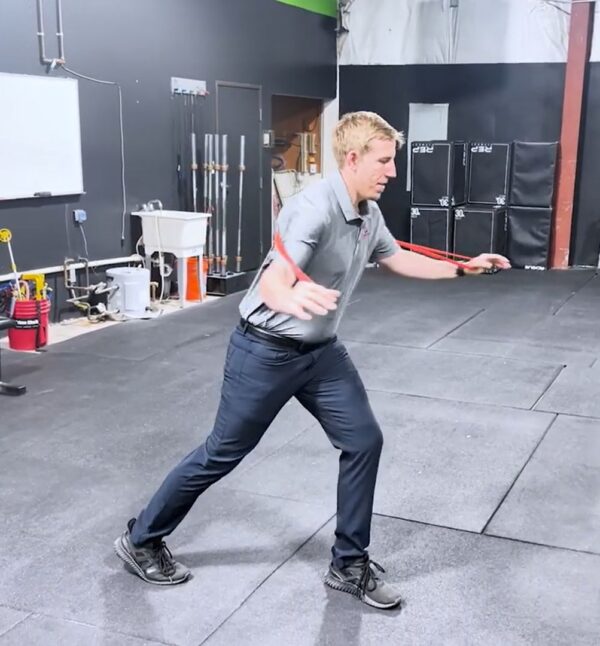
Purpose: Directly trains the serratus as it moves the shoulder blades forward and around the ribs.
Equipment Needed: Resistance band
How to Do It
- Loop a band around your upper back, just underneath your shoulder blades, and hook your thumbs through the ends.
- Step one foot forward for a stable stance.
- Reach your arms out and around in a wide, sweeping bear hug, spreading your shoulder blades wide at the end.
- Slowly return to the start, controlling the movement both in and out.
Sets: 2 sets of 8–10 reps
Tip: Choose control over speed. Your shoulder blades need to coordinate the motion all the way through.
Exercise 3: Banded Scap Angel
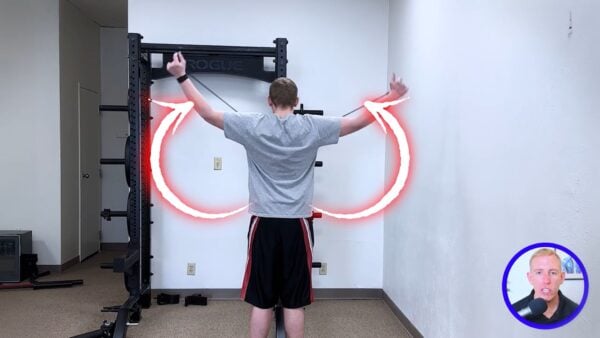
Purpose: Trains upward rotation and backward tilt of the shoulder blade through a bigger overhead arc.
Equipment Needed: Resistance band, anchored in front of you at shoulder height
How to Do It
- Grab the band with both hands, elbows straight and arms out in front of you.
- Pull the band straight back, bringing your arms past your torso.
- From there, move into an angel motion, sweeping your arms out to the sides and up until your biceps finish by your ears.
- Keep steady outward tension on the band the whole time.
Sets: 2 sets of 10 reps
Tip: This one is harder than it looks. Stay slow and controlled throughout.
Exercise 4: Single-Arm Serratus Press
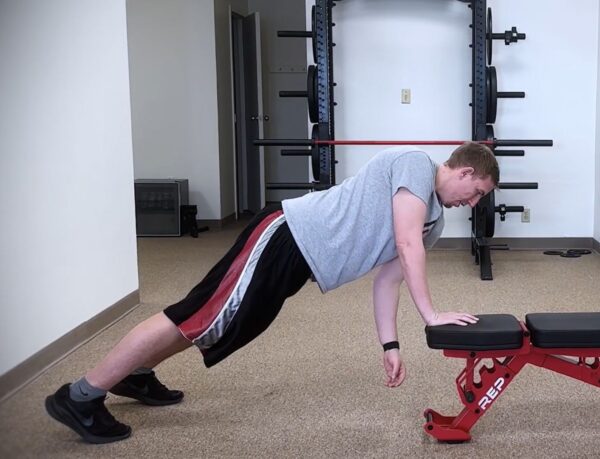
Purpose – To isolate one shoulder blade so the weaker side can’t hide behind the stronger side.
Equipment Needed: Bench or countertop
How to Do It
- Set up in a single-arm push-up plank with your hand on a bench or countertop.
- Keeping your elbow completely locked and straight, let your chest drop down slightly.
- Press the bench away to raise your body back up, driving your rib cage toward the ceiling.
- Really emphasize the pushing motion on the way up.
Sets: 3 sets of 8 reps
Tip: Fair warning: this one is spicy. If it’s too much, do the same movement with both arms. That’s a standard scapular push-up, and it works well depending on where you’re starting from.
Do this routine four to five days per week. If your winging shows up most during pushing workouts, do it before those sessions too.
Progress Won’t Happen At Once
Scapular winging won’t disappear overnight. It takes time, and if you have major, progressive weakness or a known nerve injury, get an individualized evaluation before going further. So, if you’ve tried endless exercises for shoulder pain and your shoulder blade still won’t behave, it’s time for a different approach. Our one-on-one online coaching and rehab help active you get your shoulder back for good.
About the Author: Dr. Joey Seyforth


