
Why Your Shoulder Still Pinches (And 3 Exercises That Finally Make Room)
You lift your arm overhead, and there it is again: that sharp pinch at the front of your shoulder. It shows up when you press something overhead, when you reach across your body, and even when you roll onto that side at night.
Somebody probably told you it was impingement. They handed you a band, showed you some external rotations, and told you to strengthen your cuff. So you did, for weeks. And the pinch is still there, in the same spot, at the same point in the movement. Shoulder impingement isn’t a strength problem. It’s a space problem, and you can get much stronger and still pinch in the same way. But you can do these 3 exercises to relieve the discomfort.
Quick Reference Guide
- Total Time: A few minutes (2 quick tests + 3 exercises)
- Targets: Shoulder Joint, Shoulder Blade, Rotator Cuff
- Goals: Create Space in the Front of the Shoulder, Improve Shoulder Blade Movement, Build Control Under Load
Before you start, take note of exactly where and when the pain shows up. You’ll retest at the end.
1. The Clearing Test
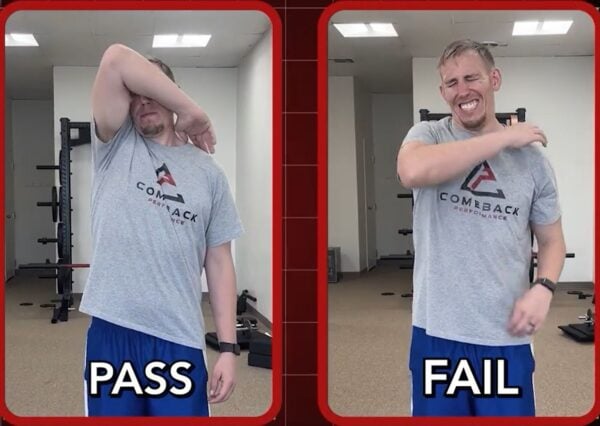
Bring your hand to your opposite shoulder and lift your elbow. Pain in the front of the shoulder is a positive sign.
2. The Hawkins-Kennedy Test:
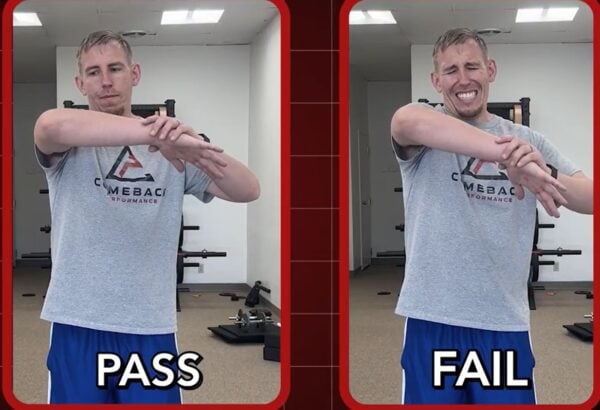
Bring your arm out in front with your elbow bent, then press down on your hand to turn your shoulder inward. Again, pain in the front of the shoulder is a positive sign.
These tests can bring on impingement-type pain, but they don’t identify every tissue involved or replace a full assessment. What they give you is a before and after.
3 Exercises to Make Room in Your Shoulder
Exercise 1: Banded Posterior Shoulder Mobilization
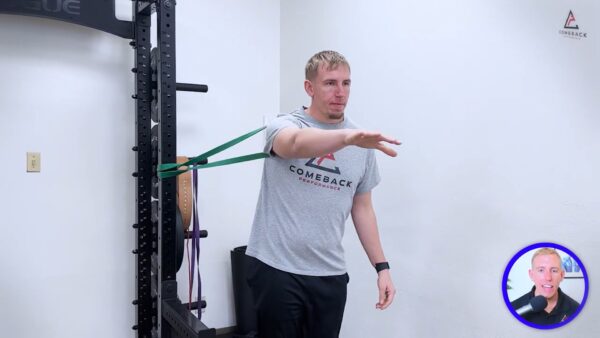
Purpose: To open up space in the front of the shoulder and take pressure off the impingement site.
Equipment Needed: Thick resistance band, sturdy anchor point
How to Do It
- Anchor a thick resistance band to something sturdy at about shoulder height.
- Slip the band high up into the front of your shoulder so it pulls your arm backward.
- Step forward to create tension. You should feel the band pulling your shoulder back into the socket.
- Gently move your arm in and out of a light chest press motion, letting the band pull the shoulder back.
Sets: 2 sets of 12-15 reps.
Tip: Let the band do the work. Keep the front of your shoulder relaxed and don’t try to muscle it.
Exercise 2: Banded Scap Angel
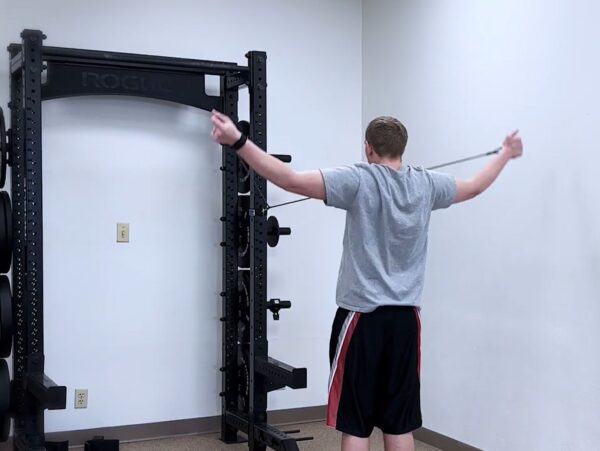
Purpose: To retrain your shoulder blade to move up and around instead of locking down and jamming the rotator cuff and bursa.
Equipment Needed: Resistance band
How to Do It
- Anchor a resistance band in front of you at about chest height and grab it with both hands, keeping your elbows completely straight.
- Pull your hands back and down toward your pockets.
- From that pocket position, slowly move your arms up and out to the sides in a wide arc, ending with your biceps near your ears.
- Focus on your shoulder blades tipping back and rotating upward as your arms rise.
Sets: 2 sets of 8-10 slow, controlled reps.
Tip: Don’t shrug your shoulders up toward your ears. Keep your neck relaxed the whole time.
Exercise 3 – Banded Bear Slider
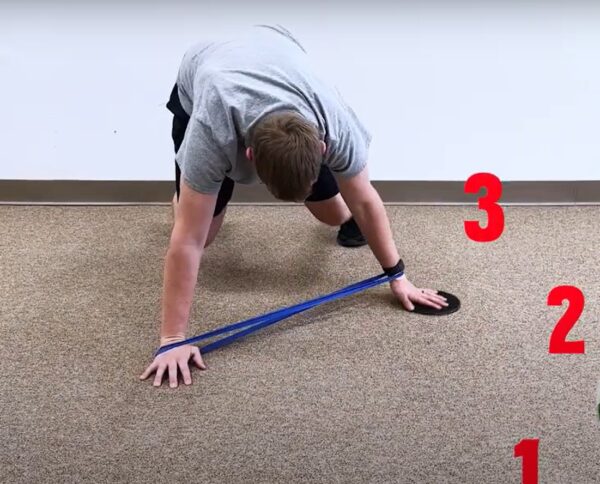
Purpose: To teach your shoulder blade and shoulder joint to work as a team while holding your body weight.
Equipment Needed: Light resistance band
How to Do It
- Place a light band around your wrist and get on all fours, hands under your shoulders and knees under your hips.
- Lift your knees off the ground into a bear position.
- Slide one hand in three directions: forward, out to the side, and back at a diagonal.
Sets: 2 sets of 5 reps. All three directions count as one rep.
Tip: Keep your torso as still as possible. No big hip swings.
Now run both tests again. Does the clearing test feel better? During the Hawkins-Kennedy test, is the pinch smaller, or does it show up later in the motion?
Any drop in pain or improvement in range is a sign you’re on the right track. It’s a clue that your mechanics are contributing to the pinching pain in front of your shoulder, but it isn’t proof that every tissue has healed.
Use the Pain Traffic Light
Do these exercises before upper body or overhead training, or several times a week based on how your shoulder responds. Use this simple guide
- Green: Muscle work or mild discomfort. Keep going.
- Yellow: A slight increase in pain that settles within 24 hours.
- Red: Sharp, catching, or lingering pain. Reduce the range or lighten the load.
Stop Guessing and Fix the Root Cause
If you’re stuck in the cycle of pinching, more stretching, and the same pinch the next time you press, it’s not because you’re broken. You just haven’t had a clear system for fixing the root cause.
That root cause usually sits in one or more of five areas: your neck, upper back, shoulder blade, shoulder joint, and nerves. After working with thousands of shoulders, we know every one has its own presentation and needs a specific plan for long-term results. If the pinching pain in front of your shoulder keeps coming back, it’s time for a plan built around you.
About the Author: Dr. Joey Seyforth


