
3 Exercises for Shoulder Impingement Pain That Keeps Coming Back
In this article, you’ll learn two quick self-tests, why your shoulder blade matters more than your posture, and three exercises for shoulder impingement pain that start changing the mechanics behind the pinch.
That pinch in your shoulder is often shoulder impingement, and it isn’t only about the shoulder joint. The real driver is usually the shoulder blade sitting behind it. When the shoulder blade doesn’t move the way it should, the ball of the shoulder gets squeezed every time you lift.
Your shoulder blade has to rotate upward as your arm goes up. If it doesn’t rotate enough, the ball of your shoulder gets compressed between the shoulder and the shoulder blade. That’s where the impingement happens, and it can pinch different tissues, including the bursa.
Before starting, check where you stand. These two quick tests can bring out common shoulder impingement symptoms.
Test 1: Cross-Body Lift.
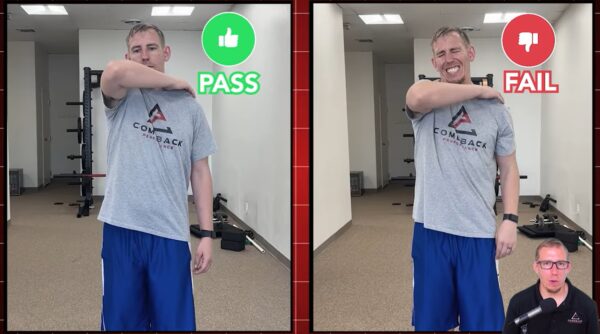
Place the hand of your painful side on your opposite shoulder, then lift your elbow upward. Notice whether it brings on your familiar pinch at the front or top of the shoulder, and how high the elbow gets before it starts.
Test 2: Hawkins-Kennedy.
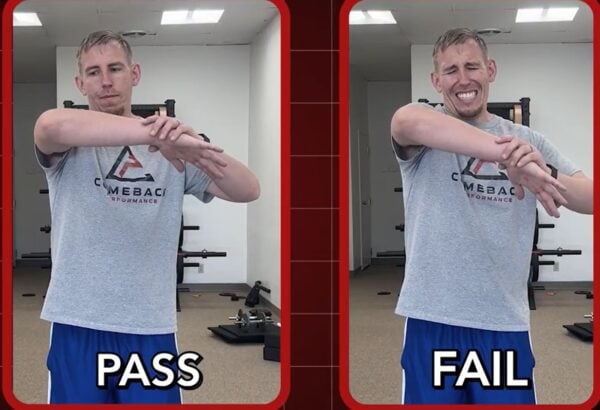
Hold your arm out in front with your elbow bent, then press your hand down so the shoulder rotates inward.
If either test brings back the same pinch you feel when reaching or pressing, remember how it feels. You’ll retest after the exercises.
Quick Reference Guide
- How Often: 3-4 times a week, and before any pressing or overhead days at the gym
- Targets: Shoulder Blade, Shoulder Joint, Core
- Goals: Improve Shoulder Blade Rotation, Restore Rotation Mobility, Build Shoulder Stability
The 3 Exercises to Change the Mechanics Behind the Pinch
Exercise 1: Banded Scap Angel
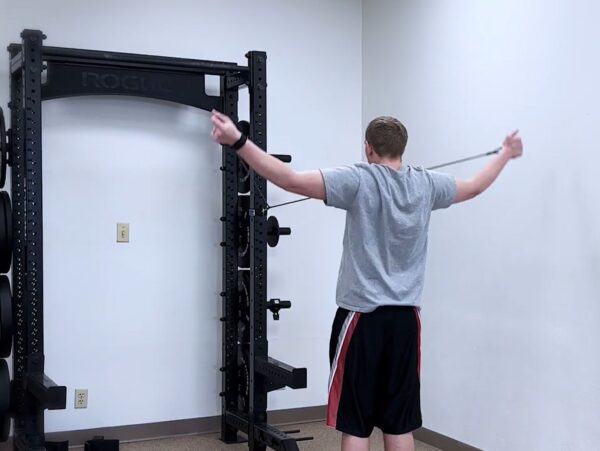
Purpose: This trains the upward rotation and backward tilt your shoulder blade needs to get your arm overhead without the pinch.
Equipment Needed: Resistance Band
How to Do It
- Anchor a resistance band in front of you at shoulder height. Grab it with both hands, elbows straight out in front of you.
- Pull the band straight back, keeping your elbows straight, until your hands are just past your hips.
- From there, move into an “angel” motion. Sweep your arms out to the sides and up until your biceps finish next to your ears.
- Keep steady outward tension on the band the whole time.
Sets: 2 sets of 10 reps.
Tip: Try to rotate smoothly because, when your shoulder blade rotates well, the pinch has nowhere left to go.
Exercise 2: Wall Axial Rotation
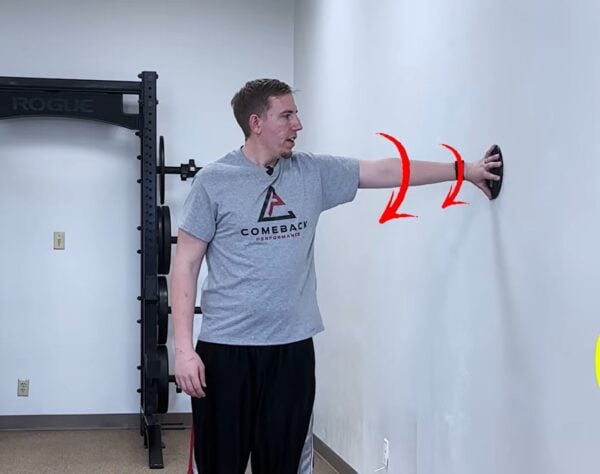
Purpose: This trains shoulder rotation and shoulder blade tilting together.
Equipment Needed: A wall, plus a slider or small towel (optional)
How to Do It
- Stand with your arm out to the side and your hand flat on the wall, elbow fully straight. A slider or small towel under your hand can make it easier.
- Gently lean your body weight into the wall so your arm is actively supporting you.
- Rotate your forearm like a windshield wiper, down toward internal rotation and up toward external rotation.
- Keep the movement small, slow, and controlled.
Sets: 2-3 sets of 15 rotations.
Tip: Only work through the range of motion you can comfortably control.
Exercise 3: Banded Bear Slider
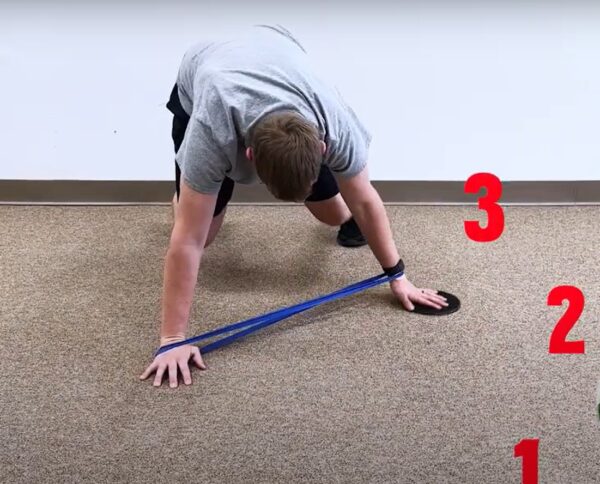
Purpose: This builds closed-chain shoulder and core stability together, which is crucial for getting rid of impingement.
Equipment Needed: Light Loop Band
How to Do It
- Place a light loop band around your wrists and get on all fours, hands directly under your shoulders and knees under your hips.
- Lift your knees off the ground into a bear crawl hover.
- Slide one hand in small, controlled steps: a few inches forward, out to the side, and back.
- Keep your torso as still as possible throughout.
Sets: 2-3 sets of 5 slow reps per side in all three directions.
Tip: The movement should come from your hand and shoulder, not your body. If your torso is rocking, slow down and shorten the slide.
Now go back to your two tests. Any change you notice came from the exercises, and that’s good news. It tells you your impingement can be changed by changing the mechanics.
Why Rest Isn’t the Answer
Rest doesn’t fix a movement problem. It just takes away the activities that expose it. You come back, nothing has changed, and the pinch is waiting for you once you load the shoulder again with bench press and dips. That said, these exercises are a strong starting point, but they likely won’t solve your impingement long term. Every shoulder has its own presentation and triggers, and responds differently to exercise and rehab. Looking at all five areas at, above, and below the shoulder is how you find the real reason behind the impingement in the first place.
If you’re tired of guessing and want a plan that actually matches your shoulder, it’s time to try our personalized movement-based rehab.
About the Author: Dr. Joey Seyforth


