Why Your Shoulder Impingement Keeps Coming Back (And How to Stop It for Good)
Struggling with shoulder impingement that always seems to come back—especially after bench pressing, overhead work, or reaching up into a cabinet? You rest, ice, feel better, return to normal… and bam, the pinch returns, sometimes worse. The problem isn’t that your shoulder is “bad.” It’s that your shoulder is compensating for other areas that aren’t doing their job. This article guides you through simple, systematic exercises to stop recurring shoulder impingement and break the cycle for good by addressing the five key areas your shoulder relies on.
The Real Reason Impingement Comes Back
It’s not just a shoulder problem; it’s a system problem. Your shoulder rests on a foundation that includes the neck, thoracic spine (upper back), shoulder blade mechanics, the ball-and-socket shoulder joint, and nerve mobility from higher up. When any of these underperform, the shoulder compensates.
Compensation → compression → irritation → impingement.
If your neck and upper back can’t rotate and extend well, your shoulder must search for that motion. If your shoulder blade doesn’t upwardly rotate 60°, the front of the shoulder gets pinched. If the ball-and-socket joint cannot roll, glide, and rotate freely, overhead positions can compress the rotator cuff or bursa. If nerves are irritated upstream, you’ll feel chronic “tightness” that stretching doesn’t fix.
Improve the “Big Five” areas, then retrain the exact positions that usually trigger your pain. That’s how you break the pain–rest–reinjury cycle.
Quick Self-Test (Do Before and After the Routine)
- Bring your hand to your opposite shoulder.
- Lift your elbow toward the ceiling.
- If you feel a sharp pinch in the front of the shoulder, that’s a positive impingement sign. Remember what it feels like, then retest after completing the exercises.
Benefits You’ll Notice
With just 12 minutes a day, you can
- Reduce that front-of-shoulder pinch during reaching and pressing.
- Improve the overhead range of motion and comfort.
- Wake up with less tightness that “keeps coming back.”
- Restore shoulder blade control for better mechanics.
- Build posterior shoulder and rotator cuff strength where it matters.
- Press and reach with more confidence without the flare-ups.
Quick Reference Box
Total Time: 12 minutes
Targets: Neck and thoracic spine mobility, scapular upward rotation, shoulder joint mechanics (posterior glide), rotator cuff and posterior shoulder strength, nerve tension/referral
Goals: Pain reduction, mobility restoration, bulletproof mechanics for pressing/overhead work.
Exercise Breakdown
Exercise 1: Banded Posterior Mobs (Decompress the Front of the Shoulder)

Purpose: Creates posterior glide to relieve anterior shoulder compression during pressing/overhead moves.
Equipment Needed: Light-to-moderate resistance band; sturdy anchor at shoulder height.
How to Do It
- Loop the band around the front of your shoulder (band crosses your chest) and anchor it behind you at shoulder height.
- Step forward to create light tension, allowing the band to pull your shoulder backward gently.
- Move your arm in and out of a slow, partial “chest press” path while letting the band guide the joint backward.
Sets: 2 sets of 12 slow reps.
Tip: You should feel a gentle “space-making” sensation in the front of the shoulder—no pinching. Keep ribs down; don’t arch your lower back.
Exercise 2: Wall Slides (Train Scapular Upward Rotation + T-Spine Extension)

Purpose: Teaches the shoulder blade to rotate up and around (60°) while your upper back extends.
Equipment Needed: Wall
How to Do It
- Stand facing a wall in a staggered stance; forearms and hands on the wall at shoulder height.
- Slide your arms upward while lightly leaning your chest toward the wall.
- Maintain smooth contact as you reach; return slowly to the starting position.
Sets: 2 sets of 10 reps
Tip: Think “shoulder blades up and around, not down and back.” If you feel pinching, shorten the range and focus on smooth scapular motion.
Exercise 3: Banded Open Book (Restore Thoracic Rotation + Control)
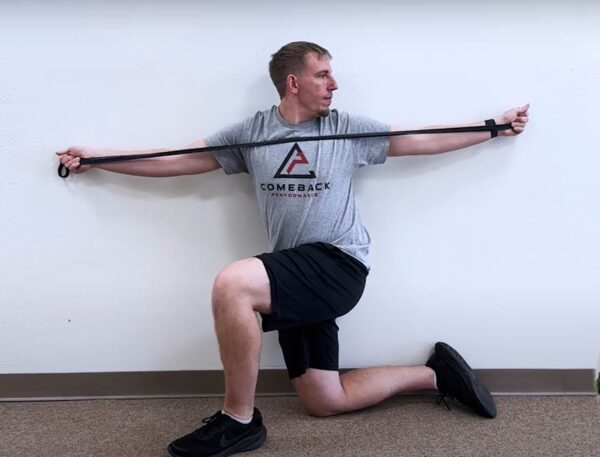
Purpose: Improves upper-back rotation and motor control that offloads the shoulder.
Equipment Needed: Light band; anchor at chest height
How to Do It
- Stand side-on to the anchor, with your hands together and holding the band at chest height.
- Rotate your upper body away from the anchor, opening the arms as your eyes follow your hands.
- Control the return, slowly unwind to the start.
Sets: 2 sets of 10 reps per side
Tip: Keep hips square; let the movement come from your ribcage/upper back. Note if one side is stiffer—that side likely needs extra attention.
Exercise 4: Banded Upper Cut (Posterior Shoulder + Rotator Cuff Strength)

Purpose: Strengthens the back of the shoulder and cuff in a cuff-friendly, externally rotated path.
Equipment Needed: Light band
How to Do It
- Stand tall, with your elbows tucked to your sides and palms up, holding the band with light tension in your hands.
- Pull hands slightly apart (external rotation), keeping elbows close.
- Lift your forearms and elbows on a slight diagonal until elbows approach eye level; lower slowly.
Sets: 2 sets of 8 slow reps
Tip: Move slowly and in control, and avoid shrugging. Keep your neck relaxed; you should feel the back of your shoulders working, not your traps.
Exercise 5: Banded Bench Pattern (Bulletproof Horizontal Pressing)
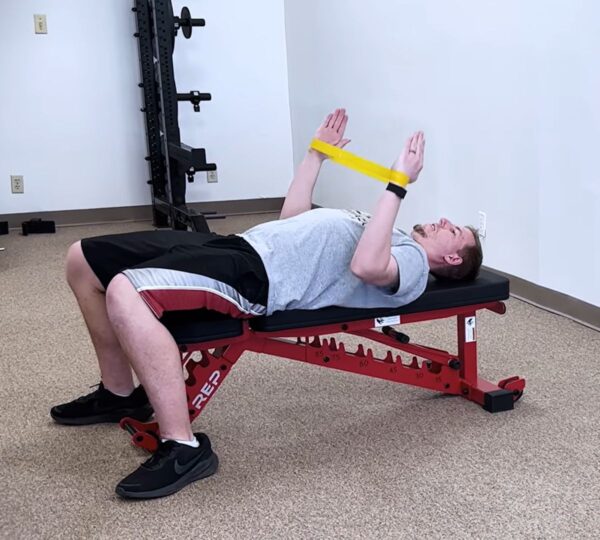
Purpose: Reintroduces pressing mechanics while reinforcing external rotation and scapular control.
Equipment Needed: Light band around wrists; optional cables or light dumbbells
How to Do It
- Loop a band around your wrists; create gentle outward tension (external rotation).
- In a standing “bench press” stance (or lying on a bench), press forward slowly, keeping slight tension on the band.
- Control the return; keep your shoulders from rolling forward.
Sets: 2 sets of 8 slow reps
Tip: “Elbows forward, shoulders back and wide.” Maintain band tension throughout to cue rotator cuff engagement.
Retest: Clearing Test
Bring your hand to your opposite shoulder and lift the elbow. You should feel less pinch, more range, and better support. That’s the Big Five working together.
The Big Five Drivers of Recurring Shoulder Impingement
- Neck and Thoracic Spine: If you can’t rotate/extend comfortably here, your shoulder is forced to compensate.
- Shoulder Blade (Scapula): It must rotate upward by approximately 60° to clear the front of the joint during elevation.
- Shoulder Joint Mechanics: A healthy ball-and-socket joint drops, rolls, glides, and rotates through a whole arc. Limited glide = compression.
- Rotator Cuff/Posterior Shoulder: Weakness in this area leads to poor control, particularly in pressing and overhead positions.
- Nerve Tension/Referral: Irritation from the neck/upper back can recreate tightness overnight—even after stretching.
Keep It Going!
You can expect easier overhead reach and reduced irritation at the front of your shoulder after these exercises. As you do the exercise, progress the loads and ranges (especially in the pressing pattern) while maintaining good scapular and thoracic mechanics to bulletproof your shoulder for real-world activity. Although these exercises are great they are NOT the long term solution to get rid of shoulder pain. A proper movement assessment with a shoulder specialist can look at the big 5 areas and see the root cause and how to fix things for good.


")