
4 Rotator Cuff Pain Exercises That Work When Banded Rotations Don’t
You know the pain that sits on the outside top of your shoulder, aches down into your arm, and gets worse at night. Someone told you it’s your rotator cuff. Maybe an MRI even showed a tear. So you did everything you were told: banded external rotations, rest, ice, maybe a cortisone shot. You changed your gym routine or stopped going altogether and it still flares up.
Here’s something that might surprise you. Your rotator cuff probably isn’t the real problem. In this article, you’ll learn what the four rotator cuff muscles actually do, why a tear isn’t always the source of your shoulder pain, and four rotator cuff pain exercises that train the cuff along with the parts of your body that support it.
Quick Reference Guide
- Total Time: About 15 minutes.
- Targets: Rotator Cuff, Shoulder Blade, and Trunk.
- Goals: Reduce Shoulder Pain, Build Cuff Endurance, Improve Shoulder Stability Under Load
The 4 Rotator Cuff Pain Exercises
Exercise 1: Banded W Hold

Purpose: To build endurance in the back of the rotator cuff so it can keep your shoulder centered instead of tiring out quickly.
Equipment Needed: Light resistance band.
How to Do It
- Hold a light band with your palms facing up and your elbows by your sides.
- Pull the band apart into a “W” shape, keeping your elbows tucked.
- Hold the position and feel the back of your shoulders working.
- Keep your shoulders down and away from your ears.
Sets: 5 reps of 10–15-second holds
Tip: Don’t shrug. If this is done right, your shoulders should be burning by the end.
Exercise 2: Waiter Carry
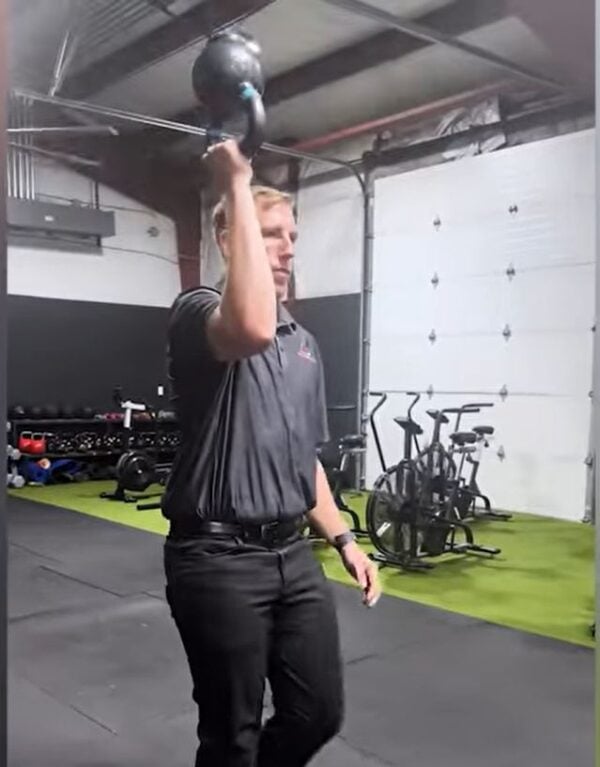
Purpose: To challenge shoulder stability in a real, loaded position, so the rotator cuff has to work together with the muscles around it to control the ball in the socket.
Equipment Needed: Kettlebell
How to Do It:
- Flip a kettlebell upside down and hold it up in a stable “waiter” position, with your shoulder stacked and your trunk tall.
- Keep your wrist controlled and your ribs down.
- Walk forward slowly while holding the weight steady.
- Don’t lean away from the weight.
Sets: 3 sets of 30–50-foot walks
Tip: If holding the kettlebell upside down is too much, hold it the normal way and walk.
Exercise 3: Banded Scaption
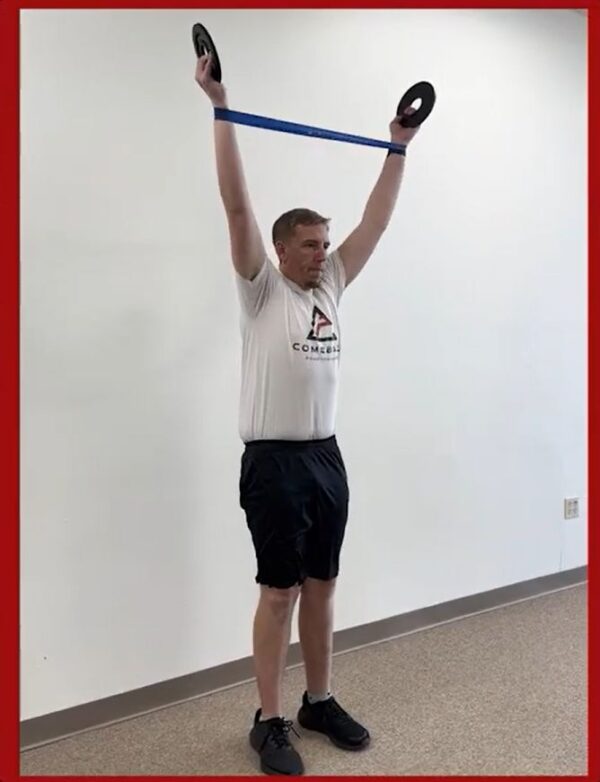
Purpose: To train the rotator cuff and shoulder blade to work together as you raise your arm.
Equipment Needed: Light resistance band, light weights
How to Do It:
- Put a band around your wrists and hold a light weight in each hand.
- Keep tension on the band by pressing your wrists outward.
- Lift your arms at a 45° angle to a comfortable height, moving slowly.
- Lower back down with the same control you used on the way up.
Sets: 2 sets of 12 controlled reps
Tip: Keep your shoulder from hiking up toward your ear. The lowering phase matters just as much as the lift.
Exercise 4: Shoulder Taps
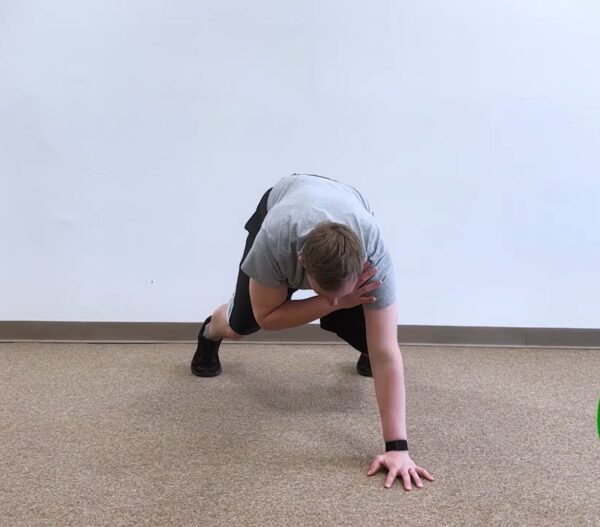
Purpose: To bring the rotator cuff, shoulder blade and trunk together in a weight-bearing position, where your shoulder has to support your body while one hand leaves the ground.
Equipment Needed: None (a bench or countertop is optional)
How to Do It:
- Get into a push-up position with your feet a little wider than usual for balance.
- Shift your weight slightly and tap your opposite shoulder with one hand.
- Switch sides.
- Keep your hips and ribs as still as possible.
Sets: 3 sets of 8–12 reps per side
Tip: If doing this on the floor is too hard, put your hands up on a bench or countertop.
Track Your Shoulder With the Pain Traffic Light
This is the step most people skip. Pay attention to how your shoulder responds to these exercises, your workouts, your daily activities and your sleep. Once you start seeing patterns, you’ll find what’s flaring it up and which areas really need attention. Here’s the pain traffic light we use with our clients:
- Green (0/10): No pain. Train freely.
- Yellow (1–3/10): Keep going, but stay in ranges that don’t spike the pain.
- Red (anything sharper than 3/10): Back off and modify.
As long as you’re training in the green and yellow zones, you’re safe to keep lifting.
Building a Shoulder That Lasts
Your rotator cuff is only as strong as the team around it. When the 17 muscles on your shoulder blade, your mid-back and your neck all do their part, the rotator cuff stops getting overloaded, and the pain settles down. Done regularly, these rotator cuff pain exercises help build the foundation your cuff needs to work properly.
With a rotator cuff tear, the worst thing you can do is nothing. The second worst is guessing which exercises and progressions to do. For most people, the problem isn’t effort. It’s not knowing where to start, or how to modify and progress the right way.
A Big Five assessment looks at the areas above and below your shoulder to get the full picture of how your body moves. That’s the exact process we use with our clients to get their shoulders back for good. If you’re ready to stop guessing and start a plan that fits your shoulder, we’re here to help.
About the Author: Dr. Joey Seyforth


