
5 Exercises to Rebuild a Bulletproof Shoulder After a Rotator Cuff Tear
Is a nagging rotator cuff tear sabotaging your life? Messing with your sleep, killing your progress in the gym, and turning simple acts like reaching overhead into a painful ordeal? You’ve probably been told the standard advice: rest, avoid lifting, and do a few basic banded rotations. Maybe you’ve even been pushed towards injections or told to start thinking about surgery.
If all that is you, then you should read this article to the end as it will show you how to move beyond temporary relief and start building true, durable shoulder stability in just a few minutes a day.
Quick Reference Guide
- Total Time: 15-20 Minutes
- Targets: Rotator Cuff (Infraspinatus, Teres Minor, Subscapularis), Scapular Stabilizers, Core
- Goals: Reduce Shoulder Pain, Rebuild Joint Stability & Control, Increase Load Tolerance.
The 5 Exercises for Real Shoulder Durability
Exercise 1: Banded Bench External Rotation Liftoff
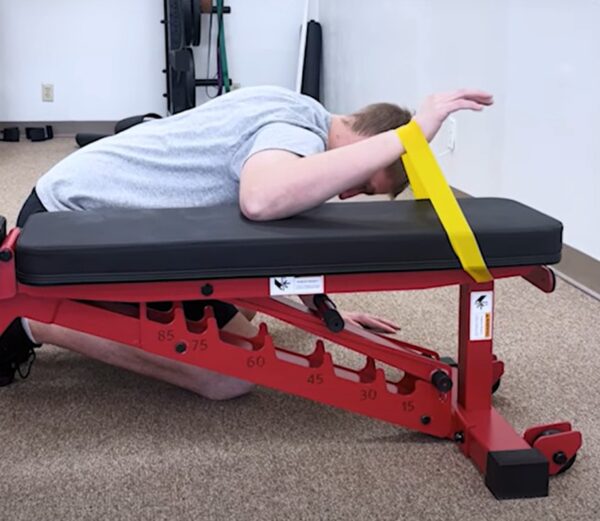
Purpose: This drill isolates and strengthens the external rotators of the cuff while teaching the joint to remain stable in an elevated position.
Equipment Needed: Bench, Light Resistance Band
How to Do It
- Kneel beside a bench and place your forearm flat on it, with your elbow bent to 90 degrees.
- Loop a light resistance band around your wrist and the bench to create gentle tension.
- Keeping your elbow on the bench, lift your hand straight up, rotating at the shoulder. Keep your neck relaxed and shoulder down.
- Pause for 1-2 seconds at the top, then slowly lower your hand back to the bench.
Sets: 2-3 sets of 8 controlled reps per side.
Tip: If you feel pinching in the front or can’t lift your hand without shrugging your shoulder, use a lighter band or perform the motion without a band first.
Exercise 2: Banded Subscapularis Punch
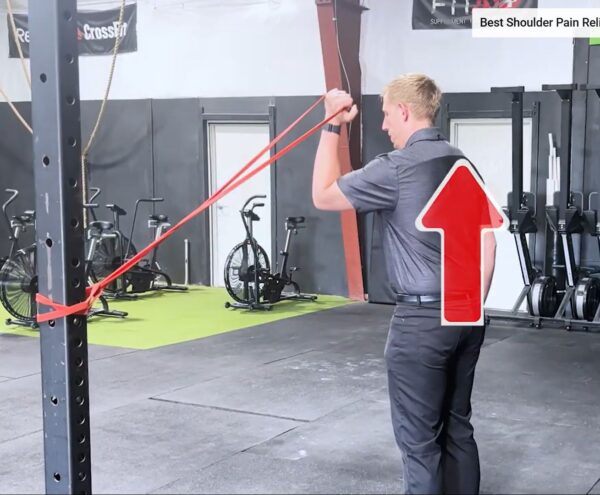
Purpose: To activate and strengthen the subscapularis—a key rotator cuff muscle on the front of the shoulder blade that prevents the joint from sliding forward.
Equipment Needed: Light Resistance Band
How to Do It
- Anchor a resistance band at your side at about waist height.
- Stand with your elbow tucked into your ribs, holding the band.
- Perform a slow, controlled punch straight up until your bicep is near your ear.
- Lower your arm back to the starting position with equal control.
Sets: 2-3 sets of 10-12 reps per side.
Tip: This is about control, not speed. If you feel a pinch at the top, shorten the range of motion and only punch as high as you can without pain.
Exercise 3: High Plank Walk-Up
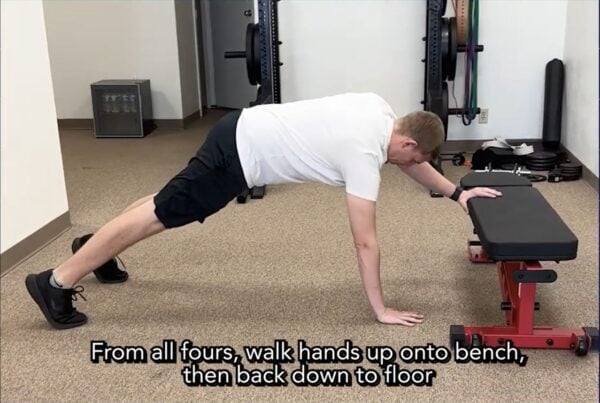
Purpose: This “closed-chain” exercise builds stability by forcing the rotator cuff and core to work together to control your bodyweight as it shifts.
Equipment Needed: Bench or other stable, elevated surface.
How to Do It
- Start in a high plank position on the floor with your hands under your shoulders and a bench in front of you.
- Keeping your core tight and body in a straight line, walk one hand up onto the bench, followed by the other.
- Walk one hand at a time back down to the floor.
- Alternate which hand leads with each repetition.
Sets: 2-3 sets of 6-8 total walk-ups.
Tip: If your hips are twisting or your shoulders are collapsing, slow down, widen your feet for more stability, or use a lower object.
Exercise 4: Banded Kettlebell Upside-Down Press
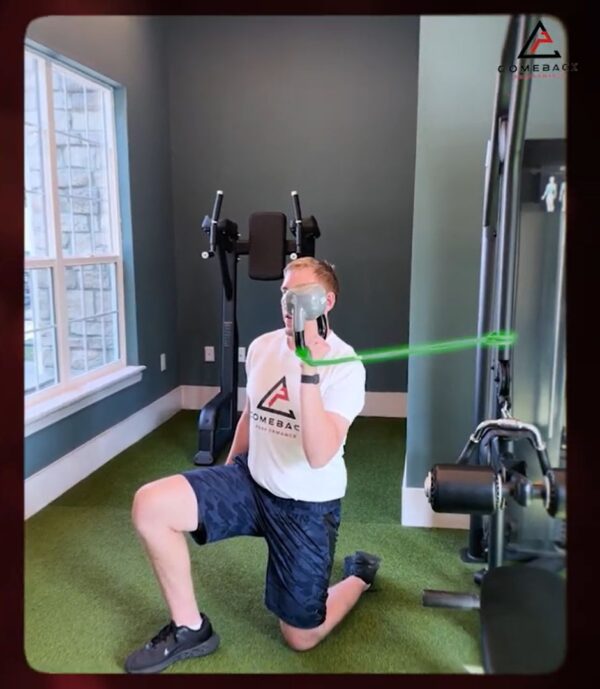
Purpose: This advanced drill adds instability to the overhead press, forcing the deep stabilizers in your shoulder to make constant micro-adjustments.
Equipment Needed: Light Kettlebell, Light-to-Medium Resistance Band
How to Do It
- Loop a resistance band around the handle of a light kettlebell and anchor the other end securely under your foot or to a low anchor point.
- Carefully flip the kettlebell upside down and hold it in a front rack position (fist by your shoulder, elbow underneath).
- Press the kettlebell slowly overhead, keeping a firm grip and balancing the bell directly over your forearm while resisting the band’s pull.
- Lower with even more control than you used to press.
Sets: 2-3 sets of 8 controlled reps per side.
Tip: This is a high-level drill. Master the movement with just a light kettlebell first before adding the band. If it feels too unstable, start by just holding the upside-down position without pressing.
Exercise 5: Banded Bear Slider
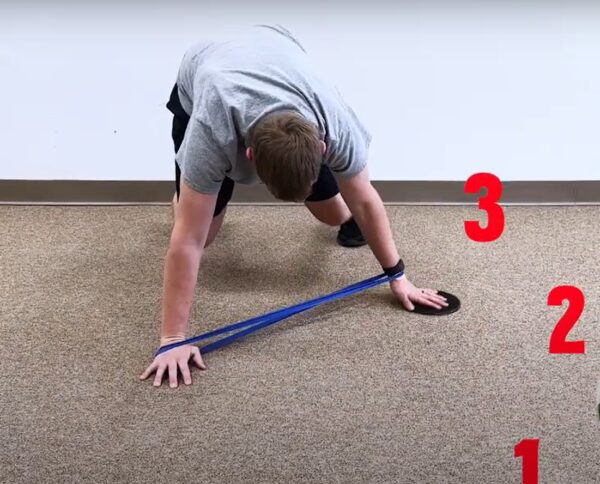
Purpose: To integrate the rotator cuff and shoulder blade, teaching them to work together to create a stable, mobile platform for your arm.
Equipment Needed: Light Resistance Band, Sliders or a towel on a smooth floor.
How to Do It
- Get into a “bear” position: hands under shoulders, knees under hips, and knees hovering an inch off the ground. Place a light band around your wrists.
- Place one hand on a slider or towel.
- Slowly slide that hand forward, then out to the side, then slightly back, returning to the start after each direction.
- Focus on letting your shoulder blade move around your rib cage. Keep pressure through the grounded hand to stay stable.
Sets: 2-3 sets of 3-5 slides in each direction, per side.
Tip: If hovering your knees is too difficult, keep them on the ground. Master the motion without the band before adding resistance.
Building A Stronger Shoulder
A rotator cuff tear doesn’t have to be a life sentence of pain or lead directly to surgery. But getting better requires you to train smarter. On your upper body training days, use the first two exercises as a warm-up and activation drill.
However, it’s important to remember that these exercises are a powerful starting point, not the entire story. If your shoulder pain continues to flare up, there’s a reason. If you’re ready to stop the cycle of pain and build a truly resilient shoulder.
About the Author: Dr. Joey Seyforth


